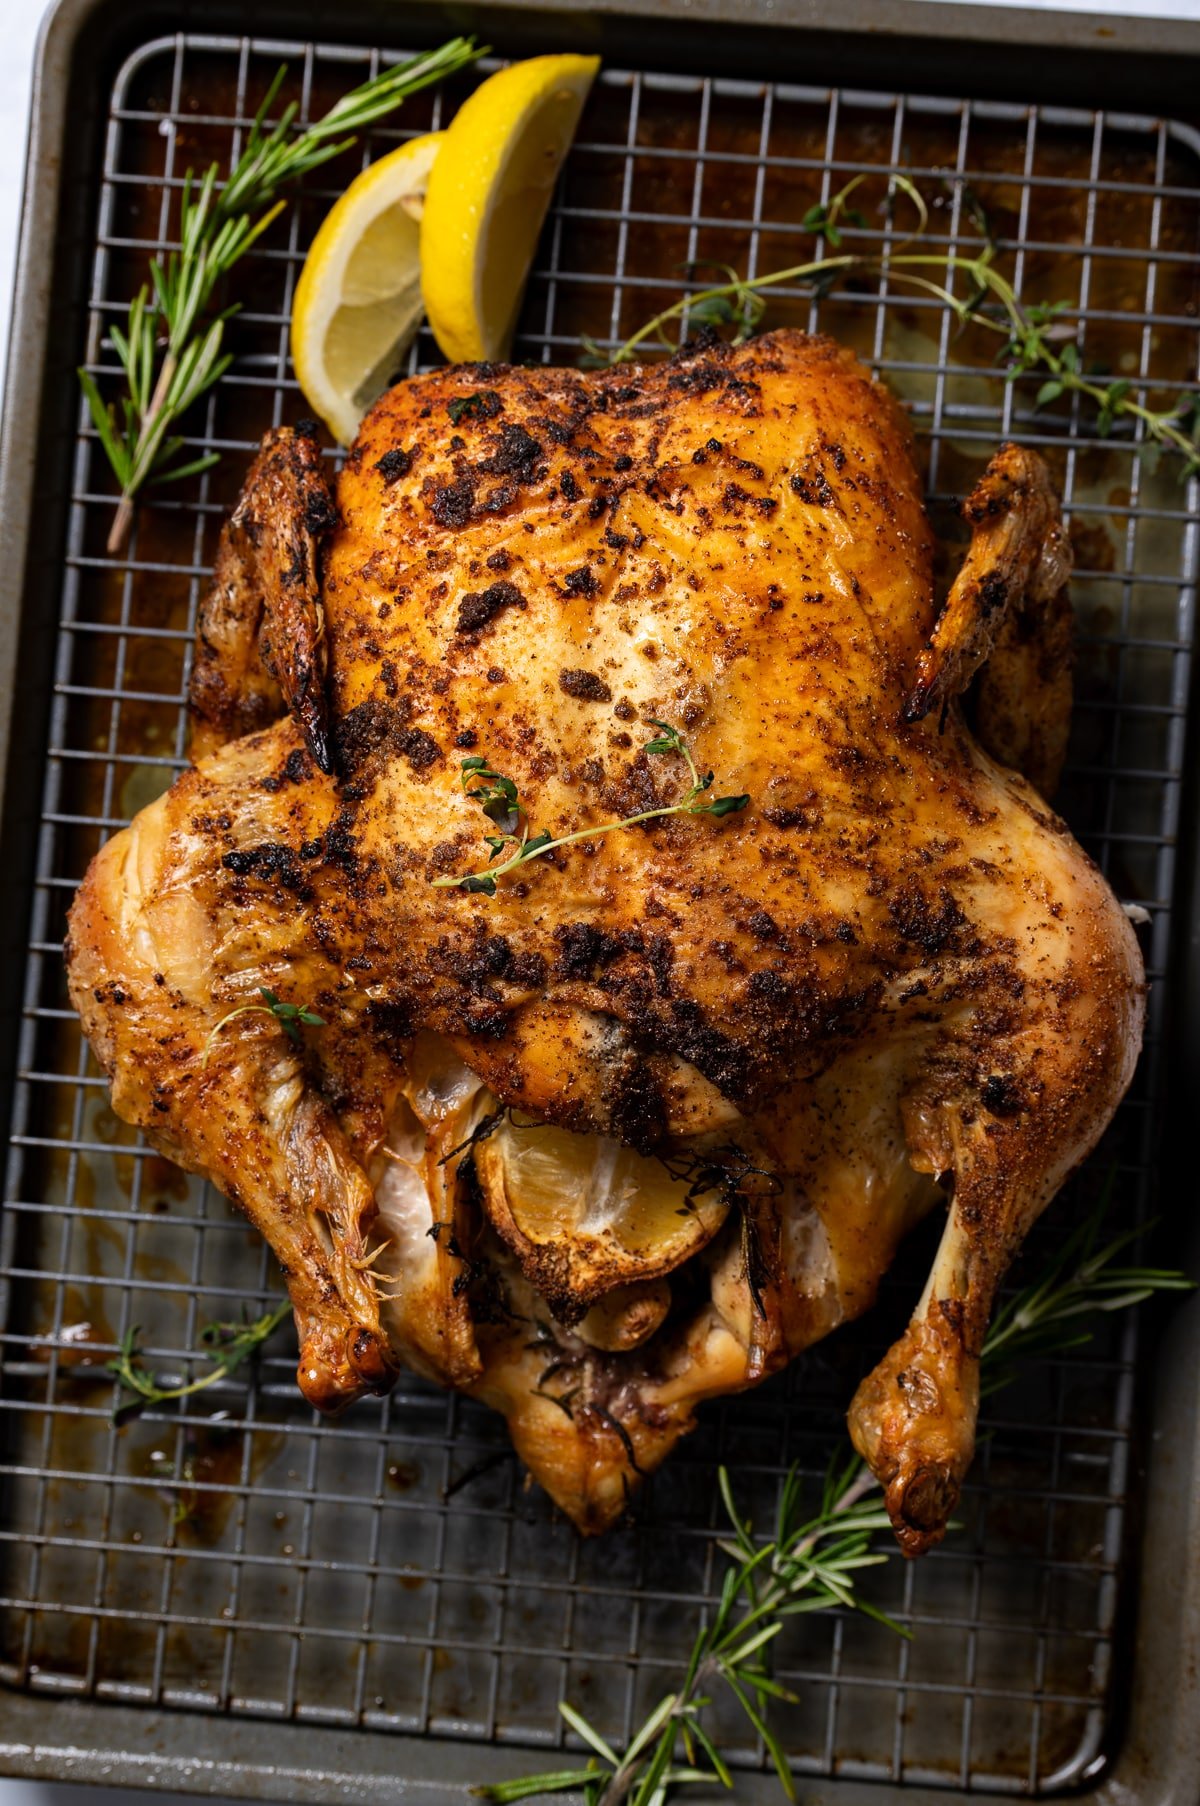
Nothing beats the aroma of a perfectly cooked roast chicken filling your kitchen with golden, crackling, crispy skin and incredibly juicy meat. My foolproof roast chicken method delivers restaurant-quality results every single time.
You’ll find the full recipe with ingredient amounts and instructions in the recipe card at the bottom of this post. Be sure to check out the blog post itself for extra tips and tricks!

Growing up, my parents made roast chicken every week, and I carried that tradition into my own kitchen. After roasting countless chickens, I set out to find a better way to get ultra‑crispy skin, deep golden color, and juicy meat.
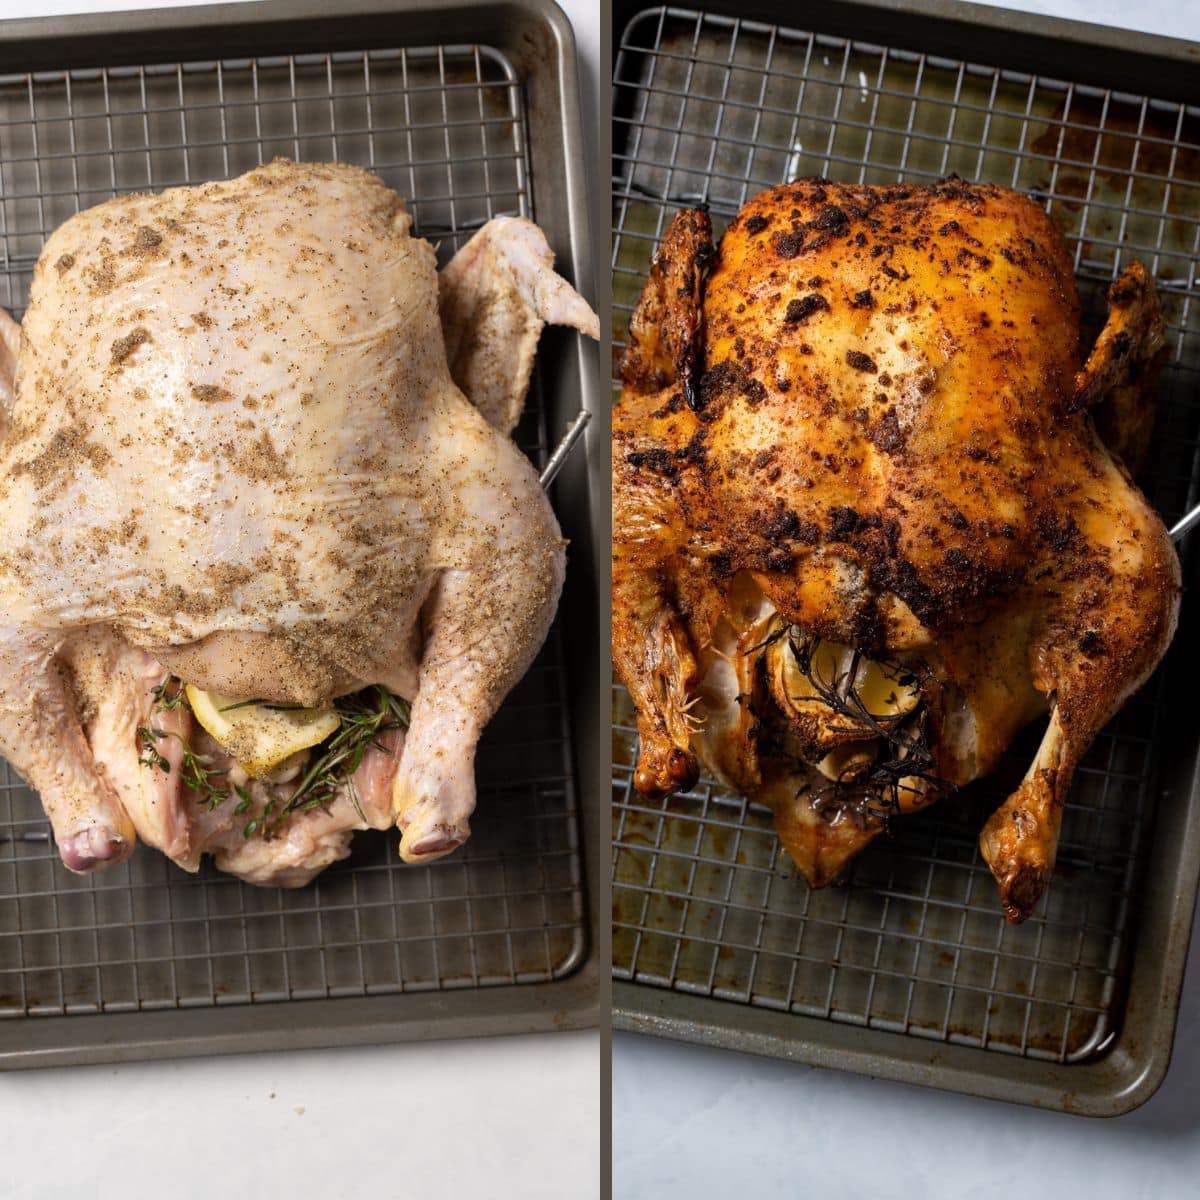
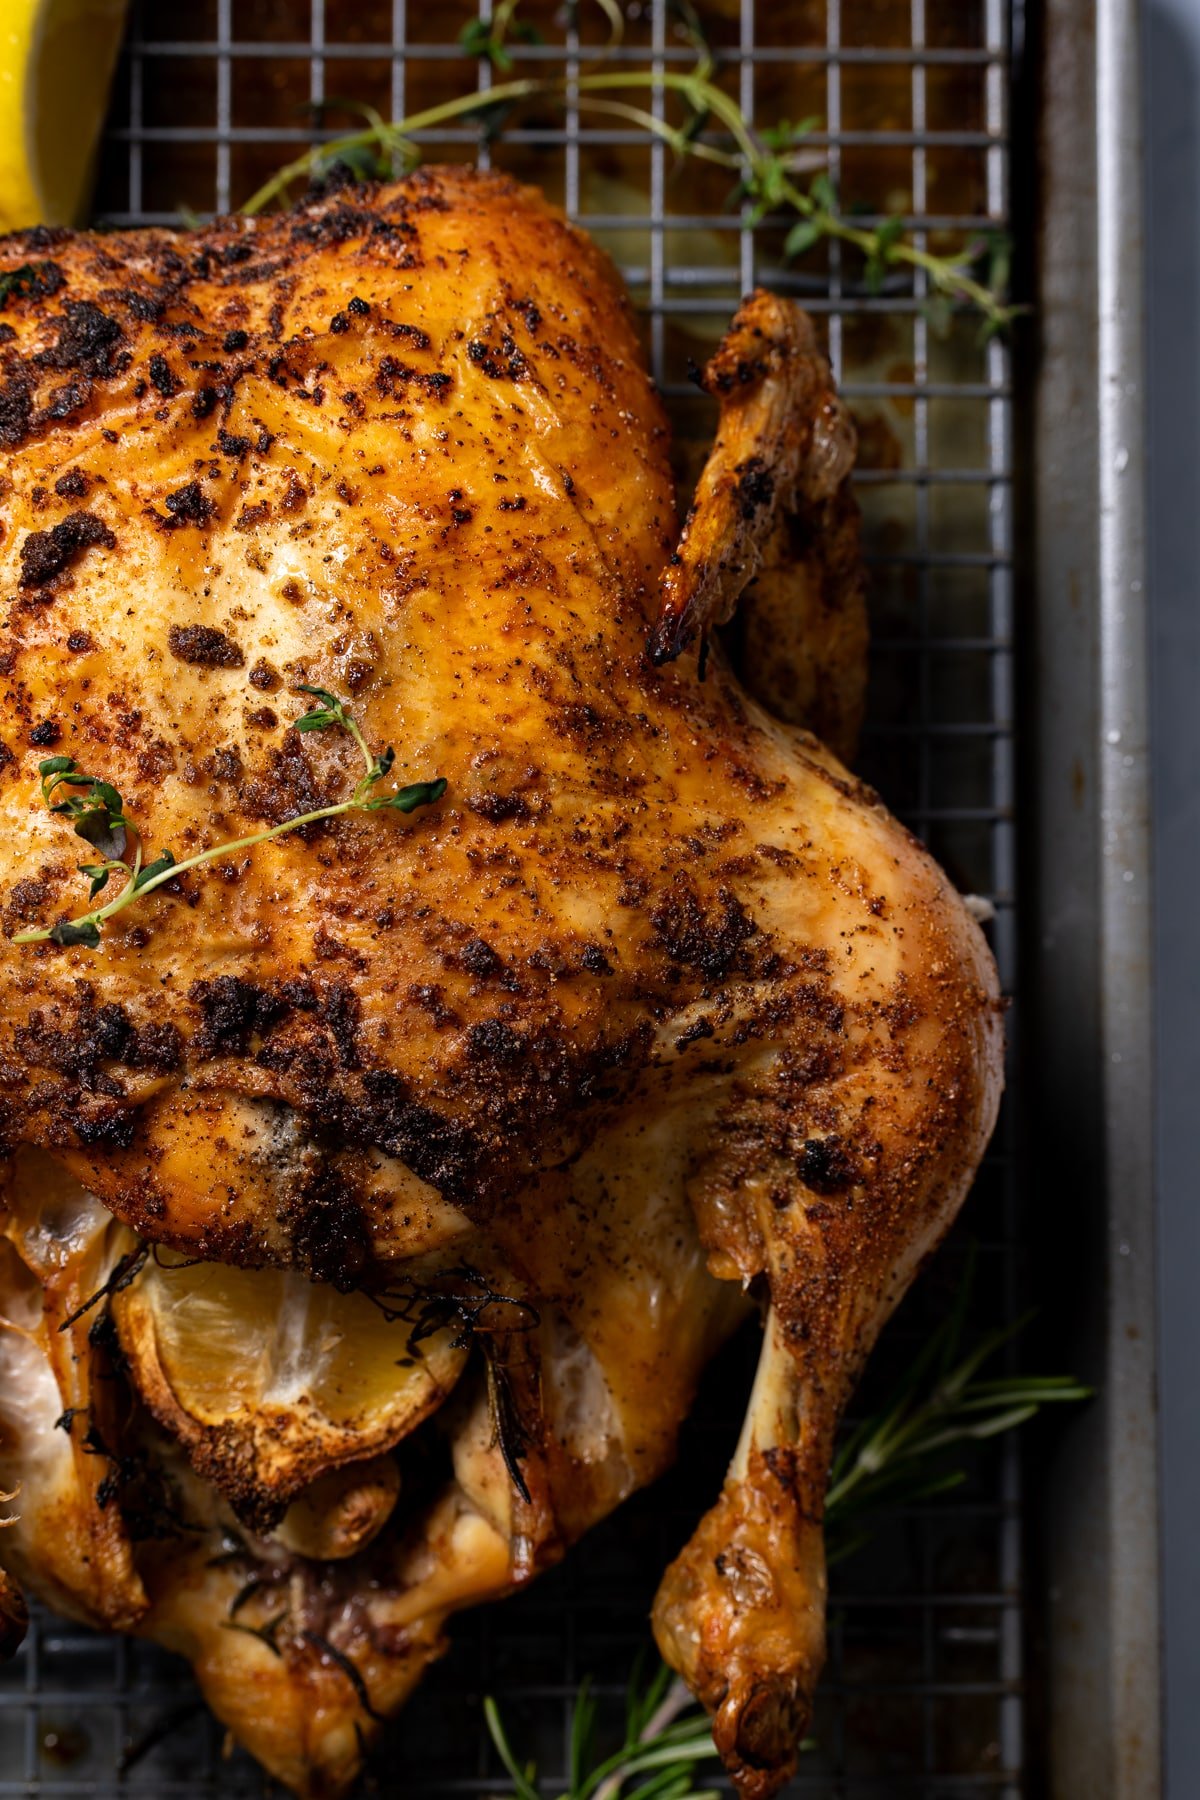
After lots of trial and error (and plenty of cookbook research), I landed on this method: start the chicken at a higher temperature, then lower the heat to finish cooking. The high heat quickly renders the fat under the skin for incredible crispiness, while the lower temperature keeps the meat tender and prevents it from drying out.
This weekly staple is so delicious and versatile that it’s a must in our meal plan. If you love using whole chickens in recipes, you’ll also enjoy the spatchcock version I make in my air fryer.
SIMPLE ROAST CHICKEN AT A GLANCE
- Prep Time: 10 minutes
- Cook Time: 1 hour 5 minutes
- Resting Time: 10 minutes
- Total Time: 1 hour 25 minutes
- Serves: 6 people
- Best For: Sunday dinners, weeknight meals, meal prep
A Quick Look at the Ingredients
Ingredient amounts and full recipe instructions are on the printable recipe card at the bottom of the post.
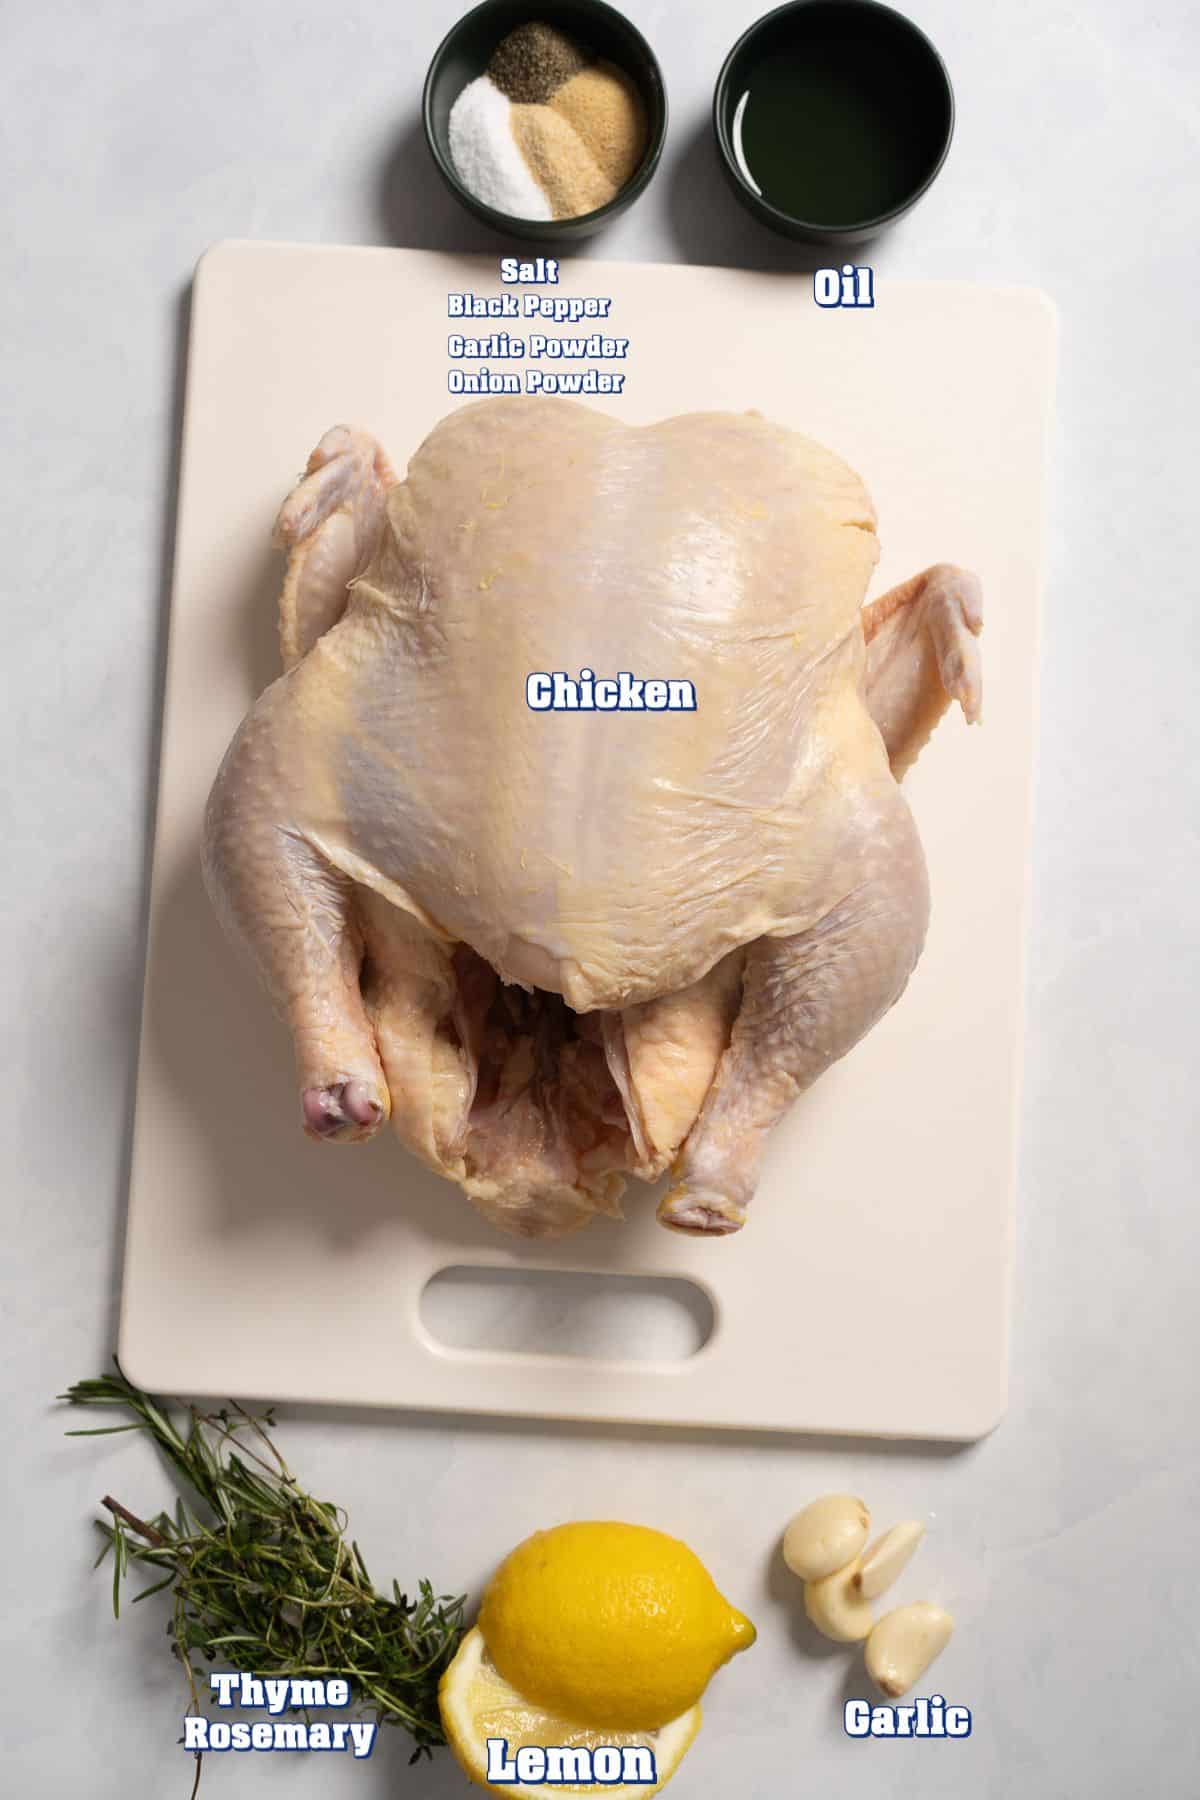
- A whole chicken: I recommend using a 4-5 pound chicken for the best results. This size fits perfectly in a standard roasting pan and cooks evenly.
- Olive oil: Helps the seasonings stick and promotes that gorgeous golden skin. I prefer using oil or even mayo over butter because butter contains water, which can prevent the crispy skin we're after.
- Seasonings: Kosher salt (essential for flavor and helps draw moisture from the skin for extra crispiness), black pepper, garlic powder, and onion powder.
- Optional aromatics: Lemon, fresh herbs like thyme and rosemary. These add flavor and moisture to the chicken cavity, but I often skip them and season the cavity directly.
Recommended Tools
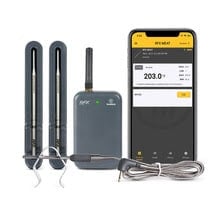
I use this wireless probe thermometer kit from ThermoWorks to track meat temperatures while they cook. It connects to my phone and sends alerts when the food is nearly done, so I never have to guess.

A baking sheet with a raised wire rack helps with the airflow, allowing air to get under the chicken.
The time needed to cook chicken depends on several factors, including the size of your bird, your oven, and the temperature of your chicken when it goes in. Your best bet is to use a thermometer and insert it into the chicken before roasting. It removes all the guesswork and ensures your chicken is perfectly cooked.
How to Make Perfect Whole Roasted Chicken
Step 1: Preheat your oven to 475°F and set up a roasting pan or sheet pan with a wire rack. The rack elevates the chicken, allowing hot air to circulate underneath for even cooking.
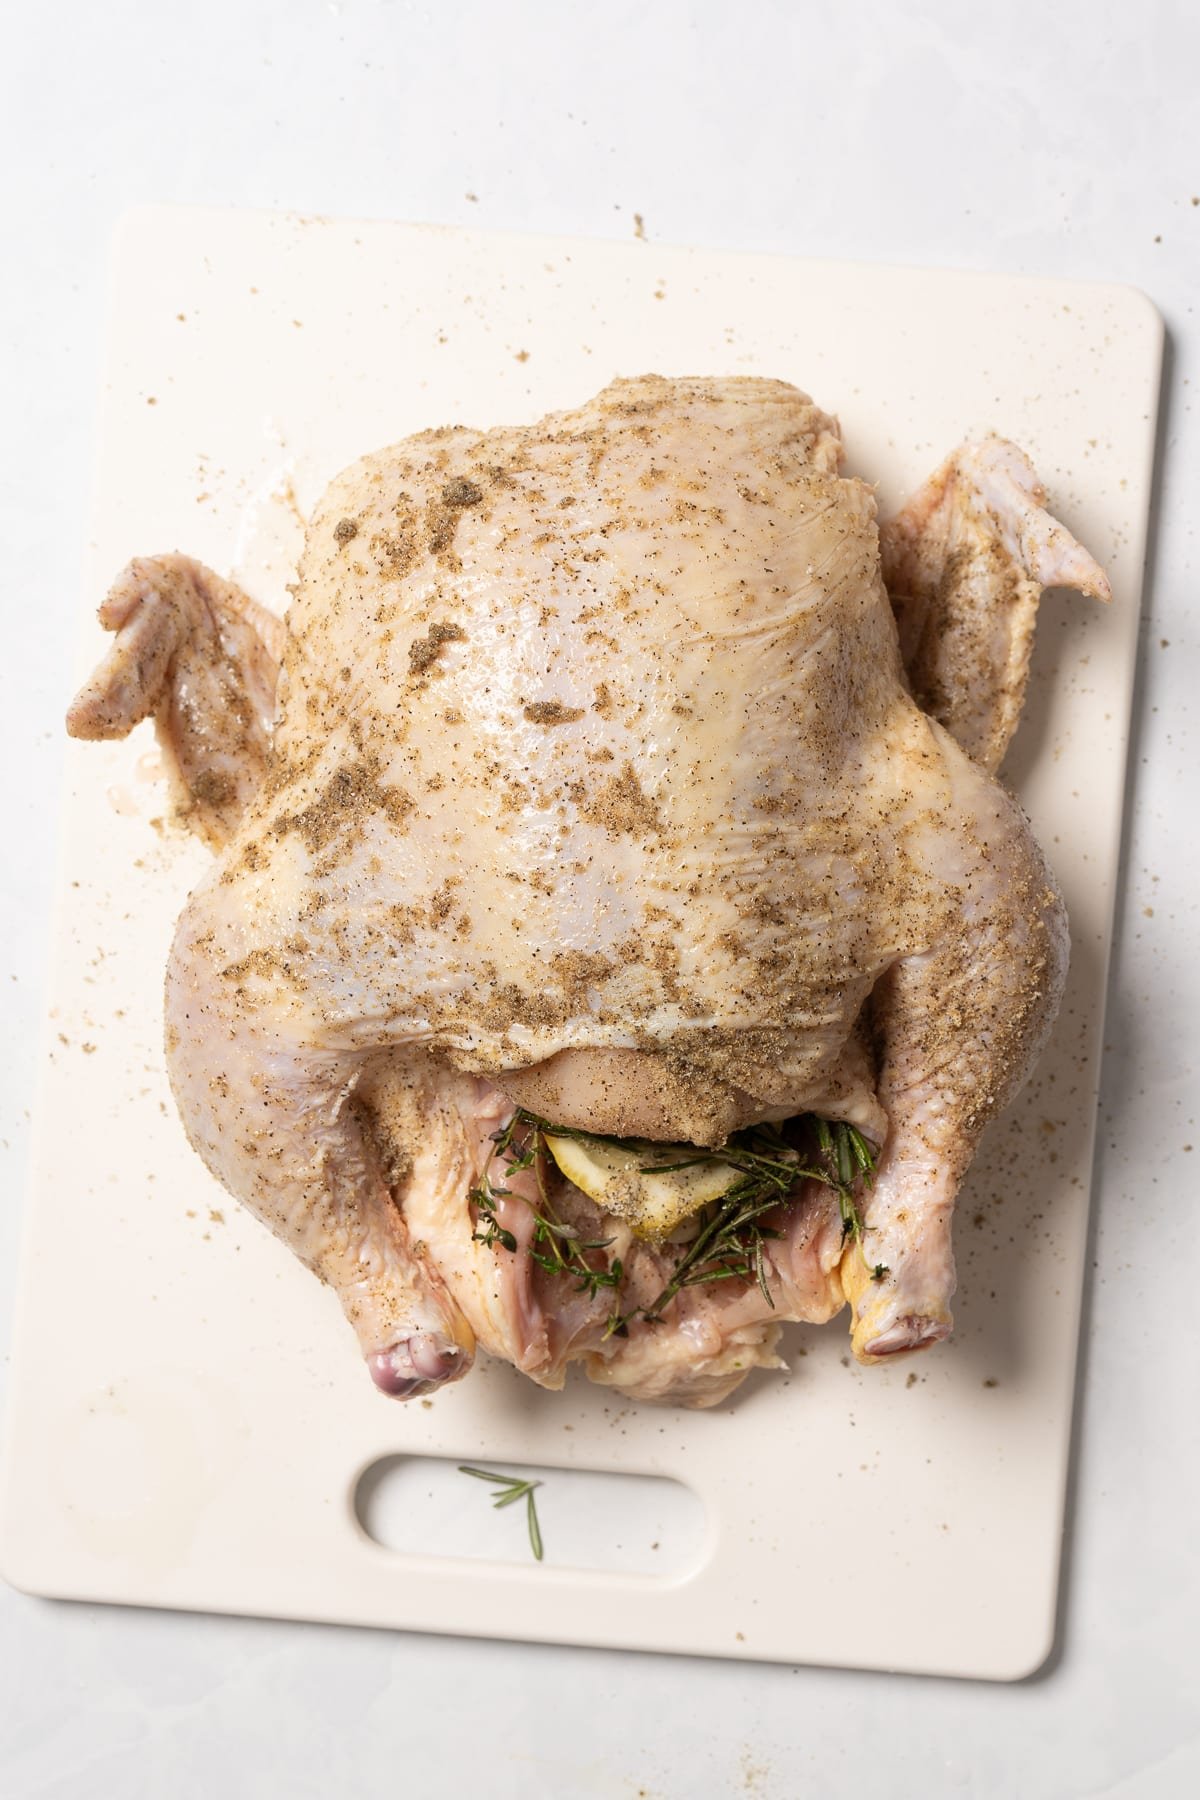
Step 2: Pat the chicken completely dry with paper towels, then rub olive oil all over the surface.
Step 3: Season the chicken with kosher salt, black pepper, garlic powder, and onion powder, all over. If using aromatics, stuff the cavity with lemon halves, peeled garlic cloves, and fresh herb sprigs.
Step 4: Place the seasoned chicken breast-side up on your prepared rack. Insert the probe thermometer into the thickest part of the thigh.
Step 5: Place the chicken in the oven and roast for 15 minutes at 475°F, then reduce the temperature to 350°F, and continue cooking for 40–50 minutes (total cook time: 55–65 minutes depending on bird size).
Step 6: Check for doneness when the thermometer reads 175°F in the thigh, and juices run clear.
Step 7: Let the chicken rest for 5-10 minutes before carving.
How to Know when your Roasted Chicken is Done
Using a reliable thermometer is crucial since different chicken sizes will have varying cook times. The most accurate way to ensure your chicken is perfectly cooked is to check that the internal temperature in the thickest part of the thigh reaches 175°F.
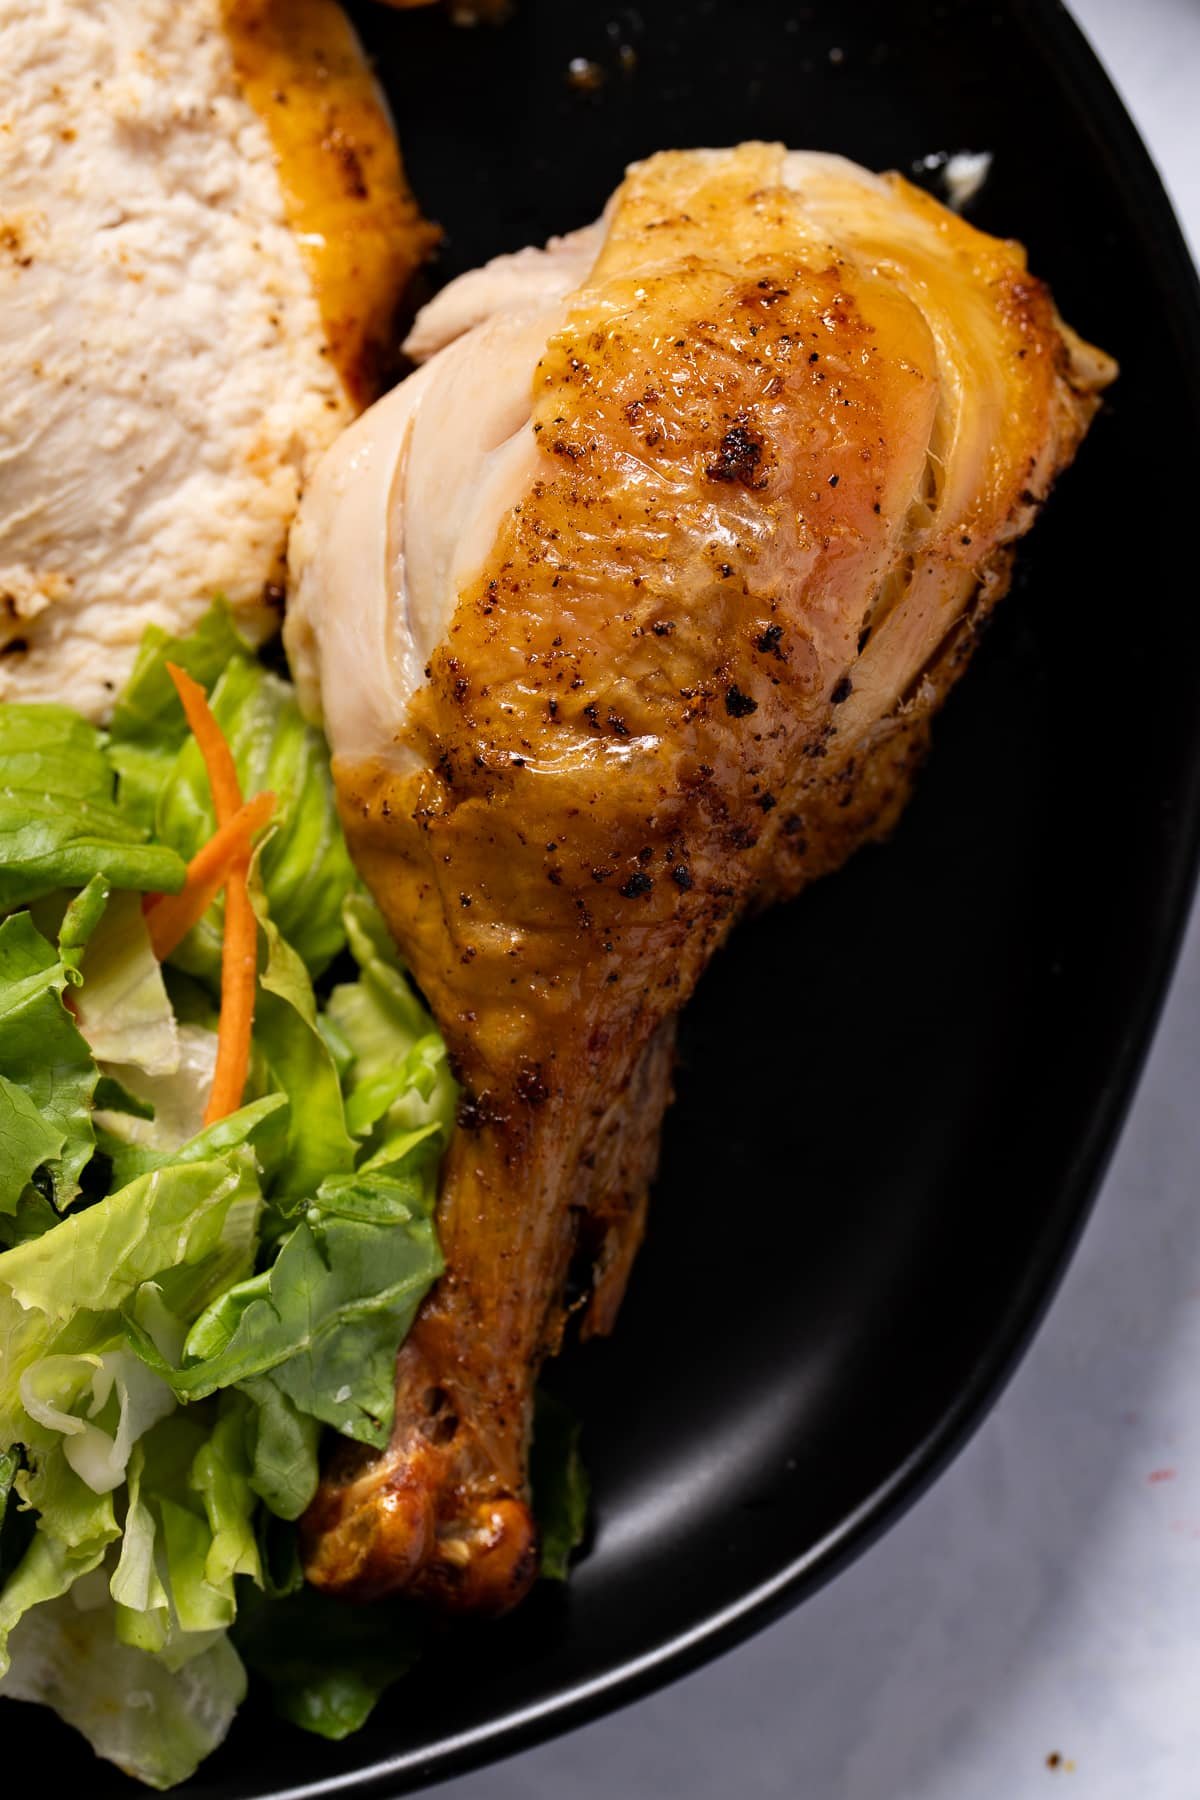
At this temperature, the juices should run clear when you pierce the thigh with a knife. This slightly higher temperature ensures the dark meat is fully cooked while still keeping the breast meat juicy and tender.
Tanya's Recipe Tips for Success
- Size matters: Stick to the 4-5 pound range for optimal results. Smaller chickens may cook too quickly, while larger ones may not cook evenly.
- To truss or not to truss: I don't bother trussing my chicken (tying the legs up) because it cooks just fine without it and saves time. One less step means getting dinner on the table faster.
- If you don't have a roasting pan: Use a cast-iron skillet or heavy-bottomed Dutch oven instead.
- Three things I never skip: Dry the chicken thoroughly with paper towels, season it generously all over, and always use a thermometer to check doneness.
- Let it rest: Those 5-10 minutes of resting time allow the juices to redistribute, ensuring every bite is moist and flavorful.
What to Serve It With
This roasted chicken pairs well with a variety of sides. Serve it with vegetables like broccoli or carrots, sides like mashed potatoes, rice, and gravy. Even a simple side salad makes a great pairing.
You can also roast vegetables along with your chicken in the tray. If doing so, add heartier, larger cut, root vegetables like potatoes, carrots, and onions at the beginning with the chicken, since they can handle the full cooking time and will soak up all those delicious drippings. For more delicate vegetables like broccoli or Brussels sprouts, add them during the last 20-30 minutes to prevent overcooking.
Storage and Leftovers
Leftover roasted chicken is incredibly versatile and keeps well in the refrigerator for up to 4 days. Shred the meat for chicken salad, slice it for sandwiches, or dice it for soups and casseroles. The bones make excellent stock, too!
To reheat, place pieces in a 350°F oven for about 10 minutes, or use the microwave for quick warming. The skin won't be as crispy when reheated, but the meat will still be delicious.
More Chicken Recipes You'll Love
I have so many chicken recipes on the site, but here are a few of my most popular:
- Brown stew chicken - a Caribbean classic. My version cooks quickly and utilizes boneless chicken thighs to make the meal easier to cook.
- Smothered chicken - A Down South staple, chicken is cooked on the stovetop and smothered in a delicious gravy.
- Garlic Parmesan whole chicken - One of my favorite ways to enjoy a roast chicken is to cover it with a delicious cheese sauce. This recipe elevates your classic roast chicken.
I hope you love this roast chicken recipe as much as we do. If you have tried this or any other recipe on my blog, please rate it and let me know how it turned out in the comments below! Your feedback is invaluable and helps us grow. I appreciate your support!
Simple Whole Roast Chicken Recipe
Ingredients
Instructions
- Preheat oven to 475°F. Set up a roasting pan or sheet pan with a wire rack.
- Pat the chicken completely dry with paper towels. Rub the olive oil all over the chicken, coating the entire surface.
- Season the chicken evenly with kosher salt, black pepper, garlic powder, and onion powder, making sure to cover all sides. If using aromatics, stuff the cavity with lemon halves, garlic cloves, and herb sprigs.
- Place the seasoned chicken breast-side up on the prepared wire rack.
- Place it in the oven on the middle rack and roast it for 15 minutes at 475°F.
- Reduce the oven temperature to 350°F and continue cooking for an additional 40-50 minutes, until the internal temperature reaches 175°F when measured in the thickest part of the thigh.
- Remove from oven and let rest for 5-10 minutes before carving and serving.
Nutrition
Notes
- The size of your chicken will determine the exact cook time. Start checking smaller chickens around 50 minutes total cook time.
- For extra crispy skin, pat the chicken dry again with paper towels before seasoning and let it air-dry in the refrigerator for 30 minutes if time allows.
- If using a probe thermometer, place it into the thickest part of the thigh. The chicken is done when the juices run clear and the temperature at the thigh reaches 175°F.
- Let the chicken rest before carving to allow juices to redistribute.

Joyce says
Ms. Tanya
Thanks so much for sharing your time and recipes with us. You have truly added to my cooking talents and some. You get tried if making things the same all the time and now I have you my secret chief😊
Tanya says
Thank you so much, Joyce! I truly appreciate it. I'm always happy to share the recipes I learn about and the ones I create with you all.
Sandi Packman says
Hi Tanya
Thank you for your recipes - we’ve loved all the ones I have tried.
I have an electric oven. It takes a while for the temperature to come down. Do you suggest anything different with the timing of this recipe?
Tanya says
Thank you Sandi! I actually have an electric oven too and follow the recipe exactly as written, it works great! The timing accounts for the slower temperature changes. However, if yours takes a little longer, you can reduce the timing of the high temp to about 10 minutes, rather than 15, before lowering it to 350F.
lee says
should I bake or use roast setting on my over, but im definitely doing this Sunday......help and thanks
Tanya Harris says
Hi Lee, I use the bake setting on my oven. I just set the temps to what's indicated in the recipe card.