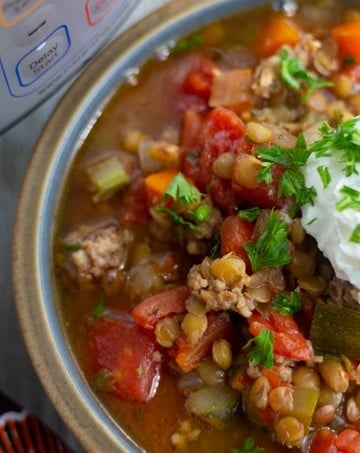
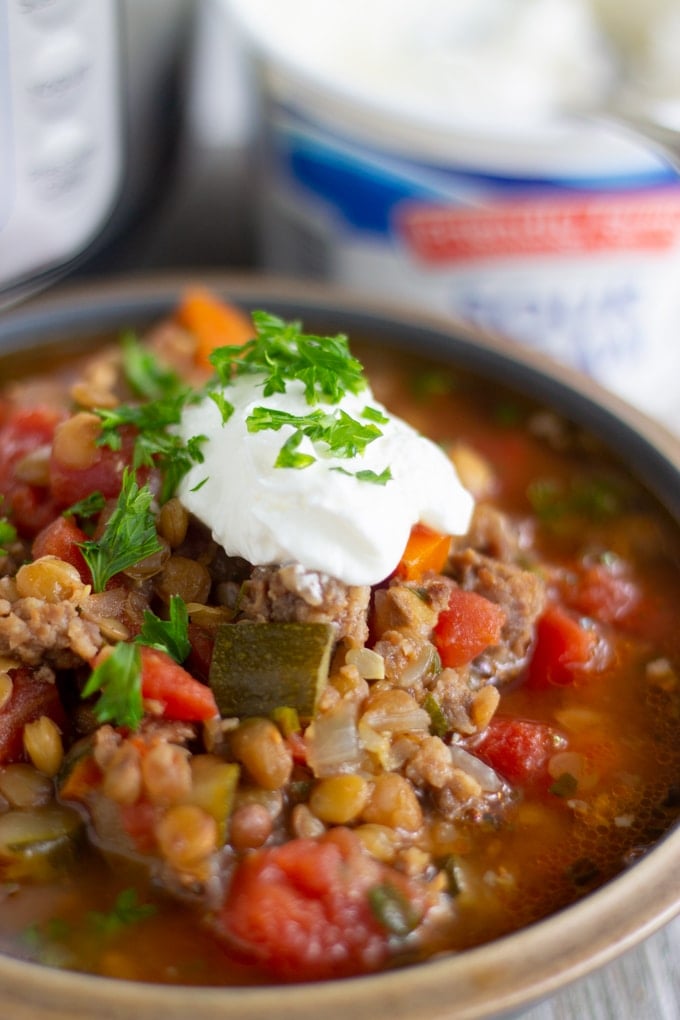
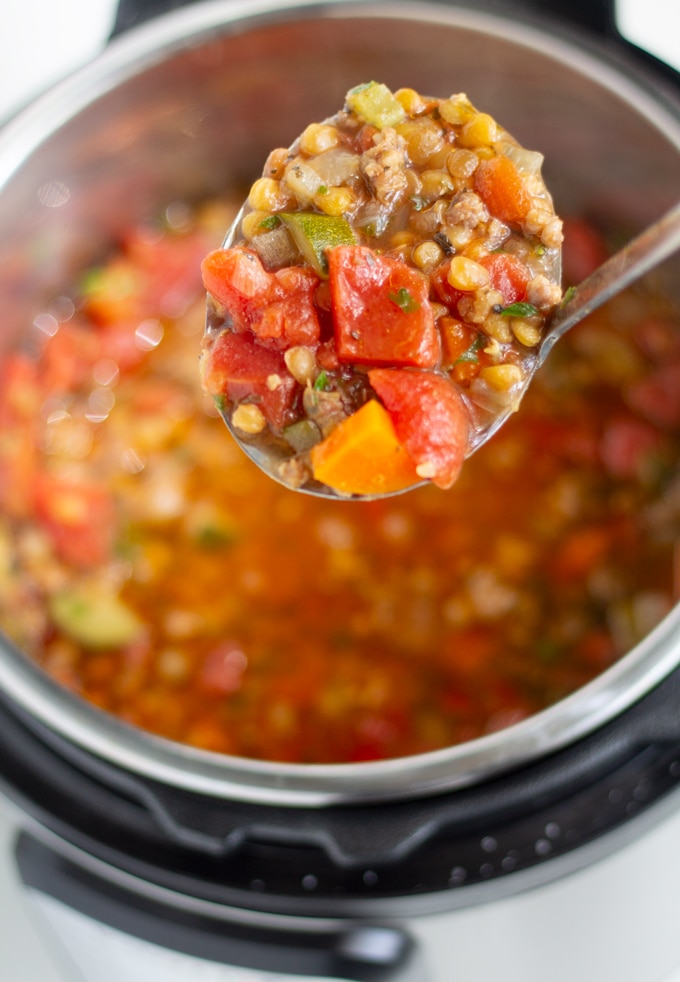
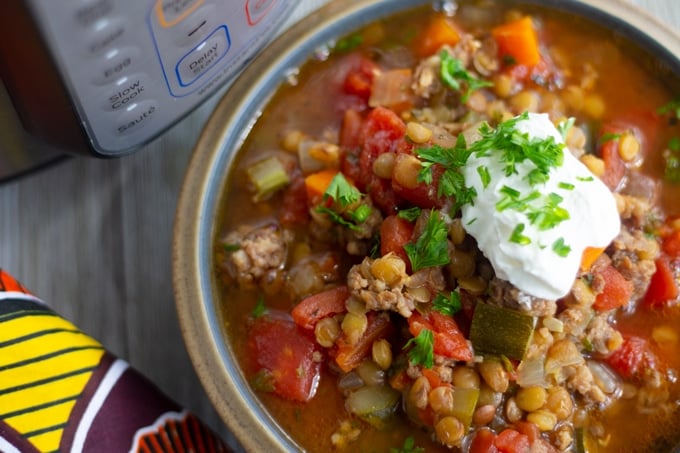
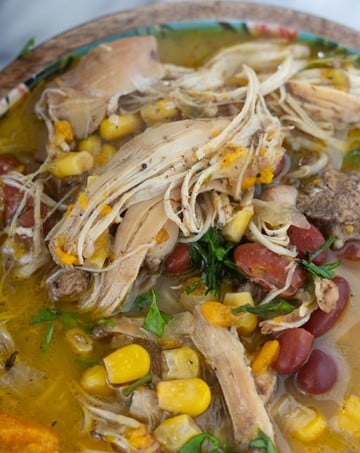
My Forking Life

  • Air Fryer
  • Pressure Cooker
  • Jamaican
  • Browse Recipes
  • Breakfast
  • Entree
  • Side Dishes
  • About
menu icon
go to homepage
  • Air Fryer
  • Pressure Cooker
  • Jamaican
  • Browse Recipes
  • Breakfast
  • Entree
  • Side Dishes
  • About
search icon
Homepage link
  • Air Fryer
  • Pressure Cooker
  • Jamaican
  • Browse Recipes
  • Breakfast
  • Entree
  • Side Dishes
  • About
×
Home

July 7, 2018 by Tanya 23 Comments

Jamaican Style Carrot Juice Recipe

jamaican style carrot juice recipe

This Jamaican Style Carrot Juice Recipe is a refreshing yet sweet treat. One of my favorite drinks when growing up in Jamaica.

jamaican style carrot juice recipe in a glass

This post contains affiliate links, please read my full disclaimer here.

The full recipe with ingredients/instructions is available on the recipe card at the bottom of the post. Important tips/tricks are also included in the blog post.

Growing up, carrots were one of my favorite vegetables to eat—not the cooked carrots, but a regular raw carrot right out of the bag. I'd grab one, sit in front of the TV, watch my cartoons, and chew on the carrot. I wanted to be Bugs Bunny.

A little birdie also told me that carrots were really good for eyesight so as a kid, I made sure I ate at least 2 a day. I still don't need glassess...I'll give props to the carrots and that little birdie.

Growing up, while I wasn't eating all the carrots in the house, I would also get to enjoy this Jamaican Style Carrot Juice. It wasn't made too often in the house, but when it was made, it was a true treat.

Now, this isn't your typical carrot juice recipe. It's a bit thicker and sweetened with condensed milk and other spices. So, in other words, it ain't the healthiest drink on the block. But seriously, who cares? It's delicious, and it does have a vegetable in it.

Ingredients for Carrot Juice

  • Carrots - rinsed and cleaned. It's up to you whether to peel them. If they aren't organic, I tend to peel them.
  • Water - this will help when blending the carrots to make the juice.
  • Condensed milk, nutmeg, and vanilla extract - this adds sweetness and flavor to the carrot juice.
jamaican style carrot juice recipe photo from up top

How to make Jamaican Style Carrot Juice with step by step Photos

Peel and chop carrots, then add them to to blender with water and blend until smooth. Strain the liquid into a jar.

carrots in water.
Place carrots in blender and cover with water. blend for about 2 minutes
carrots in strainer.
Place strainer over pitcher and pour carrot mixture in strainer. Allow to completely stain.

Add condensed milk, vanilla extract, and nutmeg to the jar and serve. Pour into a pitcher and refrigerate or serve over ice. Enjoy 🙂

condensed milk being poured.
Sweeten carrot juice with condensed milk

This Jamaican Style Carrot Juice Recipe is a breeze to make. All you need is a blender, a strainer , a bag of carrots, a can of condensed milk, vanilla extract, and nutmeg. Serve it over ice for a nice refreshing drink. Ya mon.

Want more Jamaican Recipes?? Check out my Jamaican Sorrel Drink,  Instantpot Jamaican Cornmeal Porridge , Corned Beef and Cabbage - Jamaican Style and these Jamaican Banana Fritters. 

Notes on Jamaican Style Carrot Juice Recipe

  • You will need a pretty good blender for this recipe. I love love love my Red Vitamix Blender that my hubby got me for Christmas.
  • This drink is pretty sweet, depending on how much of the sweetened condensed milk you add. However, the other spices give it a spice-filled taste.
  • Feel free to add a good splash of rum to this recipe. Yes, I like to add rum to certain drinks, rum added to this one is really good.
jamaican style carrot juice recipe
Print Recipe
4.84 from 12 votes

Jamaican Style Carrot Juice Recipe

Prep Time10 minutes mins
Total Time10 minutes mins
Course: Drinks
Cuisine: Caribbean
Servings: 8 people
Calories: 49kcal
Author: Tanya

Ingredients

  • 2 lbs carrots
  • 5 cups water
  • 1 14oz can condensed milk
  • 1 teaspoon vanilla extract
  • ½ teaspoon nutmeg
  • rum optional

Instructions

  • Peel and chop carrots into 2-inch pieces. Add to blender with 5 cups of water and blend for about 2 minutes. 
  • Place strainer over pitcher and pour mixture into strainer, allowing juice to fall into pitcher and carrot puree to remain in strainer. Discard (or save for another use) carrot puree in a strainer. 
  • Add condensed milk, vanilla extract, and nutmeg to pitcher and serve. Refrigerate or serve over ice. Enjoy 🙂

Notes

  • This drink is pretty sweet, depending on how much of the sweetened condensed milk you add. However, the other spices give it a spice-filled taste.
  • Feel free to add a good splash of rum to this recipe. Yes, I like to add rum to certain drinks, rum added to this one is delicious.

Nutrition

Calories: 49kcal | Carbohydrates: 11g | Protein: 1g | Fat: 0.3g | Saturated Fat: 0.1g | Polyunsaturated Fat: 0.1g | Monounsaturated Fat: 0.02g | Sodium: 86mg | Potassium: 364mg | Fiber: 3g | Sugar: 5g | Vitamin A: 18944IU | Vitamin C: 7mg | Calcium: 42mg | Iron: 0.3mg

Pin Jamaican Style Carrot Juice Recipe for Later

pin image showing Jamaican carrot juice with text that says Jamaican Carrot Juice

July 3, 2018 by Tanya 8 Comments

Best Roasted Tomato Basil Soup Recipe

roasted tomato soup in bowl

This Roasted Tomato Basil Soup Recipe is the best ever! Not only is it creamy and delicious, but it can be made in less than an hour with all fresh ingredients. With vegetables that are roasted in the air fryer, this flavorful soup can be on your table in less than 1 hour.

roasted tomato soup in bowl

This post contains affiliate links, please read my full disclaimer here.

I love a good and delicious tomato soup. As a matter of fact, I have two rules when it comes to tomato soup.  

  1. The soup must be homemade and use fresh tomatoes, none from a can;  and
  2. My tomatoes and vegetables must be roasted

Why the rules? Because following that method has lead to some of the best tomato soup I've ever had. I used to roast my vegetables in the oven when I wanted to make tomato soup from scratch but found that it took longer than I wanted to roast the vegetables. Now that I have my air fryer, I can roast vegetables in half the amount of time it takes to roast in the oven.

How to make the best Tomato Soup from fresh tomatoes?

All you need is about 1 lb of any kind of fresh tomato. I tend to stick with roma or tomatoes on the vine for this recipe, whichever I have on hand. Both tomatoes roast beautifully in the air fryer.

Roast the tomatoes, along with onion, carrot, garlic cloves, and red bell pepper in the air fryer for about 25 minutes at 360 degrees. Roasting your vegetables will allow your tomatoes to roast, not burn, releasing the natural sweetness of the tomatoes and other vegetables.

Once your vegetables are roasted, you will add your stock and warm a bit for added flavor. Then blend, add your chopped basil, cream, and splash of balsamic vinegar.

tomato soup in bowl with basil on top

To Peel or Not to peel the tomatoes for the Best Tomato Basil Soup Recipe? That is the Question…

Once my tomatoes and vegetables are roasted, I sometimes peel the skin off of the tomatoes and red pepper. This results in a smoother finish to my soup once it's blended. It really depends on the day on whether I do this or not. The soup is still delicious either way but for the smoothest soup possible, you must do the following: peel, blend in a blender, and pour through a fine mesh strainer.

What Goes with the Best Tomato Basil Soup?

I like to serve our tomato basil soup topped with parmesan cheese. Serve along side a delicious grilled cheese sandwich if you want a full meal.

I hope you enjoy this roasted tomato basil soup as much as we do. During these summer months, enjoy those tomatoes and fresh basil as much as you can. 🙂

Watch this video tutorial and see how I make this tomato basil soup from start to finish.

roasted tomato soup in bowl
Print Recipe
5 from 3 votes

The Best Tomato Basil Soup Recipe

Roast these tomatoes in the air fryer for The Best Tomato and Basil Soup. This soup can be on your table in less than 1 hour with robust flavor from the roasted vegetables.
Prep Time10 minutes mins
Cook Time35 minutes mins
Total Time45 minutes mins
Course: Soup
Cuisine: American
Keyword: best tomato and basil soup
Servings: 4
Calories: 160kcal
Author: Tanya

Ingredients

  • Oil for spraying
  • 1 lb red tomatoes cut in half
  • 1 medium red bell pepper quartered
  • 1 large yellow onion quartered
  • 1 medium carrot chopped into large pieces
  • 4 garlic cloves peeled
  • 1.5 cups chicken broth
  • ½ cup heavy cream
  • 4 fresh basil leaves finely chopped
  • Splash of balsamic vinegar
  • Grated Parmesan Cheese optional

Instructions

  • Spray the bottom of the air fryer basket with a little oil to prevent sticking. Add the tomatoes, red bell pepper, onion, carrot, garlic cloves to the air fryer and set for 360 degrees Fahrenheit and 25 minutes to roast.
  • Check the air fryer basket about halfway through and shake to ensure even roasting. Shake again when there is about 5 minutes left on the timer.
  • Once air fryer timer goes off, transfer vegetables to a medium stock pan and add chicken broth to stock pan. Allow mixture to come to a boil. Reduce heat and simmer for about 5 minutes. Once done, blend soup with immersion blender or allow to cool and use a traditional blender to blend the soup.
  • Add basil, heavy cream, splash of balsamic vinegar. Salt and pepper to taste. Top with parmesan cheese.

Notes

*NEVER add liquid to an air fryer. 
*You can peel the tomatoes and red bell pepper after removing from the basket if you choose to. Just make sure they cool a bit before you do so.
*Always allow the liquids to cool before adding to a traditional blender to avoid burns.

Suggested Tools

 
Air Fryer
Evo Oil Sprayer Bottle
Immersion Hand Blender

Nutrition

Calories: 160kcal

Notes on The Best Tomato Basil Soup

  • First and foremost, never ever put liquids in the Air Fryer. The Air fryer is used to roast the Vegetables. I use it in place of the oven because it roast my vegetables in half of the amount of time it would take to roast in the oven.
  • For a smoother soup consistency, pour soup into a fine mesh strainer once blended. I like my tomato soup a tiny bit chunky.
  • Never use over the counter aerosole spray cans in your air fryer. It's best to purchase a good spray bottle and use vegetable or olive oils to spray. I use the Evo Oil Sprayer Bottle
    .

Step by Step Photos of the Best Tomato Basil Soup Recipe

vegetables in air fryer basket
Add vegetables to air fryer basket.
spray bottle over basket
Spray vegetables with oil.
vegetables in basket after air frying
Roast at 360 degrees Farenheit for 25 minutes.
peeling tomatoes for soup
Allow vegetables to cool and peel tomatoes and red bell pepper if you wish.
vegeatables in pot with chicken broth
Add vegetbales and chicken broth to pot. Bring to boil, reduce heat, and allow to simmer for about 5 minutes.
vegetables blended with immersion blender
Blend with immersion blender.
heavy cream added to the best tomato basil soup
Add heavy cream and basil
the best tomato basil soup recipe on ladel
All done. Blend for longer or pour through mesh strainer for smoother consistency.

Pin The Best Tomato Basil Soup Recipe for Later

pinterest image for the best tomato basil soup recipe

Looking for more Air Fryer Recipes to enjoy with this dish? Try my Perfect Air Fryer Steak or Air Fryer Potatoes.

June 26, 2018 by Tanya Leave a Comment

Cheerwine Float

cheerwine float. Vanilla bean ice cream covered in cherry flavored soda. #cheerwine #cheerwineicecream

Cheerwine Floats made with vanilla bean ice cream and amazing cherry flavored Cola are a delicious treat for the summer. This spin on a traditional float is an easy treat for those hot summer months.

cheerwine float in milkshake glass

This post contains affiliate links, please read my full disclaimer here.

The full recipe with ingredients/instructions is available on the recipe card at the bottom of the post. Important tips/tricks are also included in the blog post.

What the heck is a Cheerwine Float? I'm sure plenty of you have that question...unless you've been to North Carolina and tried a cute, yet chain, fast food restaurant known as CookOut. Well that was my first time ever trying Cheerwine and I had it in the form of a float. The float was delicious. I am obsessed. The end.

Just kidding. Cheerwine is just too amazing not to give you just a tad bit of information about it.

What is Cheerwine?

Cheerwine is a cherry flavored soda that was created in Salisbury, NC in 1917. The company is owned by the Peeler family (still, how cool is that) and can be found in many Southern grocery stores. 

What does Cheerwine Taste Like?

Sorry folks but it does not taste like wine. Just imagine your favorite cola with a delicous cherry flavor. It does not taste like artificial cherry either, but taste like somone manually squeezed cherry juice into some Cola. If this is in fact true, I'd love to meet that person. It's in fact hard to describe how incredible Cheerwine is but trust me when I say it's delicious.

How to Make a Cheerwine Float?

A Cheerwine float is pretty easy to make. Just grab your favorite glass, fill it with vanilla bean ice cream, and add your soda until it fizzes at the top. Stick a straw in it and enjoy.

ice cream in glass with cola being poured into it

You can add the maraschino cherries if you like but they aren’t necessary, they just make it pretty.

cheerwine float. Vanilla bean ice cream covered in cherry flavored soda. #cheerwine #cheerwineicecream
Print Recipe
No ratings yet

Cheerwine Float

Delicious Cheerwine Float Recipe includes vanilla bean ice cream covered in amazing Cherry flavored soda. 
Prep Time2 minutes mins
Total Time2 minutes mins
Course: Dessert
Cuisine: American
Keyword: cheerwine float
Servings: 1
Calories: 217kcal
Author: Tanya

Ingredients

  • 2 scoops vanilla bean ice cream
  • 8 oz Cheerwine soda

Instructions

  • Place ice cream in tall glass. 
  • Pour soda over ice cream and watch the magic happen. 
  • Add a straw and cherry on top. Enjoy 🙂

Notes

Suggested Items
Cheerwine Cherry Soda

Nutrition

Calories: 217kcal

I hope you enjoyed my history (although brief) history of Cheerwine. What's your favorite float reicipe?

Pin Cheerwine Float for Later

Love a good milkshake recipe? Try my Oreo Cookie Milkshake.

June 12, 2018 by Tanya 15 Comments

Pan Seared Scallops with Purple Carrot Chutney

Pan Seared Scallops Recipe. Served with a purple carrot chutney. #sponsored #recipe #souldfoodsessions

This elegant Pan Seared Scallops Recipe is served over an amazing purple carrot and ginger chutney and potato and leek soup. This post is #sponsored by A Table is Set: A four city tour served with a Coke. All opnions are my own. 

Pan Seared Scallops Recipe. Served with a purple carrot chutney. #sponsored #recipe #souldfoodsessions

The full recipe with ingredients/instructions is available on the recipe card at the bottom of the post. Important tips/tricks are also included in the blog post.

I live for amazing food and recipes. I watch cooking shows, try different restaurants, and read cookbooks for fun. Call me a foodie nerd. So imagine how thrilled this foodie nerd was to hear about the Soul Food Sessions Tour, The Table is Set: A four city-tour served with a Coke.

scallops with chutney with soda bottle in back

So what is Soul Food Sessions? It's a series of nonprofit dinners in Charlotte, NC that was created to help increase diverity in the culinary industry. The movement acknowledges and supports people of color in the culinary, hospitality, and beverage industry. I have to say that I am excited about this movement. The need for diversity in the food blog world was one of the reasons I started My Forking Life. I am honored they asked me to help spread the word about their upcoming tour.

scallops with chutney over potato leek

Soul Food Sessions has partnered with Coca-Cola Consolidated to take their dinners on a four city tour. The tour starts in Charlotte, NC (their home market) on June 19th, 2018. Next stops will be Washington DC, Baltimore MD, and Charleston SC.

Now what does any of this have to do with these scallops? Everything!!!! I was blessed with the opportunity to create this pan seared scallops recipe that will be served at the dinner in Charlotte, NC. It was my first time making scallops. It was my first time making chutney. But the results? AMAZING!!! I truly hope they can bless your palet with this dish in all 4 stops because it is delicious!

scallops over potato leek soup with soda in back

I wish I could say that I created this recipe but all credit goes to Chef Greg Williams, one of the founders of Soul Food Sessions and co-owner of What the Fries Food Truck. Let's just say the man is a culinary genius. The flavor of that chutney had me dancing around my kitchen in joy. It has now been deemed a staple recipe for our home kitchen.

I had a blast recreating this dish and I learned a ton about picking scallops and cooking chutney. Check out my step by step photos below to learn what I learned.

That's one great thing I can say about this tour, it will awaken your inner foodie and encourage you to try foods you wouldn't typically eat at home.

It's recommended that you pair this pan-seared scallop recipe with Coca-Cola Zero Sugar. Coca-Cola Zero Sugar brings to the forefront the richness of scallops combined with the bold flavors of ginger and garlic in the chutney.

Information about the Charlotte Event:

Date: June 19, 2018

Location: Free Range Brewin

Pan Seared Scallops Recipe. Served with a purple carrot chutney. #sponsored #recipe #souldfoodsessions
Print Recipe
5 from 9 votes

Pan Seared Scallops Recipe Paired with Coca Cola

Pan Seared Scallops with Purple Carrot Chutney Paired with Coca Cola. Coca-Cola Zero Sugar brings to the forefront the richness of scallops combined with the boastful flavors of ginger and garlic in chutney.
Prep Time20 minutes mins
Cook Time40 minutes mins
Total Time1 hour hr
Course: Appetizer
Cuisine: American
Keyword: recipe, scallops
Servings: 2
Author: Tanya

Ingredients

PURPLE CARROT CHUTNEY

  • 2 purple carrots finely grated
  • 1 red onion thinly sliced
  • 2 cloves garlic
  • 1 cup grated ginger
  • 1 cup sugar
  • 1 ¾ cups balsamic vinegar
  • 1 tablespoon olive oil

SEARED SCALLOPS

  • 6 U10 scallops
  • salt and pepper to taste
  • 1 tablespoon olive oil

POTATO LEEK SOUP

  • 2 cups potato leek soup

GARNISH

  • chives
  • balsamic vinaigrette

BEVERAGE PAIRING

  • Coca-Cola Zero Sugar

Instructions

PREPARE THE PURPLE CARROT CHUTNEY.

  • Heat 1 tablespoon olive oil in medium sauté pan over medium heat. Add carrots, onion, garlic, ginger and sugar. Let brown and caramelize for 5 minutes. Add balsamic vinegar to deglaze pan. Cook for 30 minutes. Set aside.

MAKE THE SCALLOPS.

  • Heat 1 tablespoon olive oil in medium sauté pan over medium heat. Dry scallops with paper towel and salt and pepper to taste. Add to pan, being careful not to overcrowd scallops. Sear until golden-brown; flip and repeat.

PLATE THE DISH.

  • Spoon potato leek soup into base of bowl. Top with chutney and scallops. Finish with chives and balsamic vinaigrette.
  • Serve and enjoy with a Coca-Cola Zero Sugar.

Notes

Find this recipe and others at The Table is Set..
Make sure to use dry packed scallops for this dish.

Step by Step Photos of Pan Seared Scallops with Purple Carrot Chutney

ingredients for recipe in cups
chutney ingredients in skillet before vinegar
chutney ingredients in skillet after vinegar added
raw scallps on paper towel
hand removing scallop foot
scallop cooking in skillet
seared scallops in skillet
finished recipe on top of potato leek soup

May 24, 2018 by Tanya 23 Comments

Hawaiian Macaroni Salad

This Hawaiian Macaroni Salad is a sweet and tangy macaroni salad that is a twist on traditional macaroni salad. Covered in a delicious creamy sauce with bright vegetables, it's perfect for summer. #easy #hawaiian #sidedish #cookoutsides #mealprep #pastasalad #picnicsalad #summersalad #hawaiianmacaronisalad #myforkinglife

This Hawaiian Macaroni Salad Recipe is a delicious spin on traditional macaroni salad. The creamy tangy and sweet sauce combined with pasta and bright vegetables make this the perfect pasta salad. 

Hawaiian macaroni in glass bowl

This post contains affiliate links, please read my full disclaimer here.

The full recipe with ingredients/instructions is available on the recipe card at the bottom of the post. Important tips/tricks are also included in the blog post.

Summer is made for cookouts, spiked lemonade, and macaroni salad. Ok, summer is so much more than that but if you know me, you know I love me some summer. Speaking of summer, one of my best summer memories is from a summer when I was 17 and I traveled to Hawaii to stay for an entire month! Best summer ever!!! Although the summer I got married on June 21st, the first day of summer, may just have that one beat. Either way, I had a blast in Hawaii visiting family, volunteering at the local hospital, hiking, attending luau's, and straight chilling.

I love this recipe for Hawaiian Macaroni Salad because everytime I make it it brings back memories of my time on the island (I only stayed on Oahu). This recipe is so simple yet delicious that it's a must try for any macaroni salad lover.

What is Hawaiian Macaroni Salad?

It's a creamy sweet and tangy salad that can be found all over Hawaii. There are many additions that can be added, but base recipes generally include elbow macaroni that has been slightly over cooked and lots of good quality mayonnaise.

sauce being poured on vegetables

What makes Hawaiian Macaroni Salad Different?

The Sauce!! It's sweet, tangy, and oh so delicious. The mayonniase, milk, and apple cider vinegar are keys to the sauce. Most Hawaiian Macaroni Salad recipes require at least 2 cups of mayonaise...this one does not. I'm not that into mayonnaise and the movie Undercover Brother makes me feel bad for even liking it. Just kidding. But I feel that my version just didn't need 2 cups.

Traditional Hawaiian Macaroni Salad also tends to have super soft overcooked noodles to absorb all the creamy sauce. I like my noodles cooked to al dente so I don't overcook it. My obsession with the dish is with the sauce.

Hawaiian Macaroni Salad with or without Tuna, That is the Question!

The beauty of this dish is that it is amazing with or without tuna. I make it both ways often, my daughter doesn't like the tuna (hence why my photos are missing tuna). On the other hand, everyone else loves it with tuna. Your choice, both are amazing.

I really hope you enjoy this Hawaiian Macaroni Salad recipe. It's perfect for bbq's, cookouts, and for meal preps throughout the week.

Tips for Hawaiian Macaroni Salad Recipe

  • Allow your macaroni to cool for about 10 -15 minutes before adding the sauce. That will help keep your sauce creamy.
  • Use high quality mayonnaise only for this recipe. Any high quality brand will do.
  • Have fun with the additions to the recipe. Sub veggies for other veggies, protein for other proteins, etc. It's the sauce that really makes this dish pop.
  • This macaroni salad is best after refrigeration. 2 hours is usually enough for the flavors to mend together.
This Hawaiian Macaroni Salad is a sweet and tangy macaroni salad that is a twist on traditional macaroni salad. Covered in a delicious creamy sauce with bright vegetables, it's perfect for summer. #easy #hawaiian #sidedish #cookoutsides #mealprep #pastasalad #picnicsalad #summersalad #hawaiianmacaronisalad #myforkinglife
Print Recipe
4.91 from 11 votes

Hawaiian Macaroni Salad

This sweet and tangy Hawaiian Macaroni Salad is the perfect macaroni salad for any cookout or bbq. 
Prep Time10 minutes mins
Cook Time10 minutes mins
Refrigeration2 hours hrs
Total Time2 hours hrs 20 minutes mins
Course: Side Dish
Cuisine: American
Servings: 10 people
Calories: 431kcal
Author: Tanya

Ingredients

  • 1 lb uncooked macaroni pasta
  • 1.25 cup good quality mayonnaise
  • 2 Tablespoon milk
  • 2 Tablespoon sugar
  • 1 Tablespoon dijon mustard
  • 1 Tablespoon apple cider vinegar
  • ½ teaspoon salt
  • ¼ teaspoon freshly ground black pepper
  • 1 cup red bell pepper chopped
  • ½ cup red onion chopped
  • 1 cup seedless cucumber chopped
  • 1 cup carrots shredded
  • 2 5 oz cans chunk light tuna (optional add in)

Instructions

  • Prepare elbow macaroni as indicated on the box, drain, and set aside to cool.
  • Combine mayonnaise, sugar, dijon mustard, apple cider vinegar, milk, salt, and black pepper in a medium bowl and stir to combine.
  • Place pasta, red onion, red bell pepper, cucumber, carrots, and tuna (if you are using tuna) in a separate bowl. Pour sauce over top and stir to combine.
  • Refrigerate for 2 hours and Enjoy.

Nutrition

Calories: 431kcal

Step by Step Photos of Hawaiian Macaroni Salad

  • pasta in colander
  • Tsauce for salad in glass bowl with wooden spoon
  • pasta and vegetables in glass bowl
  • finished bowl of hawaiian salad

Loving this summer pasta salad recipe? Try my Cold Seafood Salad Recipe.

Pin Hawaiian Salad For Later

Have you tried this recipe? Lease us a comment below and let us know how you liked it 🙂

May 15, 2018 by Tanya 6 Comments

Cheddar and Sour Cream Corn on the Cob Seasoning

cheddar and sour cream corn on the cob seasoning

This Cheddar and Sour Cream Corn on the Cob seasoning is a delicious twist on traditional corn on the cob. Serve it along side your favorite cookout meal for a fun and tasty side dish.

cheddar corn stacked on top of each other

This post contains affiliate links, please read my full disclaimer here.

The full recipe with ingredients/instructions is available on the recipe card at the bottom of the post. Important tips/tricks are also included in the blog post.

There is something magical about grabbing an ear of corn with both hands and chowing down. Heck, you could use one hand for all I care but corn eaten off the cob is just simply amazing. There’s a relaxation that comes along with it that I just can’t explain. In our house, we eat a ton of corn on the cob. It was one of my cravings during my pregnancy and if I ate it, we all ate it.

Traditionally, we would season our corn with loads of butter and some salt. Of course, as foodies, we had to start to think outside the box and then this corn on the cob seasoning became a favorite in our household. The credit for this beauty goes to hubby who loves cheddar and sour cream potato chips.The corn on the cob seasoning in this recipe is pretty simple and involves minmum ingredients, cheesy puffs, sour cream, and our top secret ingredient...Jerk Seasoning. I guess it’s not so top secret anymore. Actually, it’s not really top secret...my hubby puts jerk seasoning on just about everything and he was the brain child behind this recipe creation. If you don’t have jerk seasoning than salt is just as fine as a substiute. But seriously, use the jerk if you can.

corn on the cob on white plate

You can prepare the corn anyway you like when it comes to this recipe, as long as it’s cooked. I like to use my Instant Pot as it’s quick, easy, and gets my corn cooked just the way we like, cooked with a nice little crunch that leaves juices flying everywhere. With only a 2 minute pressure cooktime, this method just can’t be beat.

Now that I’ve let you all know about this corn on the cob seasoning, I’d love to hear from you about your favorite corn on the cob seasoning in the comments below. Until the next recipe, Enjoy 🙂


Try this Easy Cheddar and Sour Cream Corn on the Cob Seasoning. A delicous side dish for any summer bbq. #cornonthecobseasoning #sidedish #corn #summermeals #easymeals #summervegetables #myforkinglife #instantpot #instantpotsides
Print Recipe
5 from 1 vote

Cheddar and Sour Cream Corn on the Cob Seasoning

Not your typical corn on the cob recipe. Have fun eating this corn on the cob, especially if you love cheddar and sour cream.  
Prep Time5 minutes mins
Cook Time2 minutes mins
rise to pressure10 minutes mins
Total Time7 minutes mins
Course: Side Dish
Cuisine: American
Servings: 6 people
Calories: 171kcal
Author: Tanya

Ingredients

  • 5-6 ears of corn silk and husk removed
  • ½ cup sour cream
  • 4 cups Cheeto Puff Chips
  • 1 teaspoon Jerk Seasoning*

Instructions

Instant Pot Instructions

  • Place 1 cup of water in instant Pot. Add trivet and place corn on top of trivet. Cover and pressure cook on Manual for 2 minutes. Once timer goes off, quick release.

Oven Instructions

  • Preheat oven to 450 degrees. Wrap corn in foil and place on cookie sheet. Roast in oven for 20-25 minutes until done.

Grill Instructions

  • Wrap corn in heavy duty foil. Cook over coals/grill gate turning occasionally for about 15 minutes until corn is done.
  • While corn is cooking, add Cheeto Puffs to food processor along with jerk seasoning. Process until cheetos look like light breadcrumbs. (See photo below). Spread Processed cheetos on a flat surface.
  • Once corn is done and cool enough to handle, spread sour cream over corn with brush. Then roll corn into cheetos. Serve and Enjoy 🙂

Notes

*Salt can be substituted if you don’t have jerk seasoning.
I use Island Spice Jerk Seasoning.
Suggested Tools:
I use a 6 Qt Instant Pot to prepare corn quickly.

Nutrition

Calories: 171kcal

Looking for more Instant Pot Recipes? Try my Pressure Cooker Slamon with Creamy Herb Parmesan or my Pressure Cooker Shrimp Paella.

Step by Step Photos Cheddar and Sour Cream Corn on the Cob Seasoning

  • water being poured into instant pot insert
  • corn in the instant pot
  • steam coming out of the instant pot with corn
  • cheese chips and seasoning over food processor
  • crushed chips in food processor
  • cream being spread on corn
  • corn being rolled in crushed chips
  • corn in the cib stacked up

Pin Cheddar and Sour Cream Corn on the Cob Seasoning for Later

Video

May 2, 2018 by Tanya 7 Comments

Pressure Cooker Salmon with Creamy Herb Parmesan Sauce

This 5 Minute Pressure Cooker Salmon is perfect for a quick meal in the Instant Pot. Top it with a creamy herb parmesan sauce for a quick and fancy meal. #instantpot #quickdinner #salmonrecipe #pressurecookersalmon #myforkinglife

This Pressure Cooker Salmon is the perfect quick and elegant meal. Top it with a creamy herb parmesan sauce for a quick and fancy meal.

salmon being covered with sauce

I would have never imagined that I, Tanya, would be cooking salmon in an electric pressure cooker. Not too sure why I am surprised since I use my Instant Pot for just about everything. I’ve made sous vide egg bites and cornmeal porridge for breakfast and this beautiful shrimp paella for dinner and meal prep lunches. But fish, in the pot? Yes, it can be done and it’s so awesome.

The inspiration for this recipe comes from a high school friend Katharine who informed me of a salmon recipe she created in her Instant Pot. Her method was simple yet genius. Salmon in pot with stock, herbs, and lemon juice; pressure cook, remove and add cornstarch and let cook until it thickened. Amazing sauce and fish. I was intrigued and I decided to give it a go myself.

salmon with herb on top

But there was a problem. Every single time I wanted to try the recipe, I didn’t feel like making a store run to get fresh non frozen salmon. And the week I finally bought salmon, I bought it frozen and forgot to defrost it the day I wanted to make it. Yes, fish defrost quite quickly under running water but even that felt like such a hassle. So it dawned on me, why not cook it from frozen, just like I did with the shrimp in the shrimp paella.

frozen salmom

I set it to the same cook time for 5 minutes, closed the lid, and said a prayer. Well prayer works because my salmon came out perfect! With just a 5 minute cook time, my salmon was done from frozen. My  fish was flakey and perfectly cooked, and I was able to make an amazing sauce in the same pot once done. Dinner was complete in less than 20 minutes!

The beauty with this salmon in the pressure cooker is the ability to use fresh or frozen fish. Non frozen fish will cook with a pressure cook time of about 3 minutes. Use your judgment when setting cook times for fresh or frozen fish. The thicker and bigger the filet, the longer the cook time.

salmon with fork sticking out of it

You can have fun with the herbs used in this dish as well. I've used various combos of basil, parsley, chives, and dill and it's always been delicious.

Some may have some questions about this dish and I’ve made a nice notes section for this pressure cooker salmon along with step by step photos. Of course, if you come up with new questions or love this dish, feel free to leave me a comment below. As always, enjoy 🙂

Print Recipe
4.50 from 2 votes

Pressure Cooker Salmon with Creamy Herb Parmesan Sauce

This Pressure Cooker Salmon with Creamy Herb Parmesan Sauce is the perfect quick weeknight and elegant meal. Top it with a creamy herb parmesan sauce for a quick and fancy meal.
Prep Time5 minutes mins
Cook Time15 minutes mins
Total Time20 minutes mins
Course: Main Course
Cuisine: American
Servings: 4
Calories: 655.7kcal
Author: Tanya

Ingredients

  • 4 frozen salmon filets
  • ½ cup water
  • 1.5 teaspoon minced garlic
  • ½ cup heavy cream
  • 1 cup parmesan cheese grated
  • 1 Tablespoon chopped fresh chives
  • 1 Tablespoon chopped fresh parsley
  • 1 Tablespoon fresh dill
  • 1 teaspoon fresh lemon juice
  • Salt and pepper to taste

Instructions

  • Place water and garlic in insert with trivet on top. Place salmon on top of trivet.
  • Close pressure cooker and set on Manual for 4-5 minutes.*
  • Once timer goes off, quick release the pressure. Remove salmon and trivet from the pot.
  • Turn off pressure cooker and set to Saute and adjust to Normal.
  • Once water begins to boil, whisk in the heavy cream and bring to a boil again. Allow to boil for about 2-3 minutes. The mixture should be able to stick to the back of a spoon.
  • Turn off pressure cooker and remove insert from heat. Whisk in chives, parsley, dill, parmesan cheese, and lemon juice. Salt and pepper to taste.

Notes

*Adjust time based on thickness of filet. 
Suggested Tools
Instant Pot
Trivet for Instant Pot

Nutrition

Calories: 655.7kcal

Notes on Pressure Cooker Salmon with Creamy Herb Parmesan Sauce

  • The time listed is for 4-5 minutes under high pressure for frozen salmon. Thicker bigger filets will likely need a 5 minute cook time while thinner ones will need less of a cook time. Use your judgment when setting cook times to avoid overcooked and dry fish.
  • Dry herbs can be substituted for the fresh in this recipe, just cut herb amount in half. Also, add herbs before pressure cooking if using dry herbs. Fresh herbs should be added as instructed in the recipe.
  • Broth can be used in place of water for recipe.
  • It takes about 10 minutes to reach pressure in the pressure cooker. Make sure quick release is done as soon as pressure cooker timer goes off to avoid overcooked salmon.
  • These directions are for a 6 quart Instant Pot. Please modify accordingly for bigger or smaller models.
  • Serve over pasta or rice with a side of vegetables to complete your meal.

Step by Step Photos of Pressure Cooker Salmon with Creamy Herb Parmesan Sauce

  • frozen filets in instant pot
  • instant pot display with number 5
  • top of instant pot, the valve
  • front of instant pot
  • instant pot valve switched to venting
  • cooked salmon in instant pot
  • front of instant pot with 30 displayed
  • sauce in instant pot
  • spoon with sauce on back
  • herbs in sauce in pot
  • lemon squeezed over pot
  • salmon with sauce on top

Pin Pressure Cooker Salmon with Creamy Herb Parmesan Sauce

April 23, 2018 by Tanya 3 Comments

14 Great Recipes for Air Fryers

14 Great Recipes for Air Fryers. Easy air fryer recipes for any occasion. Great list to get you to start cooking in your air fryer. #airfryer #recipe #airfryerrecipes #reciperoundup #airfryerbreakfast #airfryerchicken #airfryersteak
Everyone needs a list of great recipes for air fryers. This list has you covered for breakfast, lunch, and dinner. Here's a list of recipes to get you started. This post may contain affiliate links, please read my full disclosure here. 
 
photo of air fryer recipes and text that says 14 air fryer recipes
So you’re trying to decide if you should buy an air fryer. Believe me, I was there. I have a small kitchen and another kitchen appliance terrified me. Where would I put it? Would I actually use it? Do I really need something just to fry food without oil?
 

[Read more...]

March 20, 2018 by Tanya 21 Comments

Healthier General Tso's Chicken Recipe in the Air Fryer

This healthy general tso's chicken recipe is made in the air fryer for a healthier take on the dish. Have dinner ready in 30 minutes or less. #weeknightdinner #asiandinner #healthydinner #healthy #airfryerrecipes #airfryer #airfryerchicken #quickdinner #dinnerforbusypeople healthy general tso chicken recipe.

This Healthy General Tso's Chicken Recipe is still fried but "fried" in the air fryer and can be made in less than 30 minutes. Top it with the amazing general tso's sauce for an easy and quick weeknight dinner.

General Tso chicken on plate

This post contains affiliate links, please read my full disclaimer here.

The full recipe with ingredients/instructions is available on the recipe card at the bottom of the post. Important tips/tricks are also included in the blog post.


I have a few rules when it comes to General Tso's chicken. It must have crunch, it must have a little spice, and it must be saucy! At least that was my experience the first time I tried this dish.

It was almost 10 years ago when I first had it at a restaurant in Durham, NC during law school. I first tried this dish during a study break with friends and I fell in love.

It was also during this study break that I bit into one of the hot peppers that comes in the dish and I couldn't breathe for a good minute. The peppers are not to be eaten, the peppers are not to be eaten. I wish I knew that before I took a bite.

Despite the incident with the pepper, the dish was delicious. The chicken had the perfect crunch and the sauce was a perfect combination of sweet and salty. The depth of flavor was amazing. It's a dish that I came to love and recreate in my kitchen quite often.

Initially, my general process when creating general Tso's chicken was to batter and fry the chicken pieces until crunchy and then coat them in my sauce.

Although delicious, it became a bit cumbersome for weeknight dinners. My deep fryer broke which was a bummer and the time it took to heat oil on the stovetop just didn't fit into my tight schedule for weeknights.

So one night when my daughter requested this for dinner, a light bulb clicked in my head and I found that my Air Fryer would be the perfect fix. It became a win win because the air fryer cut the time it took to prepare the general tso chicken recipe but it also became my new healthy general tso chicken recipe since I needed no oil to fry it.

I initially purchased my air fryer to deal with a pregnancy craving I had for french fries. Well to be fair, I always crave french fries so I shouldn't blame that on pregnancy. Either way, I use my air fryer for much more than french fries and I am excited to share with you all the recipes I create in this amazing appliance.

General tso chicken in bowl with red pepper

What is an Air Fryer?

So what's an air fryer you may ask? In general, it's an appliance that recreates fried foods without actually frying the food in tons of oil. It also roasts and bakes food but its main claim to fame is the fact that it can give the same texture as fried foods without using a ton of oil.

It's a healthier option for home cooks who desire the delicious crunch that comes with fried foods but not the delicious calories and fat. It also tends to have a quicker cook time than many foods that are typically baked in the oven.

With help of my air fryer, I create this dish in less than 30 minutes. That's right, I use the air fryer to prep my chicken and I create my sauce while that's going.

There are a few tips and tricks to make this recipe a success. For one, you will want to coat your chicken pieces in potato starch. It's a tip I picked up from This Old Gal. It provides the perfect crunch for the chicken pieces without changing the taste profile.

You will also want to make sure that your air fryer basket is properly oiled. I just put a little olive oil on a paper towel and rub it all over the bottom of my basket. That way the chicken pieces won't stick when frying. This is the only oil you will need for frying the chicken pieces in this recipe. How awesome is that?!?

The last tip is to shake the air fryer basket about every 5 minutes when cooking. This will ensure that your chicken pieces are evenly cooked and crisp.

The beauty of this dish is that while your chicken pieces are cooking in the air fryer, you can work on creating your sauce on the stovetop. Dump the chicken pieces into the sauce when they are done cooking for the perfect weeknight dinner.

I like to serve our healthy general tso chicken recipe with a side of white rice I make in my Instant Pot. For veggies, I serve with steamed or air fried broccoli.

I hope you enjoy this healthy General Tso Chicken recipe in the air fryer as much as we do.

Looking for other Healthy Air Fryer Recipes? Try these out...

  • Perfect Air Fryer Steak with Garlic Herb Butter
  • Healthier Cheesesteak Factory Avocado Rolls
  • Crispy Air Fryer Fish
  • Air Fryer Meatloaf
  • Thin Air Fried Pork Chops (Japanese Tonkatsu Style)
This healthy general tso's chicken recipe is made in the air fryer for a healthier take on the dish. Have dinner ready in 30 minutes or less. #weeknightdinner #asiandinner #healthydinner #healthy #airfryerrecipes #airfryer #airfryerchicken #quickdinner #dinnerforbusypeople healthy general tso chicken recipe.
Print Recipe
5 from 7 votes

Healthier General Tso's Chicken Recipe

This healthy General Tso's Chicken Recipe is still fried but "fried" in the air fryer and can be made in less than 30 minutes. Top it with the amazing general tso sauce for an easy and quick weeknight dinner.
Prep Time5 minutes mins
Cook Time25 minutes mins
Total Time30 minutes mins
Course: Main Course
Cuisine: Chinese
Servings: 4
Calories: 430kcal
Author: Tanya

Ingredients

  • 1.5-2 lbs chicken thighs, boneless and skinless cut into bite sized pieces
  • ⅓ cup potato starch
  • 1 Tablespoon vegetable oil
  • 6 dried red chillies
  • 3 green onions chopped
  • 2 teaspoon garlic minced
  • 1 teaspoon ginger minced
  • ¾ cup brown sugar
  • ½ cup chicken broth
  • ½ cup soy sauce
  • 2 Tablespoon rice vinegar
  • 1 teaspoon sesame oil
  • 1 pinch of salt
  • 2 teaspoon corn starch
  • ¼ cup water

Instructions

  • Set Air Fryer to 400 degrees Fahrenheit. Coat chicken thighs with potato starch making sure all pieces are fully covered. Use tongs to place chicken pieces in Air Fryer basket. Cook chicken pieces for 20-25 minutes until crispy, shaking basket every 5 minutes. 
  • Meanwhile, prepare sauce by heating vegetable oil in skillet over medium-high heat. Once hot, add green onions, dried chilies, garlic, and ginger and stir fry for about 1 minute, until chillies brighten in color and onions have softened. 
  • Add brown sugar, chicken broth, soy sauce, rice vinegar, sesame oil, and pinch of salt to the skillet and stir. Bring to a boil and cook for about 3 minutes. 
  • Once chicken in air fryer is finished, add to sauce and stir in. 
  • Create a thickener by whisking 2 teaspoons of corn starch in ¼ cup cold water. Stir into boiling sauce and allow to cook for about 1 minute, until sauce has thickened. 
  • Serve with rice and vegetable and Enjoy 🙂

Notes

Note for Healthy General Tso's Chicken Recipe

Break a few of the chills peppers in half before adding to skillet for a spicier dish.

Suggested Tools for Healthy General Tso's Chicken Recipe

I have this Air Fryer
You will want to coat chicken with Silicone Kitchen Tongs so coating stays on chicken when mixing and transferring to air fryer.
A skillet for making the sauce on the stove top.

Some Ingredients You Will Need

Dried Red Chillies
Potato Starch

Nutrition

Calories: 430kcal
 

Step by Step Photos of Healthy General Tso Chicken Recipe

chicken pieces covered in cornstarch
chicken pieces in air fryer basket
peppers and onions cooking in non stick skillet
sauce being made in non stick skillet
finished fried chicken pieces in air fryer basket
chicken pieces in sauce
finished chicken and sauce in skillet

Want more Chinese recipes? Try my Zucchini Mushroom Chicken Recipe.

Pin Healthy General Tso's Chicken Recipe for Later

an image of the finished dish with text that says air fryer general tso's chicken

March 13, 2018 by Tanya 173 Comments

Copycat Rice a Roni

This Copycat Rice a Roni recipe is even better than the boxed version. Make it in the Instant Pot Pressure Cooker for a hands off quick, easy, and healthy side dish. #dinner #quickdinnerrecipes #copycatrice #pressurecookerrice #myforkinglife #ricepilaf #instantpot #pressurecookersides #copycatrecipes #homemade

This Copycat Rice a Roni recipe is even better than the boxed version. Make it in the Instant Pot for a hands off quick, easy, and healthier side dish.

copycat rice a roni on plate with fork next to it

This post contains affiliate links, please read my full disclaimer here.

The full recipe with ingredients/instructions is available on the recipe card at the bottom of the post. Important tips/tricks are also included in the blog post.

You ever have a random craving for a meal from your childhood? Happens to me quite often. I'll be thinking of what to create in my kitchen and I'll get a sudden urge for a dish I hadn't had in years. That's how it was when it came to this Rice a Roni.

Even as an adult, I used to buy the flavored rice and pastas from the dried goods section of the supermarket. Once I realized that these things were full of sodium and other no no ingredients, I stopped buying them.

As a matter of fact, I discovered that it was much easier and cheaper to make flavored rice out of ingredients I already had in my pantry.

Hence this homemade copycat rice a roni was born. I recall the first time I made it to go along with a delicious steak dinner I made for hubby and myself. Apparently he used to eat rice a roni as a kid too and loved it. So I made this copycat rice a roni, plated it beside a delicious steak and asparagus dinner, and waited for the verdict.

Initially, he thought it came from the box and he claimed I doctored it up somehow because it tasted so delicious. He was in shock when I told him it wasn't from a box. As a matter of fact, he didn't believe me, still doesn't believe, and always looks in the trash for a rice a roni box as evidence when I make it.

I tend to make all my rice in my Instant Pot now and this copycat rice a roni is no different. Reason being is that with the right ratio, rice cooked in the pressure cooker always comes out perfect. I tend to walk away and forget to lower the stove when it comes to stove top rice. The pressure cooker allows me to place my ingredients in the pot, set my timer, and go on to the rest of my meal. Perfection and no more burned rice bottom.

rice in instant pot insert with wooden spoon in it

The great thing about this rice a roni is that you can prep the majority of the ingredients ahead of time. No need for a rice a roni seasoning packet when all the dry herbs and spices are in your cupboard. The only herb in this recipe that isn't dried is the parsley. Dry parsley can be substituted but fresh parsley is so much better.

I hope you enjoy this homemade copycat rice a roni as much as we do. I hope your family believes you when you tell them it's not from the box. As always, Enjoy 🙂

Looking for more Instant Pot recipes with rice? Try these out:

Pressure Cooker Shrimp Paella  

Instant Pot Chicken and Rice (Halal Cart Copycat)

Instant Pot Brown Rice

Instant Pot Dirty Rice

Instant Pot Mushroom Risotto

Instant Pot Brown Rice

Instant Pot Kale Rice

Instant Pot Rice and Beans (Jamaican Style)

Or Find All of My Pressure Cooker Recipes Here.

This Copycat Rice a Roni recipe is even better than the boxed version. Make it in the Instant Pot Pressure Cooker for a hands off quick, easy, and healthy side dish. #dinner #quickdinnerrecipes #copycatrice #pressurecookerrice #myforkinglife #ricepilaf #instantpot #pressurecookersides #copycatrecipes #homemade
Print Recipe
4.73 from 76 votes

CopyCat Rice a Roni in the Instant Pot

Copycat Rice a Roni is the perfect side dish for your dinner table. 
Prep Time10 minutes mins
Cook Time10 minutes mins
natural release10 minutes mins
Total Time20 minutes mins
Course: Side Dish
Cuisine: American
Servings: 4
Calories: 160kcal
Author: Tanya

Ingredients

  • 2 Tablespoon butter
  • 2 oz thin spaghetti noodles broken into small pieces
  • 1 cup long grain white rice
  • 1 ¼ cup chicken broth
  • ½ teaspoon dry thyme
  • ½ teaspoon minced dry onion
  • ½ teaspoon garlic powder
  • ½ teaspoon salt
  • ¼ teaspoon turmeric
  • 1 Tablespoon fresh parsley* chopped

Instructions

  • Combine dry thyme, minced dry onion, garlic powder, salt, and turmeric. Set aside. 
  • Set pressure cooker to sauté. Once Hot, add butter and let melt. Once melted, add thin spaghetti noodles and stir until toasted, about 2 minutes. 
  • Add rice and stir for about 30 seconds, until slightly toasted. 
  • Add spice mixture and chicken broth and stir, ensuring that there are no pieces stuck to the bottom. Turn off sauté mode on pressure cooker and set pressure cooker on Manual mode for 8 minutes. Cover pressure cooker, making sure valve is set to sealed.  
  • Once pressure cooking time is done, allow to natural release for 10 minutes, then quick release any remaining pressure by moving valve to "venting"
  • Open lid and add chopped parsley. Fluff with fork and Enjoy!

Video

Notes

Make sure there are no dry bits stuck to the bottom of the pot. This could result in that annoying "burn" signal some pressure cookers give off. Once you add your broth, stir with a wooden spoon to ensure there is no food stuck to the bottom. 
Basmati rice can be substituted for the long grain. 
I always rinse my rice under cold water before cooking. I started doing it out of habit because mama taught me that way. It yields a much fluffier non sticky rice. 
*If subbing dry for fresh parsley, reduce amount to 1 tsp. 

Nutrition

Calories: 160kcal

Step by Step Photos of Copycat Rice a Roni in Pressure Cooker

  • dry spices for recipe in glass bowl
  • instant pot display with finger pressing saute and display says on
  • instant pot display with the word HOT on the screen
  • butter melting in instant pot insert
  • spaghetti in instant pot insert
  • rice and spaghetti in instant pot insert
  • rice, spaghetti, and chicken broth and seasonings in insert
  • finished copycat rice a roni in instant pot insert
  • parsley in hand
  • finished rice in instant pot insert

Pin Copycat Rice a Roni for later

This Copycat Rice a Roni recipe is even better than the boxed version. Make it in the Instant Pot Pressure Cooker for a hands off quick, easy, and healthy side dish. #dinner #quickdinnerrecipes #copycatrice #pressurecookerrice #myforkinglife #ricepilaf #instantpot #pressurecookersides #copycatrecipes #homemade
  • « Previous Page
  • 1
  • …
  • 62
  • 63
  • 64
  • 65
  • 66
  • …
  • 70
  • Next Page »

Welcome!

Welcome to My Forking Life! Hi, I'm Tanya, attorney, busy wife and mom, and lover of quick, easy, and delicious meals.

More about me

Popular Recipes

  • Jamaican Oxtails Recipe
  • air fried chicken in air fryer basket
    Air Fryer Fried Chicken
  • brown stew chicken in pan
    Brown Stew Chicken
  • Pressure Cooker Shrimp Paella

Holiday Favorites

  • sweet potato pie on a plate
    Southern Sweet Potato Pie Recipe
  • spoon lifting gravy out of gravy dish
    Easy Recipe for Gravy without Drippings
  • creamy baked macaroni and cheese, the best baked macaroni and cheese, creamy mac and cheese
    Creamy Baked Macaroni and Cheese
  • Stirring the giblet gravy with a spoon.
    Grandma's Giblet Gravy Recipe
as seen on...various online websites text listed

Footer

↑ back to top
  • Privacy Policy
  • Contact
  • About Tanya

As an Amazon Associate, I earn from qualifying purchases.

Copyright © 2025 My Forking Life

Rate This Recipe

Your vote:


A rating is required
A name is required
An email is required