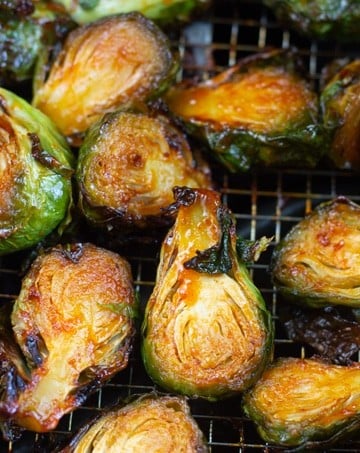
My Forking Life

  • Air Fryer
  • Jamaican
  • Entree
  • Browse Recipes
  • Breakfast
  • Side Dishes
  • About
menu icon
go to homepage
  • Air Fryer
  • Jamaican
  • Entree
  • Browse Recipes
  • Breakfast
  • Side Dishes
  • About
search icon
Homepage link
  • Air Fryer
  • Jamaican
  • Entree
  • Browse Recipes
  • Breakfast
  • Side Dishes
  • About
×
Home

September 25, 2018 by Tanya Harris 27 Comments

Air Fryer Boneless Pork Chops (Japanese Tonkatsu)

air fryer boneless pork chop on a plate

These Air Fryer Boneless Pork Chops are nice and crispy with tons of Asian flavor. Have fun with the seasonings to create your own flavor combo or just follow the recipe as stated below.

air fryer boneless pork on a plate
Full Recipe/Instructions are available in the recipe card
at the bottom of the post. You can find important tips/tricks
in the blog post.  

This post may contain affiliate links, please read my full disclosure here. 

Our Air Fryer is our go to when we are craving fried foods. Traditional frying has become a thing of the past (except when making things with loose batter). The internet has let me know that you all love your Air Fryers too which is awesome. I’ll keep the Air Fryer recipes coming 🙂

[Read more...]

September 18, 2018 by Tanya Harris 3 Comments

Pressure Cooker Lentil Soup with Sausage {Video}

final photo shot of pressure cooker lentil soup with sour cream on top

This Pressure Cooker Lentil Soup with Sausage Recipe is a delicious and hearty soup with tons of flavor. It’s a quick and easy dinner option when made in your electric pressure cooker.

final shot of pressure cooker lentil soup in a bowl

This post contains affiliate links, please read my full disclaimer here.

You’ll find the full recipe with ingredient amounts and instructions in the recipe card at the bottom of this post. Be sure to check out the blog post itself for extra tips and tricks!

This Pressure Cooker Lentil Soup with Sausage was inspired by one of our favorite soups from one of my favorite Italian restaurants, Carrabba's. Hubby had been bugging me for months to make a copycat version at home.

For months I blew him off until I finally gave in. I regret not giving in earlier because this soup is amazing and one of my favorites to make in my Instant Pot Electric Pressure Cooker.


pressure cooker lentil soup on a spoon

What exactly are lentils?

Lentils can be found in your dry bean aisle of the grocery store. They are known as “pulses” which are the edible seeds of legumes. I love to use them in cooking because they are cheap and nutritious. You can find more information about lentils here.

How long should lentils cook in a pressure cooker?

The Instant Pot Pressure Cooker option is a great way to cook dry beans without soaking and lentils comes as no exception. How long you cook lentils in the pressure cooker will depend on the type of lentils you’re cooking with and the dish you are making.

For this soup recipe, I only use brown or green lentils and cook at high pressure for 15 minutes. If I’m making lentils to use in a dish other than soup, for example tacos, then I cut the cook time down to 12 minutes.

Red lentils are a bit different as they have much faster cooktime. 12 or 15 minutes in the pressure cooker will turn red lentils into mush so I do not sub them in this recipe. 

final photo shot of pressure cooker lentil soup with sour cream on top

How to prepare lentils for pressure cooking?

The great thing about lentils is that you do not have to soak them before adding them to the pressure cooker. However, you should rinse them and inspect them to make sure there isn’t any dirt or debris in your lentils. No one wants dirty gritty soup.

How to Make Pressure Cooker Lentil Soup with Sausage

This soup is made by first sautéing your italian sausage, then adding the vegetables and giving it a quick sauté with the meat. You will then add your lentils and chicken broth and layer the diced tomatoes on top without stirring.

Anytime I make a dish in my Pressure Cooker with tomatoes, like this pressure cooker turkey chili, I layer the tomatoes on top to avoid the Instant Pot becoming scorched on the bottom. Thick sauces, like diced tomatoes, can cause the Instant Pot to scortch and possibly burn. It's better just to lay them on the top and stir once the cooking process is complete.

Can this Pressure Cooker Lentil Soup be frozen?

Yes, yes, and yes! I like to freeze this soup in quart sized freezer bags and save it for those really busy days. When I'm ready to reheat, i just remove it from my freezer and add it to my Instant Pot still frozen. I set it on 10 minutes high pressure and walk away.

frozen bag of pressure cooker lentil soup

Looking for more Instant Pot Recipes? Try these out:

  • Instant Pot Vegetable Soup
  • Pressure Cooker Turkey Chili 
  • Pressure Cooker Shrimp Paella
  • Instant Pot Chicken and Rice

pressure cooker lentil soup in a bowl
Print Recipe
5 from 3 votes

Pressure Cooker Lentil Soup with Sausage {Video}

This Pressure Cooker Lentil Soup with Sausage Recipe is a delicious and hearty soup with tons of flavor. It’s a quick and easy dinner option when made in your electric pressure cooker.
Prep Time10 minutes mins
Cook Time15 minutes mins
other20 minutes mins
Total Time45 minutes mins
Course: Soup
Cuisine: American
Keyword: pressure cooker lentil soup
Servings: 8 people
Calories: 276kcal
Author: Tanya Harris

Ingredients

  • 1 lb italian sausage ground
  • 1 large onion chopped
  • 1 stalk celery chopped
  • 1 large carrot chopped
  • 1 small zucchini chopped
  • 3 garlic cloves minced
  • 4 cups chicken broth
  • 1 cup brown or green lentils
  • 2 teaspoon dried basil
  • 1 teaspoon dried oregano
  • 2 14 ½ cans diced tomatoes undrained
  • ¼ cup fresh parsley
  • Sour cream optional
  • Parmesan cheese optional

Instructions

  • Select sauté on your Instant Pot Pressure Cooker. Once it says “HOT,” add your italian sausage to the pot and cook until brown, breaking up the meat in the process.
  • Add the onion, celery, carrot, zucchini, and garlic cloves and stir until vegetables soften a little, about 3 minutes.
  • Press “Cancel” to turn of the Instant Pot. Add the chicken broth, lentils, dried basil, and oregano to the pot and stir.
  • Pour diced tomatoes on top of the mixture. Cover Instant Pot and Pressure Cook on High Pressure for 15 minutes.
  • When timer is up, allow to natural release for 10 minutes, then release remaining pressure.
  • Add fresh parsley and stir. Salt and pepper to taste.
  • Top with sour cream or parmesan cheese.

Notes

Notes on Pressure Cooker Lentil Soup

  • You can substitute dried parsley for the fresh. Sub it by using 2 tablespoon rather than ¼ cup and add it when you add the other dried herbs. I just find that fresh parsley adds so much more flavor. 
  • This soup is great for leftovers. 

Suggested Tools for Pressure Cooker Lentil Soup

  • Electric Pressure Cooker
  • Freezer Bags

Nutrition

Calories: 276kcal | Fat: 1g

Step by step photos of Pressure Cooker Lentil Soup with Sausage

browned italian sausage for pressure cooker lentil soup
Select sauté on Instant Pot and brown sausage.
pressure cooker lentil soup with vegetables in instant pot
Add onion, celery, carrot, zucchini, and garlic to instant pot. Stir for about 3 minutes until vegetables soften a little.
pressure cooker lentil soup in instant pot with tomatoes layered on top.
Add chicken broth, dried herbs, lentils. Layer diced tomatoes on top. Do not stir in diced tomatoes. Cover Instant Pot, making sure valve is set to "sealing" and cook on high pressure for 15 minutes.
finished pressure cooker lentil soup
Once timer goes off, allow Instant Pot to natural release for 10 minutes, then quick release remaining pressure by moving the valve over to "venting." Once all the pressure is released, open the Instant Pot and add fresh parsley. Give it a stir and serve. Salt and pepper to taste and top with sour cream for the wow factor.

September 11, 2018 by Tanya Harris 15 Comments

Air Fryer Sweet and Spicy Bacon Wrapped Chicken Bites

final picture of Air fryer bacon wrapped chicken bites

This Air Fryer Bacon Wrapped Chicken is covered in a sweet and spicy rub for a quick and easy appetizer. With only 5 ingredients, this recipe is easy, delicious, and a perfect delicious appetizer.

This Air Fryer Bacon Wrapped Chicken on white plate

This post may contain affiliate links, please read my full disclosure here.

I love making appetizers in my Air Fryer. Sometimes I’ll throw some already made frozen ones in there but most of the time I opt for homemade. Some of my favorite appetizer are my Crispy Korean Air Fried Chicken Wings and my Air Fried Copycat Cheesecake Factory Avocado Rolls.

[Read more...]

September 6, 2018 by Tanya Harris 20 Comments

Creamy Pressure Cooker Pumpkin Pie Oatmeal

pressure cooker oatmeal in instant pot

This Creamy Pressure Cooker Pumpkin Pie Oatmeal is a delicious spin on traditional oatmeal. Make this quick and easy pressure cooker oatmeal in your Electric Pressure Cooker any day of the week.

oatmeal in instert with spoon sticking out

This post may contain affiliate links, please read my full disclosure here

I’ll be the first to admit that Breakfast in the morning is not always easy. But using the Instant Pot Electric Pressure Cooker for oatmeal saves the day most mornings. I can make all kinds of breakfast without standing in front of a stove stirring, tossing, and flipping anything. 

Keep reading for a super top secret way to get the pot to come to pressure quickly in this recipe.

[Read more...]

August 21, 2018 by Tanya Harris 10 Comments

White Cheddar Pressure Cooker Pasta

white cheddar pressure cooker pasta on a plate

This White Cheddar Pressure Cooker Pasta is creamy, delicious, and so easy to make in your Instant Pot Pressure Cooker. Now you can have this elegant take on macaroni and cheese can be made in less than 20 minutes in one pot.

white cheddar pressure cooker pasta on a plate

This post contains affiliate links, please read my full disclaimer here.

You’ll find the full recipe with ingredient amounts and instructions in the recipe card at the bottom of this post. Be sure to check out the blog post itself for extra tips and tricks!

I’ve always been a huge macaroni and cheese lover. Baked macaroni, stove top macaroni, slow cooker macaroni...you name it, I’ll eat it. I raved and raved all about my favorite Creamy Baked Macaroni and Cheese Recipe. And although I love this baked macaroni and cheese, I also love a good creamy stovetop pasta shell recipe.

[Read more...]

August 15, 2018 by Tanya Harris 14 Comments

Healthier Recipe for Cheesecake Factory's Avocado Egg Rolls (Air Fryer Method)

Healthier Cheesecake Avocado Egg Rolls on a platter

If you love avocado egg rolls, then you will love this healthier recipe for Cheesecake Factory's Avocado Egg Rolls. Now you can enjoy your favorite appetizer at home without all the added fat.

This post may contain affiliate links, please read my full disclosure here.

air fried egg roll being dipped in sauce

I’m a sucker for stuffing things in an egg roll and calling it an appetizer. So when I found out that Cheesecake Factory had an appetizer where they stuffed an avocado in an egg roll with a dipping sauce, I was on board.

[Read more...]

July 31, 2018 by Tanya Harris 63 Comments

Instant Pot Chicken and Rice (NY Street Cart)

instant pot chicken and rice on a plate

Enjoy the flavors of the popular New York street cart chicken (Halal Guys Copycat) right in your pressure cooker with this Instant Pot Chicken and Rice Dish. This quick and easy delicious dinner can be ready in less than 30 minutes.

instant pot chicken and rice on a plate

This post contains affiliate links, please read my full disclaimer here.

You’ll find the full recipe with ingredient amounts and instructions in the recipe card at the bottom of this post. Be sure to check out the blog post itself for extra tips and tricks!


I love New York City, especially the food. In law school, I took a trip to New York for a conference. Ask me if I remember what the actual conference was about...I don't. What I do remember is traveling with some wonderful law school colleagues, seeing Swizz Beatz on the street and asking for a pic (he was so cool about it too), partying at the 40/40 club, and standing in a long line at 3am waiting for some chicken that was sold in a cart. Yes, you read that right, I like to eat chicken at 3am. That literally was the best street food I had in my life and I knew for sure it was something that I had to recreate in my own kitchen.

MAKE NY STREET CHICKEN IN YOUR INSTANT POT

I found that my Instant Pot Pressure Cooker was the perfect vessel to recreate this dish. I’m always making one-pot meals in my Instant Pot, like my ever so popular Pressure Cooker Shrimp Paella. In fact, I use my pressure cooker so often I’ve made a whole recipe category just for you all in the recipe section of the site. 

completed instant pot chicken and rice in the pot

I adapted this street chicken and rice recipe from the Serious Eats website and perfected it for my Instant Pot. The recipe as written on their site is pretty delicious but I truly didn’t feel like marinating the meat when it came to this dish. Making this dish in the pressure cooker is perfect for a weeknight meal. 

HOW TO MAKE CHICKEN AND RICE IN THE INSTANT POT 

  • Create your white sauce

First, you'll want to make the famous white sauce for this chicken and rice dish. This sauce has a tangy yet slightly sweet taste that pairs well with the rice and chicken. Prepare this first and set it aside.

  • Brown your chicken for flavor

Then it's time for the pot. You’ll want to brown your chicken in the pot to build flavor, especially since we are skipping the traditional step of marinating the chicken. I like to set my sautè function on high to get a good caramelization. Just make sure you don’t overcrowd the pot when browning as you won’t get a nice sear. Cook your chicken thighs in batches for the best results.

  • Deglaze your pot

Next, you will have nice brown bits (they may even look a little burnt). This is fine, don’t freak out, it’s flavor! Take a bit of chicken broth and deglaze the bottom by pouring the broth into the bottom of the pot. Take a wooden spoon and scrape the bottom bits up. Make sure it’s a wooden spoon as you don’t want to scrape the bottom of your pot with metal utensils.

  • Add your onions and garlic

Next, add your onions and garlic and sauté them until the onions have softened. Make sure onions are softened a bit before adding the garlic. You don't want the garlic to burn or it will give your dish a horrid taste.

  • Add your rice...but rinse it first

Then add your rinsed rice. Rinsing your rice will allow the rice to remain fluffy and not stick to the bottom. Rinsing your rice is key for any rice dish in the Instant Pot Pressure Cooker.   

  • Add the rest of your ingredients

Add your remaining seasonings, broth, and your chicken back to the pot. Push chicken into the broth to ensure it gets fully cooked.

Set the pressure cooker for 10 minutes. Once time is up, allow it to naturally release for 10 minutes, dinner is served.

instant pot chicken and rice on a plate

Do you really have to brown the chicken in the Instant Pot first...that is the question?

Yes, yes, and yes. I get it, you may not want to but the purpose is to build flavor since you aren't marinating the meat.

I hope you enjoy this recipe as much as we do...and don't forget the sauce.

I've included step by step photos below for those who prefer those over video. Enjoy 🙂

For more photos of the operation of the Instant Pot, check out my Pressure Cooker Shrimp Paella recipe.

Other Instant Pot Recipes

  • Instant Pot Chicken and Potatoes
  • Creamy Pressure Cooker Pumpkin Pie Oatmeal
  • Sous Vide Egg Bites in the Instant Pot
  • White Cheddar Pressure Cooker Pasta
  • Southern Style Pressure Cooker Collard Greens
  • Instant Pork Chops with Gravy
instant pot chicken and rice on a plate
Print Recipe
4.75 from 28 votes

Instant Pot Chicken and Rice (NY Street Cart Style)

Enjoy the flavors of the popular New York street cart chicken (Halal Guys Copycat) right in your pressure cooker with this Instant Pot Chicken and Rice Dish. This quick and easy delicious dinner can be ready in less than 30 minutes. 
Prep Time10 minutes mins
Cook Time20 minutes mins
Total Time30 minutes mins
Course: Main Course
Cuisine: Mediterranean
Keyword: instant pot
Servings: 6 people
Calories: 575kcal
Author: Tanya Harris

Ingredients

  • 1.5 lbs chicken thighs boneless and skinless
  • 2 Tablespoon lemon juice
  • 4 Tablespoon light tasting olive oil separated
  • 1 teaspoon dried oregano
  • 1 ½ teaspoon garlic powder
  • ½ teaspoon ground coriander
  • 1 medium onion chopped
  • 3 cloves garlic chopped
  • 1 teaspoon turmeric powder
  • ½ teaspoon ground cumin
  • 1.5 cups white rice long grain or Jasmine, rinsed
  • 2 cups chicken broth separated
  • Salt and pepper to taste

White Sauce

  • ½ cup mayonnaise
  • ½ cup Greek yogurt
  • 1 Tablespoon sugar
  • 2 Tablespoon white vinegar
  • 1 teaspoon lemon juice
  • ¼ cup fresh parsley chopped
  • Kosher salt and fresh ground pepper

Instructions

  • Instructions:
  • Make the white sauce by whisking all white sauce ingredients in a medium-sized bowl. Set aside.
  • Combine chicken, lemon juice, 2 tablespoon olive oil, oregano, garlic powder, and ground coriander.
  • Set the Instant Pot to saute function. Once Instant Pot says “Hot,” add 2 tablespoon olive oil to the pot. Add 2 or 3 chicken pieces to the pot and allow to cook until browned on each side, about 3-4 minutes each side. Remove and set aside.
  • Add about ¼ cup chicken broth to the pot and use a wooden spoon to deglaze pot by stirring up brown bits. Then add onions and garlic and cook until onions have softened. Next, add turmeric powder, cumin, and rice and stir to coat rice. Add remaining chicken broth and place chicken thighs on top of rice, ensuring they are covered by the broth.
  • Turn the Instant Pot off by pressing “Cancel.” Press “Pressure cook (make sure it’s set to high pressure), set timer to 10 minutes. Place cover on Instant Pot and make sure valve is set to sealing.
  • Once the timer is up, allow Instant Pot to natural release for 10 minutes, then quick release. Open the cover and add the desired amount of salt and pepper.
  • Top chicken and rice with white sauce. Serve alongside with shredded lettuce and chopped tomatoes. Enjoy 🙂

Video


Notes

Suggested Tools for Instant Pot Chicken and Rice

  • 6 QT Instant Pot
  • wooden spoon
  • squeeze bottles for sauce

Notes on Instant Pot Chicken and Rice

  • This recipe was prepared in a 6qt Instant Pot. Please adjust accordingly for 3qt and 8qt models. 

Nutrition

Calories: 575kcal | Carbohydrates: 42g | Protein: 24g | Fat: 33g | Saturated Fat: 7g | Cholesterol: 119mg | Sodium: 503mg | Potassium: 410mg | Sugar: 3g | Vitamin A: 310IU | Vitamin C: 11.8mg | Calcium: 51mg | Iron: 1.8mg

Step by Step Photos of Instant Pot Chicken and Rice NY Street Cart Style

  • Instant pot chicken and rice white sauce in bowl
  • Raw chicken for instant pot chicken and rice covered in seasoning
  • chicken in the instant pot that has been browned
  • chicken broth over instant pot
  • onion and garlic in pot
  • rice and wodden spoon in instant pot
  • chicken in chicken broth
  • Instant Pot chicken and rice in instant pot

Pin Instant Pot Chicken and Rice for Later

pin for instant pot chicken and rice

July 24, 2018 by Tanya Harris 161 Comments

Best Banana Bread Recipe in the World

banana bread siced on plate

This by far is the best banana bread recipe in the world. No lie, it truly is.

banana bread siced on plate

You’ll find the full recipe with ingredient amounts and instructions in the recipe card at the bottom of this post. Be sure to check out the blog post itself for extra tips and tricks!

pic of Tanya

For years, I had been on the search for the best banana bread recipe in the world. I'd search the internet, find a recipe, try it out, and leave feeling "meh." Some were too crumbly. Others were too moist (Is that a thing?). A few had an off taste. At the same time, others had too many ingredients besides the banana.

So for a while, I gave up my search for the perfect banana bread recipe and just settled on buying banana bread from Starbucks, which has some pretty good banana bread.

Until this recipe. This banana bread is my all-time favorite recipe, and I've been making it for years. I think it may become your favorite, too.

♡, Tanya

I came across this recipe in Simply Recipes and decided to give it a go. It had almost 1,000 positive reviews. So, although I love the recipe, I threw in a few changes.

Why this is the Best Banana Bread Recipe in the World

Not just because I say it is, but it is, in fact, delicious, and it gets requested a ton by my family and extended family. There is enough banana taste, yet the perfect amount of sweetness to this recipe.

It also has the perfect amount of moistness. Banana bread shouldn't be too moist to the point of gummyness, but it also shouldn't be dry. There is a perfect balance, and this recipe provides just that.

It does create one single 4x8 inch loaf pan that is perfect for eating immediately or giving away to a loved one. Baking banana bread in a 4x8 loaf pan is a must in my opinion. It leads to the perfect portion size. Also, banana bread already takes nearly an hour to bake...Baking in a larger loaf pan would take longer and wouldn't result in the perfect result.

In addition to its amazing taste, it's super easy to make. I make everything in one bowl! No separation of ingredients is necessary in this banana bread recipe.

A Quick Look at the Ingredients

Ingredient amounts and full recipe instructions are on the printable recipe card at the bottom of the post.

  • Ripe Bananas – The star of the show. Use bananas with plenty of brown spots for maximum sweetness and flavor. They mash easily and create that signature banana bread moisture.
  • Unsalted Butter – Melted and mixed with the mashed bananas to create a rich base. Using unsalted gives you control over the salt level.
  • Light Brown Sugar – Packed brown sugar adds moisture and a deeper, caramel-like sweetness that complements the bananas beautifully.
  • Sour Cream – Does double duty here. It activates the baking soda (the acid reacts with it to create rise), plus adds incredible tenderness and moisture to the crumb.
  • Egg – Binds everything together and adds structure.
  • Vanilla Extract – Enhances all the flavors and adds warmth.
  • All-Purpose Flour – The foundation. Stir it in gently at the end to avoid overmixing, which can make the bread tough.
  • Baking Soda – Your leavening agent. Works with the sour cream's acidity to give the bread its lift.
  • Ground Cinnamon – Adds cozy warmth and pairs perfectly with banana.
  • Salt – Just a pinch to balance the sweetness and bring out all the flavors.

How to Make the Best Banana Bread Recipe in the WORLD

Step 1: Preheat your oven to 350 degrees Fahrenheit. Grease a 4x8 inch loaf pan and set it aside.

Step 2: Place the butter in a large microwavable bowl and microwave in 30-second increments until fully melted.

Step 3: Add the ripe bananas to the melted butter and mash them with a fork, making sure the butter coats the bananas as you mash.

Step 4: Add the baking soda, salt, brown sugar, sour cream, cinnamon, vanilla extract, and egg to the bowl. Stir everything together until well combined.

Step 5: Stir in the flour until just combined. Be careful not to overmix.

Step 6: Pour the batter into your greased loaf pan. Bake on the center rack for 50 to 60 minutes, or until a toothpick inserted in the center comes out clean.

Step 7: Remove the bread from the oven and let it cool in the pan for about 5 minutes. Then transfer it to a cooling rack to cool completely before slicing.

Here's to this delicious, easy banana bread recipe. Hope you enjoy 🙂

Looking for another way to use those leftover bananas? Try these Banana Fritters or these Banana Pancakes.

I finally found The Best Banana Recipe in the World! This Banana Bread is moist, delicious, and can be made in one bowl. #easyrecipe #bananabread #baking #onebowl #onebowlrecipes #bakingbread
Print Recipe
4.62 from 97 votes

The Best Banana Bread recipe in the World

This is the Best Banana Bread Recipe in the World. No seriously, it is.
Prep Time10 minutes mins
Cook Time1 hour hr
5 minutes mins
Total Time1 hour hr 15 minutes mins
Course: Breakfast, Dessert
Cuisine: American
Keyword: banana bread
Servings: 6
Calories: 411kcal
Author: Tanya Harris

Ingredients

  • ⅓ cup unsalted butter
  • 3 ripe bananas peeled
  • 1 teaspoon baking soda
  • Pinch of salt
  • ¾ cup brown sugar packed
  • 1 large egg
  • 1 teaspoon vanilla extract
  • 1 ½ cup All Purpose Flour
  • ½ cup sour cream
  • ½ teaspoon Ground Cinnamon

Instructions

  • Preheat oven to 350 degrees Fahrenheit. Grease a 4x8 inch loaf pan. Set aside.
  • Place butter in a large microwavable dish and place in microwave to melt. Use 30 second increments until butter is fully melted.
  • Add in ripe bananas and mash with a fork, ensure that butter coats the bananas.
  • Add baking soda, salt, brown sugar, sour cream, cinnamon, vanilla extract, and large egg to bowl. Stir to combine. Stir in the flour.
  • Pour batter into greased loaf pan. Bake in preheated oven on center rack for 50 minutes to 1 hour, or until a toothpick entered in the center comes out clean.
  • Remove from oven and allow bread to cool in pan for about 5 minutes. Then place on cooling rack to allow to cool completely. Enjoy 🙂

Video

Notes

Suggested Tools for The Best Banana Bread Recipe

4x8 inch loaf pan
Large Microwave safe mixing bowl

Nutrition

Calories: 411kcal | Carbohydrates: 65g | Protein: 5g | Fat: 15g | Saturated Fat: 9g | Cholesterol: 64mg | Sodium: 334mg | Potassium: 318mg | Fiber: 2g | Sugar: 34g | Vitamin A: 510IU | Vitamin C: 5.3mg | Calcium: 61mg | Iron: 2mg

Adapted from Simply Recipes.

Step by Step Photos of The Best Banana Bread Recipe in the World

melted butter in glass bowl
mashed banana in bowl with fork
baking soda in teaspoon over bowl
brown sugar in cup over bowl
sour cream in cup over bowl
egg in batter with wooden spoon
flour in cup over batter
batter in glass bowl
batter in baking pan
finished banana bread on cooling rack

Pin The Best Banana Bread Recipe in the World For Later

pinterest image for banana bread

July 10, 2018 by Tanya Harris 104 Comments

Crispy Korean Air Fried Chicken Wings

air fried chicken wing with green onion

This Crispy Korean Air Fried Chicken Wings recipe is delicious, sweet, sticky, and a little bit spicy. The Air Fryer provides the perfect crunch to these wings without all the added fat from frying.

air fried chicken wings with green onions

This post contains affiliate links, please read my full disclaimer here.

You’ll find the full recipe with ingredient amounts and instructions in the recipe card at the bottom of this post. Be sure to check out the blog post itself for extra tips and tricks!

So here’s a fun fact about me...I am not the biggest fan of traditional fried chicken. Only a few close friends know this fact because I live in the South and in the South, everyone loves fried chicken. However, fried chicken should be doused in a delicious sauce after it’s fried to perfection. This must be why I love Korean fried chicken so much.

*Update: My thoughts changed on traditional fried chicken after I made it in the air fryer. Air Fryer Fried Chicken is the truth!

What is Korean Fried Chicken

Korean Fried Chicken is fried chicken that has a super crunchy exterior, yet juicy interior. Therefore, the chicken is usually double fried in oil and then covered in a delicious spicy, sweet and sour type sauce. Any part of the chicken can be used to make Korean Fried Chicken.

Korean fried chicken is popular for the spicy sauce that it is covered in. The main ingredient to this sauce is a spicy Korean paste known as gochujang. The good thing about this paste is there are different heat levels. I used the mild for this recipe so I could enjoy the flavors more but the paste can be extremely spicy if you are not careful.

Why make these chicken wings in an Air Fryer?

Most Korean fried chicken is double fried in oil. Part of me wanted to find a healthier alternative but another part of me didn't want to do all that work. Blame it on the baby, work, life...but if I can simplify a delicious recipe then that's what I'm going to do.

Coating these chicken wings in cornstarch and frying them for 30 minutes in the air fryer was easy, fast, and healthy.

air fried chicken wings with green onion

How to Make Korean Air Fried Chicken Wings?

Creating Korean Air Fried Chicken Wings is easy. You don't even need to preheat the air fryer. Just set the temperature to 390 degrees, season the chicken wings, cover them in a corn starch, and cook in air fryer for 30-35 minutes.

Make sure when coating the chicken wings with cornstarch, that you shake off the cornstarch from each piece really well. You want the chicken wings to be completely covered but you don’t want too much excess corn starch. Pick up each chicken piece with a pair of tongs, tap it against the side of your bowl before placing it in the air fryer basket.

As with any air fryer recipe, make sure the bottom of your air fryer basket is properly seasoned with oil so your chicken does not stick.

Never use aresole can sprays in your air fryer. Invest in a good quality spray oil bottle. I use this brand.

close up of an air fried chicken wing

As always, enjoy.

If you like this recipe, check out my general Air Fryer Chicken Wings from Fresh or Frozen post or my Honey Mustard Chicken Wings recipe.

Notes on Korean Air Fried Chicken Wings

  • The sauce provided in this recipe is enough to lightly coat 2 lbs of chicken wings. If you desire more sauce, feel free to double the sauce ingredients.  
  • I’d suggest serving Korean Air Fried Chicken with a nice quick pickled carrot.
air fried chicken wing with green onion
Print Recipe
4.84 from 43 votes

Korean Air Fried Chicken Wings

These Korean Chicken Wings are made in an air fryer with no oil. Just as tasty as the deep fried version but much healthier. 
Prep Time10 minutes mins
Cook Time30 minutes mins
Total Time40 minutes mins
Course: Appetizer
Cuisine: korean
Keyword: Korean air fryer chicken wings
Servings: 4 people
Calories: 451kcal
Author: Tanya Harris

Ingredients

  • 2 lbs chicken wings
  • ¾ cup corn starch
  • 1 teaspoon garlic powder
  • 1 teaspoon onion powder
  • ½ teaspoon salt

Korean Air Fried Chicken Sauce

  • 2 Tablespoon gochujang Korean chilli paste
  • 3 Tablespoon honey
  • 2 Tablespoon brown sugar
  • 1 Tablespoon soy sauce
  • 1 teaspoon ginger minced
  • 1 teaspoon garlic minced
  • ½ teaspoon salt

Instructions

  • Rinse and dry chicken wings with a paper towel. Place in a large bowl and season with garlic powder, onion powder, and ½ teaspoon salt.
  • Cover chicken with corn starch and use kitchen tongs to stir, ensuring all chicken pieces are coated. Tap each piece of chicken on the side of the bowl (to remove excess starch) and place it in the air fryer basket.
  • Close the basket and cook chicken wings at 390 degrees Fahrenheit for 30 minutes, turning and rotating chicken about every 10 minutes.
  • While the chicken is cooking, make the sauce.

Korean Air Fried Chicken Sauce

  • Add the sauce ingredients into a small saucepan over medium heat and whisk until combined. Bring the sauce to a boil and reduce the heat to low and simmer for 5 minutes. Remove from heat and set aside.
  • Once chicken is done cooking, add sauce to the wings and toss to cover all wings. Enjoy 🙂

Video

Notes

*Oil may be used to spray and coat the chicken pieces if cornstarch still appears on chicken after frying. It can be done without oil as the chicken will produce it's own oil once cooking.

Suggested Tools for Korean Air Fried Chicken

Air Fryer
Kitchen Tongs
Large Bowl

Nutrition

Calories: 451kcal | Carbohydrates: 44g | Protein: 23g | Fat: 19g | Saturated Fat: 5g | Cholesterol: 94mg | Sodium: 929mg | Potassium: 241mg | Sugar: 19g | Vitamin A: 195IU | Vitamin C: 2.5mg | Calcium: 20mg | Iron: 1.5mg

Step by Step Photos of Korean Air Fried Chicken Wings

  • chicken wings covered in cornstarch
  • tongs picking up chicken shaking off excess cornstarch
  • chicken wings in air fryer basket
  • sauce cooking in saucepan
  • cooked chicken wings in air fryer basket
  • chicken wings covered in sauce

Pin Korean Air Fried Chicken Wings for Later

Looking for more Air Fryer recipes? Try my Perfect Air Fryer Steak or Healthier General Tso's Chicken in the Air Fryer.

pinterest image of crispy air fried chicken wings

July 7, 2018 by Tanya Harris 24 Comments

Jamaican Style Carrot Juice Recipe

jamaican style carrot juice recipe

This Jamaican Style Carrot Juice Recipe is a refreshing yet sweet treat. One of my favorite drinks when growing up in Jamaica.

jamaican style carrot juice recipe in a glass

This post contains affiliate links, please read my full disclaimer here.

You’ll find the full recipe with ingredient amounts and instructions in the recipe card at the bottom of this post. Be sure to check out the blog post itself for extra tips and tricks!

Growing up, carrots were one of my favorite vegetables to eat—not the cooked carrots, but a regular raw carrot right out of the bag. I'd grab one, sit in front of the TV, watch my cartoons, and chew on the carrot. I wanted to be Bugs Bunny.

A little birdie also told me that carrots were really good for eyesight so as a kid, I made sure I ate at least 2 a day. I still don't need glassess...I'll give props to the carrots and that little birdie.

Growing up, while I wasn't eating all the carrots in the house, I would also get to enjoy this Jamaican Style Carrot Juice. It wasn't made too often in the house, but when it was made, it was a true treat.

Now, this isn't your typical carrot juice recipe. It's a bit thicker and sweetened with condensed milk and other spices. So, in other words, it ain't the healthiest drink on the block. But seriously, who cares? It's delicious, and it does have a vegetable in it.

Ingredients for Carrot Juice

  • Carrots - rinsed and cleaned. It's up to you whether to peel them. If they aren't organic, I tend to peel them.
  • Water - this will help when blending the carrots to make the juice.
  • Condensed milk, nutmeg, and vanilla extract - this adds sweetness and flavor to the carrot juice.
jamaican style carrot juice recipe photo from up top

How to make Jamaican Style Carrot Juice with step by step Photos

Peel and chop carrots, then add them to to blender with water and blend until smooth. Strain the liquid into a jar.

carrots in water.
Place carrots in blender and cover with water. blend for about 2 minutes
carrots in strainer.
Place strainer over pitcher and pour carrot mixture in strainer. Allow to completely stain.

Add condensed milk, vanilla extract, and nutmeg to the jar and serve. Pour into a pitcher and refrigerate or serve over ice. Enjoy 🙂

condensed milk being poured.
Sweeten carrot juice with condensed milk

This Jamaican Style Carrot Juice Recipe is a breeze to make. All you need is a blender, a strainer , a bag of carrots, a can of condensed milk, vanilla extract, and nutmeg. Serve it over ice for a nice refreshing drink. Ya mon.

Want more Jamaican Recipes?? Check out my Jamaican Sorrel Drink,  Instantpot Jamaican Cornmeal Porridge , Corned Beef and Cabbage - Jamaican Style and these Jamaican Banana Fritters. 

Notes on Jamaican Style Carrot Juice Recipe

  • You will need a pretty good blender for this recipe. I love love love my Red Vitamix Blender that my hubby got me for Christmas.
  • This drink is pretty sweet, depending on how much of the sweetened condensed milk you add. However, the other spices give it a spice-filled taste.
  • Feel free to add a good splash of rum to this recipe. Yes, I like to add rum to certain drinks, rum added to this one is really good.
jamaican style carrot juice recipe
Print Recipe
4.77 from 13 votes

Jamaican Style Carrot Juice Recipe

Prep Time10 minutes mins
Total Time10 minutes mins
Course: Drinks
Cuisine: Caribbean
Servings: 8 people
Calories: 49kcal
Author: Tanya Harris

Ingredients

  • 2 lbs carrots
  • 5 cups water
  • 1 14oz can condensed milk
  • 1 teaspoon vanilla extract
  • ½ teaspoon nutmeg
  • rum optional

Instructions

  • Peel and chop carrots into 2-inch pieces. Add to blender with 5 cups of water and blend for about 2 minutes. 
  • Place strainer over pitcher and pour mixture into strainer, allowing juice to fall into pitcher and carrot puree to remain in strainer. Discard (or save for another use) carrot puree in a strainer. 
  • Add condensed milk, vanilla extract, and nutmeg to pitcher and serve. Refrigerate or serve over ice. Enjoy 🙂

Notes

  • This drink is pretty sweet, depending on how much of the sweetened condensed milk you add. However, the other spices give it a spice-filled taste.
  • Feel free to add a good splash of rum to this recipe. Yes, I like to add rum to certain drinks, rum added to this one is delicious.

Nutrition

Calories: 49kcal | Carbohydrates: 11g | Protein: 1g | Fat: 0.3g | Saturated Fat: 0.1g | Polyunsaturated Fat: 0.1g | Monounsaturated Fat: 0.02g | Sodium: 86mg | Potassium: 364mg | Fiber: 3g | Sugar: 5g | Vitamin A: 18944IU | Vitamin C: 7mg | Calcium: 42mg | Iron: 0.3mg

Pin Jamaican Style Carrot Juice Recipe for Later

pin image showing Jamaican carrot juice with text that says Jamaican Carrot Juice
  • « Previous Page
  • 1
  • …
  • 64
  • 65
  • 66
  • 67
  • 68
  • …
  • 72
  • Next Page »
tanya holding bowl and mixing

Welcome!

Welcome to My Forking Life! Hi, I'm Tanya, an attorney, busy wife and mom, and lover of quick, easy, and delicious meals.

More about me

Popular Recipes

  • Jamaican Oxtails Recipe
  • Air fryer fried chicken on a white platter
    Air Fryer Fried Chicken
  • brown stew chicken in pan
    Brown Stew Chicken
  • Jamaican Instant Pot Rice and Beans

Holiday Favorites

  • sweet potato pie on a plate
    Southern Sweet Potato Pie Recipe
  • spoon lifting gravy out of gravy dish
    Easy Recipe for Gravy without Drippings
  • Stirring the giblet gravy with a spoon.
    Grandma's Giblet Gravy Recipe
  • creamy baked macaroni and cheese, the best baked macaroni and cheese, creamy mac and cheese
    Creamy Baked Macaroni and Cheese
as seen on...various online websites text listed

Footer

↑ back to top
  • Privacy Policy
  • Contact
  • About Tanya

As an Amazon Associate, I earn from qualifying purchases.

Copyright © 2025 My Forking Life

Rate This Recipe

Your vote:


Let us know what you thought of this recipe:

This worked exactly as written, thanks!
My family loved this!
Thank you for sharing this recipe

Or write in your own words:

A rating is required
A name is required
An email is required