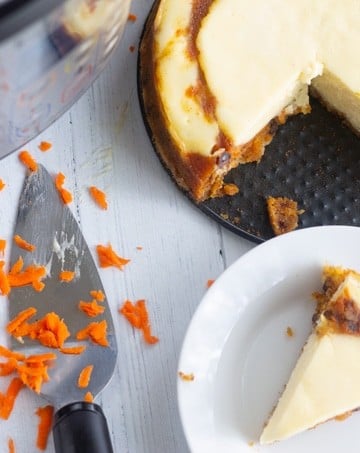
My Forking Life

  • Air Fryer
  • Pressure Cooker
  • Jamaican
  • Browse Recipes
  • Breakfast
  • Entree
  • Side Dishes
  • About
menu icon
go to homepage
  • Air Fryer
  • Pressure Cooker
  • Jamaican
  • Browse Recipes
  • Breakfast
  • Entree
  • Side Dishes
  • About
search icon
Homepage link
  • Air Fryer
  • Pressure Cooker
  • Jamaican
  • Browse Recipes
  • Breakfast
  • Entree
  • Side Dishes
  • About
×
Home » Recipe Index

Pressure Cooker Shrimp Paella

March 27, 2017 by Tanya 209 Comments

This pressure cooker shrimp paella made in my Instant Pot Pressure Cooker will knock your socks off. And if you're not wearing socks, It'll make your toes curl. Not only does it have tons of flavor, it comes together so quickly with only a five minute high pressure cook time in the Instant Pot.

pressure cooker shrimp paella on a purple plate

This post contains affiliate links, please read my full disclaimer here.

Full Recipe Ingredients/Instructions are available in the 
recipe card at the bottom of the post. 
You can find important tips/tricks in the
blog post.

I'm bizack with another Instant Pot recipe...and I'm super excited to share this one because it's such a quick and easy meal.

Although I love to cook, most weeknights I'm exhausted and I'd rather not stand in front of the stove. I'd rather not dirty up pots and pans. I'd rather order out but then my bank account says "no ma'am."

It's days like that that recipes in my Instant Pot are so important. If you haven't gotten an Instant Pot yet, you're so missing out. It is one of my all time favorite kitchen appliances, outside of my oven.

I go on and on about it in my post of Instant Pot Jamaican Cornmeal Porridge so I won't do that again here. But for those that don't know, it's an electronic pressure cooker that pretty much cuts cooking time in half.

It has a sauté function that makes it great for browning meats and softening onions that are part of meals.

pressure cooker shrimp paella on a plate

Alrighty, so about this Instant Pot pressure cooker shrimp paella. Well I always keep a bag of raw frozen shrimp in our freezer at home. I love frozen shrimp because the defrost time is so quick and the cook time of shrimp is so fast.

The great thing about this recipe is that you don't even have to defrost the shrimp. It's a literally a throw it in the pot kind of recipe. And if you prep your ingredients ahead of time by chopping the onions, peppers, and garlic...well my friend, you may break the record for the quickest dinner on the table.

Your family will love this Pressure Cooker Shrimp Paella

I remember the first time I made this for my family, my daughter literally was shocked and thought I ordered out and didn't tell her. She couldn't believe how quickly dinner was done. I just told her I was Super Mom. She was indeed impressed.

pressure cooker shrimp paella on a purple plate

People don't generally think of cooking shrimp in the pressure cooker. That makes sense because shrimp cooks quickly and if it's not done right it can lead to a rubbery mess.

The key to avoiding this of course is a short cooking time and using jumbo frozen shrimp with shell on. This will ensure your shrimp is perfectly cooked.

The only slight annoyance with this recipe is the taking the shell off after cooking and before serving. Honestly, it's up to you how you handle that part. On days I'm really tired, hubby and daughter are on their own when it comes to taking off the shells. On other days, I remove it for them so I don't hear their whining.

I've include step by step photos of how to cook this meal in the Instant Pot. I remember when I first got my Instant Pot I was lost on how to operate it. After pressing buttons and reading the manual 4 times, I figured it out. Well, as always, Enjoy 🙂

Pin Pressure Cooker Shrimp Paella for Later 🙂

pressure cooker shrimp paella pinterest image

Looking for more Pressure Cooker Recipes? Try these out:

Instant Pot Chicken and Rice (NY Street Cart)

Pressure Cooker Turkey Chili

Instant Pot Salmon with Creamy Herb Sauce

Southern Style Pressure Cooker Collard Greens

Print Recipe
4.48 from 87 votes

Instant Pot Pressure Cooker Shrimp Paella

Make this Pressure Cooker Shrimp Paella in your Instant Pot for an easy and quick dinner. With only 5 minutes of pressure cooking time, this recipe is perfect for any night.
Prep Time10 minutes mins
Cook Time5 minutes mins
Total Time15 minutes mins
Course: Main Course
Cuisine: American
Keyword: pressure cooker shrimp paella
Servings: 4
Calories: 318kcal
Author: Tanya

Ingredients

  • 1 lb jumbo shrimp, shell and tail on frozen
  • 1 cup Jasmine rice
  • 4 Tablespoon butter
  • 1 onion chopped
  • 4 cloves garlic chopped
  • 1 red pepper chopped
  • 1 cup chicken broth
  • ½ cup white wine
  • 1 teaspoon paprika
  • 1 teaspoon turmeric
  • ½ teaspoon salt
  • ¼ teaspoon black pepper
  • 1 pinch saffron threads
  • ¼ teaspoon red pepper flakes
  • ¼ cup cilantro optional

Instructions

  • Set Instant Pot to Saute function. Add butter to pot and melt. Add onions and cook until softened. Add garlic and cook for about a minute more. 
    Add paprika, turmeric, salt, black pepper, red pepper flakes, and saffron threads. Stir and cook for about 1 minute. Add red peppers. 
    Add rice and stir. Cook for about 30 seconds to 1 minute. Add chicken broth and white wine. Deglaze your pot by stirring to ensure that there is no food stuck to the bottom of the pot.  
    Add shrimp on top. Turn off Instant Pot and cover. Make sure valve is set to sealing. 
    Set Instant Pot to Manual Mode and set a 5 minute timer. When done, quick release. 
    Remove shrimp from pot and peel if desired. Serve with Cilantro. 

Video

Notes

  • Make sure there are no dry bits stuck to the bottom of the pot. This could result in that annoying "burn" signal some pressure cookers give off. Once you add your broth (but before you place frozen shrimp on top), stir with a wooden spoon to ensure there is no food stuck to the bottom. 
  • This recipe was prepared in a 6qt Instant Pot. Please adjust accordingly for 3qt and 8qt models. 

Nutrition

Calories: 318kcal

Shop this Recipe

Notes on Pressure Cooker Shrimp Paella

  • Use raw jumbo frozen shrimp with the shell on. This will ensure that your shrimp is not overcooked and your rice cooks perfectly. If you don't have jumbo shrimp or it's not frozen, then you will need to cook the shrimp seperatley.
  • Make sure to deglaze your pot after the rice is added. Any food stuck to the bottom of an Instant Pot may cause the "burn signal to appear."
  • This recipe can be modified with many different vegetable or meat additions. There are some great modifications on the comments below.
  • Rinsed rice...I find this is a must in every rice recipe I make.

Step by Step Photos of Instant Pot Pressure Cooker Shrimp Paella

Instant Pot Pressure Cooker Shrimp Paella. Quick and easy recipe. Only 5 minutes of pressure cooking time.
Press Sauté button on Instant Pot. It will automatically say 30 minutes. No need to adjust the time.
Instant Pot Pressure Cooker Shrimp Paella. Quick and easy recipe. Only 5 minutes of pressure cooking time.
When Instant Pot says Hot, you are ready to add your ingredients. Add butter to melt.
Instant Pot Pressure Cooker Shrimp Paella. Quick and easy recipe. Only 5 minutes of pressure cooking time.
Add onions and stir. Cook until softened, about 3 minutes.
Instant Pot Pressure Cooker Shrimp Paella. Quick and easy recipe. Only 5 minutes of pressure cooking time.
Add garlic. Stir and cook for about 1 minute.
Instant Pot Pressure Cooker Shrimp Paella. Quick and easy recipe. Only 5 minutes of pressure cooking time.
Add spices and stir, cooking for about 1 minute.
Instant Pot Pressure Cooker Shrimp Paella. Quick and easy recipe. Only 5 minutes of pressure cooking time.
Add red peppers and rice and stir, Leaving to cook for about 1 minute.
Instant Pot Pressure Cooker Shrimp Paella. Quick and easy recipe. Only 5 minutes of pressure cooking time.
Add wine and chicken broth. Make sure the rice is all covered.
Instant Pot Pressure Cooker Shrimp Paella. Quick and easy recipe. Only 5 minutes of pressure cooking time.
Add frozen shrimp to the top, shells and tails on. Do not stir!
Instant Pot Pressure Cooker Shrimp Paella. Quick and easy recipe. Only 5 minutes of pressure cooking time.
Turn the Instant Pot Off.
Instant Pot Pressure Cooker Shrimp Paella. Quick and easy recipe. Only 5 minutes of pressure cooking time.
Cover the Instant Pot, making sure the dial is turned to "Sealing."
Instant Pot Pressure Cooker Shrimp Paella. Quick and easy recipe. Only 5 minutes of pressure cooking time.
Select the Manual Button and Adust the time to 5 by pressing the minus (-) button. This is how you start the Instant Pot and pressure will begin to build. The screen will then say "On" while pressure is building before the timer starts.
Instant Pot Pressure Cooker Shrimp Paella. Quick and easy recipe. Only 5 minutes of pressure cooking time.
Once the timer is done, your Instant Pot will beep and your screen will look like this. This is when your natural release timer starts if you want to use it. We won't be using natural release for this recipe.
Instant Pot Pressure Cooker Shrimp Paella. Quick and easy recipe. Only 5 minutes of pressure cooking time.
Move the dial to the left or the right to "Venting" to let the pressure and steam escape. This is known as a "quick release."
Instant Pot Pressure Cooker Shrimp Paella. Quick and easy recipe. Only 5 minutes of pressure cooking time.
DO NOT OPEN THE INSTANT POT WHEN THAT LITTLE METAL CIRCLE IS UP. Too much pressure is in the pot. Once the little metal circle is completely down is when you can take off the cover.
Instant Pot Pressure Cooker Shrimp Paella. Quick and easy recipe. Only 5 minutes of pressure cooking time.
When the little metal circle is all the way down, your Instant Pot is ready to open.
Instant Pot Pressure Cooker Shrimp Paella. Quick and easy recipe. Only 5 minutes of pressure cooking time.
All done. You may remove shrimp and top and peel before serving.

Adapted from Health Starts in the Kitchen.

Cinnabon Waffles Recipe + Hello Spring

March 20, 2017 by Tanya 26 Comments

These Cinnabon Waffles are a great twist on the typical Cinnamon roll. Great for brunch. Great for breakfast.

This Cinnabon Waffles Recipe is delicious and easy to make. Enjoy this sweet treat in celebration of Spring.

cinnabon waffles on white plate

This post contains affiliate links, please read my full disclaimer here.

Full Recipe Ingredients/Instructions are available in the 
recipe card at the bottom of the post. 
You can find important tips/tricks in the
blog post.

So Spring is here! Hooray! Other than my allergies acting a fool, I love Spring because it means we are one season closer to my favorite season, Summer! Another cool thing about Spring are all the cool foodie holidays that happen during this time. In honor of these foodie Holiday recipes, I've included a few recipes from a few other bloggers below.

National Waffle Day is on March 25th and I decided to represent with this Cinnabon Waffle Recipe!!! Why a Cinnabon Waffle?? Well I  love, love, love, love Cinnabons. They are my favorite mall treat. I love them so much that one time, on a road trip home from Maryland, I made my husband get off the highway because I swore I saw a Cinnabon sign. Well...there was no Cinnabon off that exit, apparently no sign, and 10 minutes added to our trip. Oooops. It was at that time that I realized I had it bad for this sweet treat.

I've actually made copycat Cinnabons from scratch a few times but in order to get the dough just like I like it, it takes a whole lot of mixing and rising which means a whole lotta waiting. So I needed a faster fix and decided using my waffle iron would be much better.

waffle batter in waffle iron

I tend to make this Cinnabon Waffles recipe alone or with a side of fried chicken for some good ol' Chicken and Waffles. Great thing is if I make them for dinner, I just pack up any leftover waffle batter and enjoy waffles for breakfast too.

cooked waffle in waffle iron

This recipe does take a few steps but the results are the perfect waffle for Waffle Day. Perfectly waffled waffles with a brown sugar topping and cream cheese glaze. So yum.

Thbutter covered with sugar and cinnamon

For brown sugar topping

Don't forget to check out some of the other post for some other great foodie holiday recipes. Until next time...

syrup being poured on waffle on white plate

Notes on Cinnabon Waffles Recipe

  1. You can use almond milk or regular milk. I've used both with no problems.
  2. Prior to making these waffles, preheat oven to 250 degrees. Once waffles are done, place on baking sheet in preheated oven to keep waffles warm.
  3. These are so good with a nice tall glass of milk.

Looking for more breakfast recipes? Try my Pumpkin Waffles, Pressure Cooker Bread Pudding or Creamy Instant Pot Cheddar and Jalapeño Grits. 

These Cinnabon Waffles are a great twist on the typical Cinnamon roll. Great for brunch. Great for breakfast.
Print Recipe
5 from 8 votes

Cinnabon Waffles

Prep Time20 minutes mins
Cook Time10 minutes mins
Total Time30 minutes mins
Course: Breakfast
Servings: 8
Calories: 554.5kcal
Author: Tanya

Ingredients

  • 1 ¾ cup all purpose flour
  • 1 Tablespoon baking powder
  • 1 Tablespoon sugar
  • 1 teaspoon cinnamon
  • ½ teaspoon salt
  • 1 teaspoon vanilla extract
  • 3 eggs
  • ½ cup butter melted
  • 1 ½ cup milk

Cinnamon Sugar Topping

  • ½ cup butter
  • ¾ cup brown sugar
  • 1 Tablespoon cinnamon

Cream Cheese Topping

  • 4 Tablespoon butter
  • 2 ounces cream cheese
  • ¾ cup powdered sugar
  • ½ teaspoon vanilla extract
  • 2 Tablespoon milk

Instructions

  • Combine all purpose flour, sugar, salt, and cinnamon in a bowl. Set aside.
    Separate eggs, placing egg whites in a mixing bowl and whip egg whites until stiff peaks form.
    In another bowl, combine egg yolks, vanilla extract, melted butter, and milk and stir. Add dry ingredients and stir until combined.
    Fold in egg whites until egg whites disappear in batter.
    Place on preheated waffle iron and cook until done.
    Assemble waffle by topping with cinnamon sugar and cream cheese toppings. Enjoy 🙂

Cinnamon Sugar Topping

  • Place butter, brown sugar, and cinnamon in a pan over medium-low heat. Stir until butter melts and mixture starts to slightly bubble. Remove from heat. 

Cream Cheese Topping

  • Mix butter and cream cheese together with mixer until combined and fluffy. Add powdered sugar, vanilla, and milk.

Nutrition

Calories: 554.5kcal

Hello Spring Collab Recipes

March 20th National Ravioli Day

Biscuits & Savvy | Spinach Ravioli with Ricotta Bacon Filling

March 23rd National Chips and Dip Day

Stay Snatched | Smoked Cheddar Jalapeno Bacon Dip

March 27th National World Whiskey Day

March 30th National Turkey Neck Soup Day

Pin Cinnabon Waffles Recipe for Later

an image made for pinterest with waffles on top and syrup being poured on waddles on the bottom.

Beet Carrot Apple Juice

March 16, 2017 by Tanya 11 Comments

This 3 Ingredient Beet Apple Carrot Juice Recipe is a delicious and healthy drink. Beets have a ton of health benefits and this is a great way to get it in your diet. Vegan friendly juice.

This Beet Apple Carrot Juice is one of my favorite juice recipes. Yes, raw beets can be delicious!

beet juice in a glass

This post contains affiliate links, please read my full disclaimer here.

Full Recipe Ingredients/Instructions are available in the 
recipe card at the bottom of the post. 
You can find important tips/tricks in the
blog post.

The first time I had beets, which wasn't that long ago, I thought they were the grossest thing on the planet. Seriously, I wondered why anyone would even consider eating them. Granted, the beets I tried were pickled and I ate them by themselves. So for a while, I left the beets alone.

Then one day, I was reading...as I tend to do often because I'm a smarty pants, and discovered that beets have a ton of health benefits. Like a freaking ton. And since I'm on this whole healthy kick in my life (except for the fact that I've been test baking macarons every night), I decided I was going to have to find a way to get beets in my belly, other than pickled of course. Hence the creation of this Beets Apple Carrot Juice recipe.

ingredients for beet juice on white counter

I played around with a lot of different ingredients when it came to creating beet juice. The first time I had way too many things added and decided to keep it simple with what was in my kitchen at the time, which happened to be beets, carrots, and Honeycrisp apples. Once I mixed these together, I was surprised by how delicious it was and it became my go-to breakfast drink.

Side Effects of Beet Juice

Now of course, there were a few...umm, complications when it came to drinking this beet juice. First, this beet apple carrot juice causes a little stomach discomfort initially. Oh heck, I'll call it what it is...It causes gas. My hubby seriously threatened to leave and I provided so much laughter to my daughter when I started drinking this juice. Now I can't be sure if this was caused totally by the beet juice or the fact that I started eating fruits and vegetables like crazy. If your body isn't used to tons of healthy food, it may react like that initially. I no longer have this problem if anyone was wondering.

Also, be prepared for your...umm...bodily waste to turn red. Don't freak out., it's normal and won't last that long. Again, your body has to get used to all the beet love. Other than those weird occurrences, beets are great!!!

beet juice being poured into glass from juicer

Health Benefits of Beet Carrot Apple Juice

So what about those health benefits of this beet apple carrot juice you may ask? Here's a nice list for ya

  1. Beet juice lowers blood pressure and is good for overall heart health. According to Web MD, beet juice can lower blood pressure immediately after consumption.
  2. Beets are known to decrease the risk of spinal defects and brain delay in the fetus for pregnant women.
  3. Carrots are known to help with heart health as well as vision. I talk a little more about carrots here in my Jamaican Style Carrot Juice. Not as healthy but oh so good.
  4. An apple a day keeps the doctor away. ok, not really true but apples have a ton of health benefits as well.
  5. This juice is not recommended for anyone that suffers from kidney stones as beets and other oxalate-rich food should be eaten with caution.

Can I make Beet Carrot Apple Juice in a Juicer or Blender...That is the Question??

Both work wonderfully...however, if you decide to blend...I'd use a high quality blender and strain the juice afterwards.

Well, I hope you like this beets carrot apple juice recipe as much as I do. I'll be sure to continue to include more healthy (and non healthy...I love my sweets man) recipes in the coming weeks. Until next time...

Looking for more beet recipes? Try these beet chips or these sautéed beet greens.

This 3 Ingredient Beet Apple Carrot Juice Recipe is a delicious and healthy drink. Beets have a ton of health benefits and this is a great way to get it in your diet. Vegan friendly juice.
Print Recipe
5 from 15 votes

Beet Apple Carrot Juice

This 3 Ingredient Beet Apple Carrot Juice Recipe is a delicious and healthy drink. Beets have a ton of health benefits and this is a great way to get it in your diet.  
Prep Time10 minutes mins
Course: Breakfast
Cuisine: American
Keyword: beet carrot apple juice
Servings: 2
Calories: 170.5kcal
Author: Tanya

Ingredients

  • 2 medium beet roots peeled
  • 2 medium carrots stems removed
  • 2 large honey crisp apples seeds removed

Instructions

  • Add ingredients to a juicer. Stir and enjoy. 

Nutrition

Calories: 170.5kcal

Notes on Beet Carrot Apple Juice

  • Please use Honey Crisp or a similar juicy sweet apple. This is what gives the juice a sweet delicious taste.
  • This juice can be made with a juicer or a blender. If you're making with a blender, add a tiny bit of fruit juice or water and blend. Pour through a strainer and enjoy.
  • If your juicer is old school like mine and you have a thick consistency on top, either run through a strainer or stir juice before drinking.
  • Beets stain...so be careful when peeling because your hands will turn red, would hate to get that on your clothes.

Pin Beet Carrot Apple Juice Recipe for Later

pinterest image of beet juice on top and ingredients for beet juice on the bottom

Balsamic Strawberries and the Quick Sweet Treats Ebook

March 15, 2017 by Tanya Leave a Comment

balsamic strawberries

Balsamic Straweberries and The Quick Sweet Treats Ebook.

balsamic strawberries in glass bowl with whipped cream on top and title saying Quick sweet treats with image of knife, spoon, and fork and text that says Tanya at My forking life

This post contains affiliate links, please read my full disclaimer here.

So the time has come for me to reveal my Ebook. Well...this ebook was revealed a while ago and silly me forgot to promote it. My loyal email subscribers all have their copies and I hope they love it. I know I do...it's my baby.

How can you get one? By subscribing to my email list you will get a copy sent to you.

Benefits of subscribing by email? Other than this cool free ebook, you'll get notified whenever I post a new recipe. Also, if life will let me be great, I plan on doing a monthly newsletter. No worries, I won't spam you.

So where's the recipe you may ask. I'll post this Strawberry Balsamic Strawberries recipe here. You can find this recipe and other Quick Sweet Treats in the ebook.

Why Quick Seet Treats. So you may have noticed, I don't have tons of baked goods and sweet treats on the blog. It's not that I don't love making them, I really do...but there is this thing called time that just won't let me be great. I don't have enough of it. And I like my sweets and desserts. So I figured I would share a few desserts I like to make when I need something quick and in a hurry.

Why an ebook? Because I've wanted to make one forever and think they are pretty cool. Plus the fact that you can access them offline means a lot. Like seriously, imagine if that power went out and all the cell signals were down and you really needed dessert, That quick sweet treats ebook could really save the day.

Thank you again for your support. Oh yea, Happy 1 year Bloggerversary to My Forking Life!! Woo hoo!

balsamic strawberries
Print Recipe
No ratings yet

Balsamic Strawberries

Prep Time1 hour hr
Calories: 56kcal
Author: Tanya

Ingredients

  • 10 fresh strawberries Stemmed and Cut in half
  • ½ Tablespoon balsamic vinegar
  • 1 teaspoon white sugar
  • pinch of freshly ground black pepper

Instructions

  • Add strawberries, balsamic vinegar, sugar, and black pepper to a bowl. Stir to combine making sure strawberries are fully coated. 
    Cover and leave at room temperature for 1 hour. 
    Eat as is or serve with vanilla ice cream or whipped cream. 

Nutrition

Calories: 56kcal

Chocolate Chip Pecan Cookie Recipe

March 13, 2017 by Tanya 4 Comments

Chocolate chip pecan cookie recipes. Thin and crispy cookies with a chewy middle. Bake these and have them with milk.

This Chocolate Chip Pecan Cookie Recipe is a delicious treat. They are thin, crispy, and yummy.

hand picking up chocolate chip cookie from stack of chocolate chip precan cookies

This Chocolate Chip Pecan Cookie Recipe quickly became a favorite in our household. These are so thin, so crispy, so chewy, and so yummy. There are different kind of cookie lovers in the World. Those who like the fluffy cookie, like my Easy Pumpkin Cookie Recipe, or those who like the crispy on the outside and chewy in the middle cookie. In our house, these tend to be a favorite.

ingredients for chocolate chip pecan cookies in steel bowl with white spoon sticking out

There are plenty...and I mean plenty of recipes for chocolate chip cookies on the net...and it's obvious why, soft chocolate chip cookies are amazing! But I like to add a bit extra when I make mine, adding additional ingredients to the base recipe. The inspiration I got for this recipe is a from German Chocolate Cake. German Chocolate happens to be hubby's favorite kind of cake and although he ask for me to make it quite often, I ain't got time for all that. Instead, I figured why not add some coconut, pecans, and chocolate chips to the cookie batter and BAM...just like a German Chocolate Cake in a fraction of the time. Well not exactly but hey, the cookie is still delicious.

Chocolate chip pecan cookies on checkered kitchen towel

It took a lot of practice to get these chocolate chip pecan cookies thin, crispy, and chewy like I like and the results were consistent. Make sure to check out the Notes Section below on some tips to ensure your cookies are the same.

Notes on Chocolate Chip Pecan Cookie Recipe

  • Make sure you use softened butter for the recipe. I just leave it out on the counter top for a few hours.
  • Your egg should be room temperature before it's added to the dough as well.
  • The bake time for these cookies are 8-10 minutes but keep a close eye on them, they can burn quickly if in the oven for too long.
  • Use a cookie scoop to make sure your cookies are uniform.

Looking for more Cookie Recipes? Try these out:

  • Lemon Crinkle Cookies from Scratch
  • Easy Lace Cookies
Chocolate chip pecan cookie recipe. Thin and crispy cookies with a chewy middle. Bake these and have them with milk.
Print Recipe
No ratings yet

Chocolate Chip Pecan Cookie Recipe

Prep Time10 minutes mins
Cook Time10 minutes mins
Total Time20 minutes mins
Course: Dessert
Servings: 16
Calories: 235.3kcal
Author: Tanya

Ingredients

  • 1 cup all purpose flour
  • ½ teaspoon baking soda
  • ½ teaspoon salt
  • 8 Tablespoon butter softened
  • ½ cup granulated sugar
  • ½ cup light brown sugar
  • 1 large egg
  • 1 teaspoon vanilla extract
  • 1 cup milk chocolate chips
  • ½ cup chopped pecans
  • ¼ cup sweetened coconut flakes

Instructions

  • Preheat oven to 375 degrees. 
    Combine all purpose flour, baking soda, and salt in a bowl. Set aside. 
    Beat butter until fluffy, about a minute and add white sugar and brown sugar until fully mixed in. 
    Add egg and vanilla to butter mixture until well combined. 
    Add flour mixture to butter mixture until well blended and flour disappears. 
    Fold in chocolate chips, pecans, and sweetened coconut flakes until incorporated into dough. 
    Place dough on baking sheet with a cookie scoop or tablespoon, spacing 2 inches apart. 
    Bake in preheated oven for about 8-10 minutes or until the tops of the cookies are golden. Once done, remove from oven and allow to cool on baking sheet for a few minutes. Then transfer to wire rack to complete cooling. Enjoy 🙂

Nutrition

Calories: 235.3kcal

Pin Chocolate Chip Pecan Cookie Recipe for Later

image with chocolate chip pecan cookies on top and chocolate chip cookies on bottom.

Shamrock Mint Hot Chocolate

March 6, 2017 by Tanya 6 Comments

Shamrock Mint Hot Chocolate Recipe. Great drink for St. Patrick's Day.

This Shamrock Mint Hot Chocolate Recipe is perfect for St. Patrick's Day! Well, it's perfect any day of the year. If you like chocolate and mint, you are in for a real treat.

chocolate drink with whipped cream on top

This post contains affiliate links, please read my full disclaimer here.

Full Recipe Ingredients/Instructions are available in the 
recipe card at the bottom of the post. 
You can find important tips/tricks in the
blog post.

The weather in NC has been so flip floppy, with one day it being cold and windy till the next day it being bikini weather. Well my body isn't bikini ready yet soooo womp womp. Either way, I like hot drinks year round, no matter what the weather. My husband thought I was crazy when we went to South Florida and I ordered hot coffee in 90 degree weather. I don't know, there's just something about that warm drink in my belly.

Despite the wacky warm weather, I found it the perfect time to talk about this Shamrock Mint Hot Chocolate recipe since St. Patrick's Day is near.

Now I won't act like I thought of this idea for Shamrock Mint Hot Chocolate out of the green....hehe, get it? I actually found out that McDonalds has a Shamrock Hot Chocolate when I was searching around for a recipe for the green Shamrock Milkshake. Rather than getting in my car and driving to McDonalds to try this hot chocolate, I walked to my kitchen and made my own...and I loved it. I've never had the McDonald's Shamrock Hot Chocolate and I probably never will because this one is so good. And you simply can't beat homemade hot chocolate.

So what makes this Shamrock Hot Chocolate so special?? Mint of course. If you follow the blog, you probably know that I love mint chocolate. I love it so much that I make these Mint Oreo Cupcakes for Two whenever I crave the combo. Funny thing is that my hubby and daughter, who claim they can't stand mint and chocolate mixed together, actually liked this hot chocolate. I swear they

Easy to make...let's see, shall we...

First, grab some semisweet chocolate and break it into pieces...

semi sweet chocolate broken into chunks

Then heat 1 cup heavy cream, 1 cup milk, and 3 tablespoon sugar over medium low heat just until it starts to bubble...

milk and heavy cream in saucepan

Then whisk in 3 tablespoon cocoa powder until it becomes dissolved. Then add your chocolate pieces...

chocolae melting in saucepan in milk and heavy cream

Stir until melted. Add ½ teaspoon peppermint extract...

chocolate melted in cream in saucepan

Pour in mugs (tall glass ones are pretty) and top with whipped cream and green sprinkles. Enjoy 🙂

Shamrock Mint Hot Chocolate Recipe. Great drink for St. Patrick's Day.
Print Recipe
No ratings yet

Shamrock Mint Hot Chocolate

Prep Time5 minutes mins
Cook Time10 minutes mins
Total Time15 minutes mins
Servings: 4 person
Calories: 420kcal
Author: Tanya

Ingredients

  • 4 oz semisweet chocolate chopped
  • 1 cup heavy cream
  • 1 cup milk
  • 3 Tbsp sugar
  • 3 Tbsp cocoa powder
  • ½ teaspoon peppermint extract
  • Whipped Cream for topping optional
  • Green sugar sprinkles for topping optional

Instructions

  • Heat milk, cream, sugar in medium saucepan over medium low heat until it starts to get warm and you start to see little bubbles. 
    Add cocoa powder and whisk until dissolved. Add chocolate and stir until it is all melted. Add peppermint extract.
    Add to glasses or mugs. Top with whipped cream and green sugar sprinkles. 

Nutrition

Calories: 420kcal


Pin Shamrock Mint Hot Chocolate for Later

chocolate drink covered in whipped cream on top with photos of chocolate and chocolate melting on bottom

Cheesy Corned Beef Hash Breakfast Casserole

February 27, 2017 by Tanya 7 Comments

Corned Beef Hash Breakfast. Corned beef casserole for breakfast. Perfect for meal prep. Perfect for a St. Patrick's Day Breakfast

This Cheesy Corned Beef Hash Breakfast Casserole is the perfect breakfast option for this St. Patrick's Day.

corned beef hash casserole on white plate

This post contains affiliate links, please read my full disclaimer here.

Full Recipe Ingredients/Instructions are available in the 
recipe card at the bottom of the post. 
You can find important tips/tricks in the
blog post.

Alright, it's February and I've already been thinking about St. Patrick's Day. Whenever I realize St. Patrick's Day is among us, I get ready with the mint desserts, corned beef recipes, and lucky charms. I know, there is a lot of history behind the Holiday and I appreciate that...but I really get excited about them turning that river in Chicago green.I know, I'm a little nerdy but green is my favorite color.

So about this corned beef hash breakfast casserole... I'm a lover of make ahead easy breakfast recipes and this casserole is just that. I like to make it on a meal prep day and eat it for a few days of the week by popping it in the microwave. Of course, that's only when there are any leftovers.

Most of my egg casseroles are meatless but I wanted to get a little creative with this one with the corned beef. Once we tried it, we loved it and I've made it this way a few times already. Hope you enjoy this corned beef hash casserole as much as we do.

Notes on Cheesy Corned Beef Hash Breakfast Casserole

  • If making this as a make ahead breakfast, just keep it on the fridge and warm it up in the microwave for breakfast. I keep it for 3 days at the most.
  • The corned beef can be substituted by any other deli meat but tis the season for corned beef.

Need more St. Patrick's Day meal ideas? Check out my Corned Beef and Cabbage - Jamaican Style and my Mint Oreo Cupcakes for Two

Need more Breakfast recipes? Try these out:

Instant Pot Egg Bites

Air Fryer Egg Frittata

Breakfast Air Fried Potatoes

Million Dollar Bacon

Banana Oatmeal Pancakes

Corned Beef Hash Breakfast. Corned beef casserole for breakfast. Perfect for meal prep. Perfect for a St. Patrick's Day Breakfast
Print Recipe
4.50 from 8 votes

Cheesy Corned Beef Hash Breakfast Casserole

Cheesy Corned Beef Hash Breakfast Casserole. Perfect breakfast casserole. 
Prep Time10 minutes mins
Cook Time40 minutes mins
Total Time50 minutes mins
Servings: 8
Calories: 162.4kcal
Author: Tanya

Ingredients

  • 1 medium Russet potato chopped
  • ¼ cup water
  • 5 eggs
  • ¼ cup milk
  • ¼ lb deli corned beef chopped
  • 1 roma tomato chopped
  • 3 green onions chopped
  • 1 teaspoon hot sauce optional
  • ½ teaspoon salt
  • ½ teaspoon paprika
  • ⅛ teaspoon black pepper
  • 1 cup sharp cheddar cheese shredded

Instructions

  • Preheat oven to 350 degrees
  • Add potato and ¼ cup water to a microwave safe bowl. Cover and microwave for 4 minutes or until softened. set aside,
  • Whisk eggs and milk in a bowl. Add potatoes, corned beef, tomatoes, green onion, hot sauce, paprika, salt, black pepper, and ½ cup cheddar cheese. Stir to combine. 
  • Place in greased 1.5 qt casserole dish and top with remaining cheese. 
  • Bake for 35-40 minutes or until eggs are set and cheese is bubbling. 

Nutrition

Calories: 162.4kcal

Pin Cheesy Corned Beef Hash Breakfst Casserole for Later

image of corned beef casserole on plate on top, text that says cheesy corned beef hash breakfast casserole, and image of casserole in baking dish on bottom

Chai Tea Cupcakes with Buttercream Icing

February 20, 2017 by Tanya 26 Comments

These Chai Tea Cupcakes with Buttercream Icing are a delicious treat. Just think of a Chai Latte but in cupcake form. So delicious, so fun!

chair tea cupcake topped with buttercream and in foil cupcake liner

This post contains affiliate links, please read my full disclaimer here.

Full Recipe Ingredients/Instructions are available in the 
recipe card at the bottom of the post. 
You can find important tips/tricks in the
blog post.

I may be a bit late to the game but I just found my love for chai tea! I was never a big tea drinker but started getting into them when I decided to give up coffee for lent last year. You can read about that experience here.

Will I give up coffee this year? I don't know, I may but I would be fine either way thanks to Chai Tea! In addition to my new love for Chai Tea, I also have a love for cupcakes. Well, I've always loved cupcakes but decided it was time to bring my two loves together. Say hello to these Chai Tea Cupcakes with Buttercream Icing!

cupcakes on top of and in front of silver platter with cupcake in front half eaten

So this tea obsession of mine was pretty serious. I have green tea, black tea, purple tea (hibiscus) and a host of others chilling in my cabinet waiting to be drunk. I can't say I loved all the teas I've tried but have found an appreciation for the many that exist. Tea has always calmed me during times of high stress. The aroma is what gets my nerves to pause and relax.

So how did we get to cupcakes? The last cup of chai tea I made tasted like dessert, only because I sweetened with milk and sugar and topped it with whipped cream and cinnamon. I think professional tea drinkers would frown upon that but it was sooo good. The next natural step would be cupcakes.

cupcakes on platter with tea bag in middle and cupcake in front half eaten

These chai tea cupcakes remind me of spice cupcakes, because I used a lot of spice in them. It literally reminds me of a chai latte I would get from my favorite coffee shot. The buttercream icing is a typical butter cream flavor to contrast all the flavor of the cupcake. And of course, I topped with cinnamon to make them perty.

I hope you enjoy these chai tea cupcakes as much as we do. Daughter snuck and ate 4 in a row the first time I made them. I couldn't even stay mad at her.

Looking for more cupcake or mini cake recipes? Try my red velvet cupcakes or these mini rum carrot cakes. 

Chai Tea Cupcakes are a delicious treat. Made with chai black tea and delicious spices with butter cream frosting.
Print Recipe
5 from 6 votes

Chai Tea Cupcakes with Buttercream Frosting

Servings: 12
Calories: 270.6kcal
Author: Tanya

Ingredients

  • 1 cup milk
  • 4 chai tea bags
  • ¾ cup white sugar
  • ½ cup vanilla flavored yogurt
  • ¼ cup vegetable oil
  • 1 cup all purpose flour
  • ¼ teaspoon baking soda
  • ½ teaspoon baking powder
  • 1 ½ teaspoon ground cinnamon
  • ½ teaspoon ginger
  • ¼ teaspoon ground cloves
  • ¼ teaspoon salt

Buttercream Frosting

  • ½ cup butter softened
  • 1 teaspoon vanilla extract
  • 1 ½ cup powdered sugar
  • 1 Tablespoon milk

Instructions

  • Preheat oven to 350 degrees. 
    Place milk in a pot over medium heat. As soon as milk starts to boil and you see bubbles, remove from heat and add tea bags. Allow to brew for 10 minutes 
    Add all purpose flour, baking soda, baking powder, ground cinnamon, ground ginger, ground cloves, and salt to a bowl. Set aside. 
    In another big bowl, combine milk and tea mixture, white sugar, vanilla flavored yogurt, and vegetable oil. Stir until incorporated.  Add dry ingredients and mix until flour disappears.
    Place in muffin tin and bake for 20-25 minutes, or until toothpick comes out clean. Allow to cool. Frost with icing and dust with cinnamon. 
    To make frosting, add butter, vanilla extract, powdered sugar, and milk to a bowl and mix with mixer until fluffy.

Notes

Nutrition

Calories: 270.6kcal

Step by Step Photos of Chai Tea Cupcakes

  • tea bags in liquid in saucepan
  • dry
  • wet ingredients in bowl with whisk in it
  • batter in bowl with whisk
  • baked cupcakes in cupcake tin
  • buttercream in bowl whipped
  • chai tea cupcakes on platter with tea bag in middle and half eaten cupcake on side

Pin Chai Tea Cupcakes with Buttercream Icing for Later

pinterest image of cupcake on top, text that says chai tea cupcakes with buttercream icing, and multiple cupcakes on bottom if image

Roasted Cauliflower and Sweet Potato Recipe

February 13, 2017 by Tanya 50 Comments

Roasted Cauliflower and sweet potato recipe. Great easy and healthy side dish. Sheet pan sides are perfect for dinner. Vegetarian sides. Gluten free. Vegan.

This Roasted Cauliflower and Sweet Potato Recipe is a perfect easy side dish for any dinner. The added rosemary and garlic give it wonderful flavor.  

cauliflower and sweet potatoe in white bowl covered with rosemary springs with baking sheet in background

This post contains affiliate links, please read my full disclaimer here.

Full Recipe Ingredients/Instructions are available in the 
recipe card at the bottom of the post. 
You can find important tips/tricks in the
blog post.

Cauliflower...oh the wonderful neglected vegetable in my kitchen. I loved cauliflower growing up, especially raw dipped in tons of ranch. But for the last few years, cauliflower has been pretty absent from my diet. Such a shame.

Now that I'm a grown up, a wife, and a parent, I think it's time I start incorporating this vegetable (and a host of others I neglected) back into our kitchen and into our diet. First step will be with this easy roasted cauliflower and sweet potato recipe.

roasted cauliflower and sweet potato in white bowl with rosemary springs on top and side

Now when I say easy, I mean easy. I just preheated my oven, chopped these veggies, added some oil and rosemary and garlic, and popped it in the oven.

This was the perfect side dish for my entrees. One night I ate this as the main course without meat. I don't know if that's healthy but I sure got full.

Speaking of full, my time has been feeling quite full lately...watching reruns of Living Single. Remember that show? Best friends in the 90s living as roommates.

It's funny because I was around 10 when that show was on t.v. I never could relate to the characters at that time (I mean, I was 10) but watching it in my 30s (early 30s) I absolutely can relate.

One episode in particular really sparked my interest. Maxine Shaw, an attorney who worked at a law firm, was fired from her job and had took up new employment at a telephone agency. Well...the agency turns out to be shady and all the employees and the owner end up getting arrested and find themselves in court.

Maxine Shaw is appointed a public defender and this guy is terrible. As a matter of fact, he represents the stigma t.v. gives a lot of public defenders, overworked, cases not even looked at before court, and urging clients to plea.

Well no worries...Maxine Shaw fired him, defended herself, and won her case! She also ended up representing all of the other employees of the call agency and got them all off. As a matter of fact, the Judge was so impressed by Maxine's work that she recommended her to the Public Defender's Office and she began to work there.

Ok, so I just recapped an entire episode of Living Single (spoiler alert) but I do so with good reason. I work as a Public Defender and the stigma giving to these lawyers, well it is a tad bit annoying.

I know many Maxine Shaw's who handle heavy case loads like a boss. Researching issues and ensuring that every client's case gets the care and attention it needs.

Either way, I was impressed how although the show initially cast Public Defenders in a bad light, I did like how Maxine Show represented quite the opposite.

A maverick attorney who is sharp, hard working, and aggressive for her clients. Now what does this have to do with this roasted cauliflower and sweet potato recipe? Not a darn thing...I just really like that episode and wanted to shout out my amazing Public Defender friends.

I hope you enjoy this cauliflower and sweet potato recipe as much as we do. Now off to watch more Living Single...

Looking for more cauliflower recipes? Try my roasted cauliflower dip recipe. 

Looking for a few recipes to serve this side dish with? Try these out:

Juicy Air Fryer Turkey Burger

Air Fryer Steak with Garlic Herb Butter

Notes on Roasted Cauliflower and Sweet Potato

  • Make sure Cauliflower and Sweet Potato are completely dry before you oil and garlic and rosemary. It ill give it a nice crisp. If not, you will have mush. No one wants mushy veggies.
  • Dried Rosemary may be substituted for fresh. I just like fresh rosemary because it's so perty.
  • Cauliflower is known as a super food, known to aid with the fighting of cancer, good for digestion, and good for the heart.
Print Recipe
4.94 from 15 votes

Roasted Cauliflower and Sweet Potato

Prep Time10 minutes mins
Cook Time25 minutes mins
Total Time35 minutes mins
Course: Side Dish
Servings: 6
Calories: 110kcal
Author: Tanya

Ingredients

  • 1 medium cauliflower head broken into small pieces
  • 1 medium sweet potato chopped
  • 4 cloves garlic minced
  • 2 Tablespoon fresh rosemary chopped
  • ¼ teaspoon salt
  • ⅛ teaspoon black pepper
  • 2-3 Tablespoon olive oil

Instructions

  • Preheat oven to 425 degrees Fahrenheit. Line a baking sheet with foil and set aside. 
    Add cauliflower, sweet potato, rosemary, garlic, salt, and black pepper to a large bowl and stir. Add enough oil and stir to make sure all pieces are coated with a little oil. 
    Place on baking sheet and cook for 25 minutes, or until sweet potato is softened. 
    Enjoy 🙂

Nutrition

Calories: 110kcal

Step by Step Photos of Roasted Cauliflower and Sweet Potato Recipe

  • cauliflower broken into pieces on white background
  • sweet potato cut on white background
  • rosemary chopped on white board
  • cauliflower, sweet, potato and rosemary mixed in bowl
  • cauliflower sweet potato and rosemary on baking sheet
  • cooked cauliflower, sweet potato, and rosemary in white bowl with baking sheet in background

Pin Roasted Cauliflower and Sweet Potato Recipe for Later

pinterest image with cauliflwoer and sweet before cooking on top, text says roasted cauliflower and sweet potato my forking life, and photo of recipe in white bowl with baking sheet at top

Mini Spinach & Mozzarella Stuffed Meatloaf

February 3, 2017 by Tanya 4 Comments

mozzarella stuffed meatloaf. Easy and delicious.

This Mini Spinach & Mozzarella Stuffed Meatloaf Recipe is perfect for any weeknight dinner. Enjoy it with a side of mashed potatoes for a complete meal.

mozzarella stuffed meatloaf covered in ketchup on white plate with cupcake pan in back with meatloaves in it

This post contains affiliate links, please read my full disclaimer here.

Full Recipe Ingredients/Instructions are available in the 
recipe card at the bottom of the post. 
You can find important tips/tricks in the
blog post.

Oh for the love of meatloaf! Well, for the love of mozzarella stuffed meatloaf. Add some spinach to it and it's the perfect combo.

Our household loves meatloaf but the typical meatloaf requires a big hunk of meat be baked in an oven for an entire hour. That's a super long time if you're making it for a weeknight dinner. It's definitely not worth it if all you'll hear for an entire hour is "is it done yet" and "let's just order pizza, I'm starving." Dang on hubby and kid.

These mini meatloafs come together in a breeze and only require a 25-30 minute bake time. The advantage of making any dish in mini form is usually less cooking time. Plus, these meatloafs are just so darn cute!

Speaking of cute, did you get a chance to watch the New Edition Story on BET?? Oh my gosh, amazing!!!! I've always loved New Edition. "Can you stand the rain" "Mr. Telephone Man" and "If it isn't love" are some of my favorite songs of all time. Let's just say that my house and car have been blasting all the hits since it aired. I sure hope they put it on DVD because I am buying.

fork picking up piece of stuffed meatloaf with spinach on white plate

I sure hope you all enjoy this mini meatloaf stuffed with mozzarella and spinach recipe as much as my family does. Such an easy way to incorporate veggies and cheese in a weeknight dinner. Check out the video below for further instructions. As always, Enjoy 🙂

Notes on Mini Mozzarella Stuffed Meatloaf Stuffed

  • You will need a muffin tin for these minis. Make sure to spray it with non stick cooking spray.
  • Please, please, please use fresh mozzarella. It taste so good. It melts so good. It's just that good.
  • Make sure to squeeze out all the water from the defrosted frozen spinach. If you don't, you may end up with a messy and odd meatloaf.
  • These are great as leftovers. I would assume you could freeze them but we never have enough leftover to freeze.
  • Make sure to check the meat with a quick read thermometer to ensure meat is thoroughly cooked. Ground beef should be cooked to a temperature of 160 degrees Fahrenheit.

Looking for more meatloaf recipes? Try my Air Fryer Meatloaf. 

mozzarella stuffed meatloaf. Easy and delicious.
Print Recipe
5 from 2 votes

Mini Stuffed Meatloaf

Prep Time10 minutes mins
Cook Time30 minutes mins
Total Time40 minutes mins
Course: Main Course
Cuisine: American
Servings: 6 person
Calories: 446kcal
Author: Tanya

Ingredients

  • ¾ cup frozen spinach defrosted
  • 1 medium onion
  • 2 garlic cloves
  • ½ cup fresh parsley
  • 1.5 lbs ground beef
  • 1 cup breadcrumbs
  • ⅔ cup ketchup
  • 2 eggs
  • 1 teaspoon ground thyme
  • ½ teaspoon salt
  • ½ teaspoon oregano
  • ½ teaspoon black pepper
  • 12 slices of mozzarella

Topping

  • ⅓ cup ketchup
  • 2 Tablespoon dijon mustard
  • 2 Tablespoon brown sugar

Instructions

  • Preheat oven to 350 degrees Fahrenheit. Spray muffin tin with cooking spray and set aside. 
    Squeeze excess water from spinach and set aside. 
    Add onion, garlic cloves, and parsley to food processor and process until smooth. Set aside. 
    Add ground beef, breadcrumbs, ketchup, eggs, thyme, oregano, salt, black pepper, and food processor mixture to a large bowl and mix with hands until incorporated. 
    Break mixture in half and place half of mixture in muffin tin bottoms. Add spinach and slice of mozzarella cheese in each tin bottom, cover with remaining meat mixture.
    Make Topping Mixture and cover each mini meatloaf with mixture. Bake in preheated oven for 25-30 minutes or until internal temperature reaches 160 degrees Fahrenheit. 

To Make Topping

  • Combine ketchup, Dijon mustard, and brown sugar in bowl until incorporated. 

Nutrition

Calories: 446kcal

Pin this Mini Mozzarella Stuffed Meatloaf for Later

Callaloo and SaltFish + BHM Virtual Potluck

January 31, 2017 by Tanya 4 Comments

callaloo and saltfish.

This Jamaican Callaloo and Saltfish recipe is the perfect main course or side dish for any meal. Generally eaten for breakfast in Jamaica, this delicious dish can be served at any time of the day.

Callaloo in and saltfish in cast iron skillet

This post contains affiliate links, please read my full disclaimer here.

Full Recipe Ingredients/Instructions are available in the 
recipe card at the bottom of the post. 
You can find important tips/tricks in the
blog post.

What a gwan?

Translation: What is going on?!?

You gon fi luv mi callaloo n sal fish recipe.

Translation:You are going to love my callaloo and saltfish recipe.

I love speaking Jamaican patios but my mom tells me I sound horrible when I try. Although I was raised in a Jamaican household, I was raised in the lovely states of Maryland and Florida and only visited Jamaica once in a while. When I speak patios I sound like the actors in Cool Runnings. Great movie but horrible accents. Moving on...

I was honored to be invited to a Black History Month Virtual Potluck, organized by Meiko of Meiko And The Dish and Aaron of The Hungry Hutch. This potluck will include 28 of some of the best black food bloggers in the world. We are talking Southern, African, Caribbean, Creole...all kinds of amazing recipes.

[Read more...]

The Best Red Velvet Cupcakes with Cream Cheese Frosting

January 19, 2017 by Tanya 8 Comments

These are the best red velvet cupcakes you will ever have! So red, so velvet, so good.

cupcakes on white board with sprinkles in corner

This post contains affiliate links, please read my full disclaimer here.

Full Recipe Ingredients/Instructions are available in the 
recipe card at the bottom of the post. 
You can find important tips/tricks in the
blog post.

Yes, you read it right, these are the Best Red Velvet Cupcakes in the whole wide world! That's such a bold statement but it is what it is. They are so moist, so delicious, and so red. They never disappoint and the recipe is easy peasy.

red velvet cupcake in black cupcake liners

These cupcakes are rich and moist. I've had dry red velvet cupcakes before and it made me so angry. Like really mad, lol. When you bite into a red velvet cupcake, it should be light and fluffy yet moist, not dense.

The other necessity for a red velvet cupcake is the cream cheese frosting. Cream cheese frosting is a must to achieve the best red velvet cupcake.

Ingredients

For the cupcakes

  • Dry ingredients - All-purpose flour, Unsweetened cocoa powder, Baking soda, Salt
  • Wet ingredients - Eggs, Granulated sugar, Buttermilk, Vegetable oil, Vanilla extract, White vinegar, Red food coloring

For the cream cheese frosting

  • Cream cheese
  • Butter
  • Fresh lemon juice
  • Powdered sugar

Expert tips

  • When making cupcakes, you want to buy cupcake liners that say they are no fade.
  • The cream cheese frosting will yield more frosting than you need. I'd rather have much more frosting than less frosting. I refrigerate the leftover frosting and eat it when I need a little sweetness in my life.
  • I used a larger decorating tip for frosting these cupcakes. The bigger the tip, the better the frosting for your cupcake. Purchase the right size tip to ensure even and pretty frosting.
  • It should also be noted that I am not the best cupcake decorator in the world. It takes skill and practice to get these looking perfect. I sprinkle the top with red sprinkles to jazz it up. It gives it a nice taste too.
  • My cream cheese frosting is a bit different than the traditional ones as I like to add a hint of lemon rather than vanilla extract like most recipes call for. Why do I add lemon? I don't know, I had lemon one day and just decided why not, but the results were amazing! I have been adding it to this frosting ever since.

Looking for more cupcake/cake recipes? Try these out:

  • Chai Tea Cupcakes
  • Mini Carrot Rum Cakes
  • Simple Pumpkin Cake Recipe
  • Easy Southern Peach Cobbler 
  • Moist Chocolate Cake Recipe

How to store Red Velvet Cupcakes

To refrigerate: The dairy in the cream cheese frosting means the cupcakes must be stored in the refrigerator, and not on the counter-top. Once baked, cooled, and frosted, place the cupcakes in an airtight container in the fridge for up to 3 days.

To freeze: If you plan to freeze these cupcakes, do so before adding the cream cheese frosting. Bake and cool the cupcakes, then place in an airtight container in the freezer for up to 3 months. Defrost overnight in the fridge, or at room temperature for a couple of hours, then whip up the frosting and top the cupcakes.

Pin this recipe for later

FAQs

What flavor is red velvet cake?

Red velvet cake is a vanilla cake that is flavored with some cocoa powder. The red velvet comes from the red food coloring that is added to the cake batter.

Are red velvet cupcakes just chocolate?

No red velvet is not a chocolate cake, it is a vanilla-based cake with far less cocoa added than you would in a regular chocolate cake.

What do buttermilk and vinegar add to cakes?

Both buttermilk and vinegar are acidic, so they balance out the sweetness and add a little tang to any cake they are added to.

If you have tried this Red Velvet Cupcake recipe, or any other recipe on my blog, then please rate it and let me know how it turned out in the comments below!

Print Recipe
5 from 1 vote

The Best Red Velvet Cupcakes

These are the best red velvet cupcakes you will ever have! So red, so velvet, so good.
Prep Time15 minutes mins
Cook Time25 minutes mins
Total Time40 minutes mins
Course: Dessert
Cuisine: American
Keyword: red velvet cupcakes
Servings: 24 person
Calories: 220kcal
Author: Tanya

Ingredients

  • 2.5 cups all purpose flour
  • 1.5 teaspoon unsweetened cocoa powder
  • 1 teaspoon baking soda
  • 1 teaspoon salt
  • 2 eggs
  • 1.5 cups granulated sugar
  • 1.5 cups vegetable oil
  • 1 cup buttermilk
  • 1 teaspoon vanilla extract
  • 1 teaspoon white vinegar
  • 1 1 oz bottle red food coloring

Cream Cheese Frosting

  • 2 8 oz packs cream cheese softened
  • ½ cup butter softened
  • 1 Tablespoon fresh lemon juice
  • 6 cups powdered sugar

Instructions

  • Preheat oven to 350 degrees Fahrenheit. Prepare a cupcake pan with cupcake liners or grease the pan. Set aside.
  • Combine flour, cocoa powder, baking soda, and salt in a medium bowl and set aside. 
  • In a large mixing bowl, beat eggs and sugar until fully combined. Add vegetable oil, buttermilk, vinegar, and vanilla extract and stir to combine. Add flour mixture. Your batter should be a light brown color. 
  • Add the entire bottle of red food coloring and stir to combine, ensuring it is fully combined and very red. 
  • Spoon batter into the cupcake pan. Bake in the preheated oven for 25-27 minutes or until a toothpick inserted in the center comes out clean. Allow cupcakes to fully cool before frosting. 

Cream Cheese Frosting

  • Mix cream cheese and butter until fluffy. Add lemon juice. While mixing, slowly add powdered sugar. Frost cooled cupcakes with frosting.

Notes

  • The cream cheese frosting will yield more frosting than you need. I'd rather have much more frosting than less frosting. I refrigerate the leftover frosting and eat it when I need a little sweetness in my life.

Nutrition

Calories: 220kcal

Cake Recipe adapted from Southern Plate

Sweet Chili Thai Cucumber Salad

January 17, 2017 by Tanya 27 Comments

sweet chili that cucumber salad recipe

This Sweet Chilli Thai Cucumber Salad is the perfect refreshing salad to go along any meal. Chop, chop, chop the veggies and herbs and let it marinate for a great salad.  

sweet chili thai cucumber salad and red peppers in white bowl

This post contains affiliate links, please read my full disclaimer here.

Full Recipe Ingredients/Instructions are available in the 
recipe card at the bottom of the post. 
You can find important tips/tricks in the
blog post.

Finally, a salad recipe! woo hoo! Although I am sure most readers don't mind the baked goods, like this Mini Rum Carrot Cake or the comfort food like this Creamy Baked Macaroni and Cheese. Hehehe. But like everyone else, I've made a resolution to get more veggies in my diet. Now don't get me wrong, we were doing pretty well with getting veggies in our diet but I know my hubby and baby girl were getting a wee bit tired of the same ol' side salad with dinner every night. That's where this cucumber salad comes about.

I was in the grocery store perusing the produce aisle because....well, it's kind of fun looking at vegetables and herbs and sniffing them. Am I the only one that does this? Then I came across the cucumbers and picked some up because they were on sale. Anyone else buy produce just because it's on sale? I initially planned on slicing these babies up and putting it on some lettuce with a whole lot of ranch dressing. Yummy! But I knew my family would want something a tad bit different.

I recalled seeing a cucumber salad recipe on the side of a Thai sweet chili bottle and decided that's what needed to go on these cucumbers. I don't recall Add the red onion, red peppers, cilantro, and lime juice and you have a winner winner.

sweet thai chili salad in white bowl

I sure hope you enjoy this Sweet Chili Thai Cucumber Salad as much as we do. Until the next recipe...

Notes on Sweet Chili Thai Cucumber Salad

    • This salad is great on it's own, served as a side with your favorite savory dish.
    • I love this salad on top of tacos with sour cream, super yum!
    • Consider leaving the peel on when making this Sweet Chilli Thai Cucumber Salad. The majoirty of nutrients are in the peel of the cucumber, rich in Vitamin A and contributes to healthy eyes.

Looking for more salad recipes? Try these out:

Kale and Broccoli Salad with Sweet and Sour Dressing

Carrot Raisin Salad

Cranberry Pecan Apple Salad Recipe

Sweet Chili Thai Cucumber Salad. Perfect healthy salad. Light and refreshing salad. Great thai flavor.
Print Recipe
5 from 13 votes

Sweet Chilli Thai Cucumber Salad

Prep Time10 minutes mins
Cook Time1 hour hr
Total Time1 hour hr 10 minutes mins
Course: Side Dish
Cuisine: Thai
Servings: 4 person
Calories: 45kcal
Author: Tanya

Ingredients

  • 2 medium cucumbers chopped
  • ½ red bell pepper chopped
  • ⅓ cup red onion chopped
  • ½ cup cilantro chopped
  • 2 Tablespoon fresh lime juice
  • 3 Tablespoon Sweet Chili Sauce
  • ¼ teaspoon salt
  • ⅛ teaspoon black pepper

Instructions

  • Add all ingredients to a bowl and stir. Refrigerate for about an hour to allow flavors to mend. Enjoy 🙂

Video

Nutrition

Calories: 45kcal

Pin Sweet Chili Thai Cucumber Salad for Later

Sweet Chili Thai Cucumber Salad. Perfect healthy salad. Light and refreshing salad. Great Thai flavor. Vegetarian. Vegan.

Instant Pot Jamaican Cornmeal Porridge Recipe

January 9, 2017 by Tanya 61 Comments

instapot cornmeal porridge recipe jamaican

This Jamaican Cornmeal Porridge Recipe is one I grew up eating. Now my daughter, hubby, and I enjoy this recipe almost weekly. Make it in the Instant Pot for a hands off breakfast.

Instapot cornmeal porridge in bowls with instant pot in background

This post contains affiliate links, please read my full disclaimer here.

Full Recipe Ingredients/Instructions are available in the 
recipe card at the bottom of the post. 
You can find important tips/tricks in the
blog post.

*Updated on 11/17/19

Update: After feedback by some readers on the Burn Signal this recipe may cause, I've updated this post. I've tested this recipe in multiple Instant Pot machines and could never get a burn signal. I was able to purchase an Instant Pot that was more sensitive to giving off a burn and was able to figure out the cause.

Some of the newer designs are more susceptible to giving off a burn while many older models won't. If your machine does give off a burn with this recipe, simply release the pressure valve to relase all the pressure, open the machine, whisk the ingredients and cook on sauté until thickened, about 8-10 more minutes. Then add in your condensed milk. Or, you can make my stovetop cornmeal porridge recipe.

Instapot!!! Ok, I know...it's called Instant Pot, but I like saying Instapot! I got an instant pot over the Christmas break and I've been loving this thing. What the heck is an Instant Pot you may ask?!? Well that's what I wondered when I ordered it with no clue what it was. But everyone was getting it so I wanted one too. Well, it's pretty much a pressure cooker. An electronic genius pressure cooker that won't blow up in your kitchen if you follow the instructions. It has tons of settings and you can find one on Amazon for a pretty reasonable price.

instapot cornmeal porridgein in bowl

My instant pot has a bunch of settings, from meat, poultry, soup, saute, slow cooker, and porridge. Yes, there is a setting on the instant pot for porridge. It isn't quite clear what they expect to be made with this setting but I automatically thought about Jamaican cornmeal porridge and got excited. Pretty much the reason I bought mine.

Jamaican cornmeal porridge is simply made with yellow cornmeal, milk, water, spices, and condensed milk. That's it for this easy breakfast. It's served warm and I like to serve mine with a side of bacon. I would serve everything with a side of bacon if I could. Bacon is amazing.

I hope you enjoy this easy peasy breakfast recipe as much as we do. Keep a lookout for some other Instapot recipes to come your way. This thing is pretty cool.

Notes on Instant Pot Jamaican Cornmeal Porridge

  • Traditionally, cornmeal porridge is made on the stove and requires stirring. If you're going to use the Instapot, make sure you use super fine cornmeal to avoid any lumps.
  • I use condensed milk to sweeten my porridge. Feel free to use sugar as a substitute if you like.

Looking for other Instant Pot Breakfast Recipes? Try these out:

  • Pumpkin Pie Instant Pot Oatmeal
  • Instant Pot Sausage Gravy for Biscuits and Gravy
  • Creamy Cheddar and Jalapeño Instant Pot Grits
  • Instant Pot Egg Bites
Instantpot cornmeal porridge
Print Recipe
4.35 from 20 votes

Instant Pot Jamaican Cornmeal Porridge

Easy and delicious cornmeal porridge made right in your pressure cooker. A slightly sweet and warm breakfast that is perfect for any morning. 
Prep Time5 minutes mins
Cook Time20 minutes mins
Total Time25 minutes mins
Course: Breakfast
Cuisine: Caribbean
Servings: 4 people
Calories: 241kcal
Author: Tanya

Ingredients

  • 4 cups water separated
  • 1 cup milk
  • 1 cup yellow cornmeal fine
  • 2 sticks cinnamon
  • 3 pimento berries
  • 1 teaspoon vanilla extract
  • ½ teaspoon nutmeg, ground
  • ½ cup sweetened condensed milk

Instructions

  • Add 3 cups water and 1 cup milk to Instant pot and stir.
    In a separate bowl, whisk 1 cup water and cornmeal until fully combined. Add to instant pot and whis. Add cinnamon sticks, pimento berries, vanilla extract, and nutmeg. Cover and cook on porridge for 6 minutes. 
    Once timer goes off, allow to naturally release for at least 10 minutes, then quick release any remaining pressure. 
    Once done with natural release, open Instant Pot and whisk to remove any lumps. 
    Add sweetened condensed milk to sweeten. Enjoy 🙂

Notes

After feedback by some readers on the Burn Signal this recipe may cause, I've updated this post. I've tested this recipe in multiple Instant Pot machines and could never get a burn signal. I was able to purchase an Instant Pot that was more sensitive to giving off a burn and was able to figure out the cause.
Some of the newer designs are more susceptible to giving off a burn while many older models won't. If your machine does give off a burn with this recipe, simply release the pressure valve to relase all the pressure, open the machine, whisk the ingredients and cook on sauté until thickened, about 8-10 more minutes. Then add in your condesned milk. 

Nutrition

Calories: 241kcal

Video for Instant Pot Jamaican Cornmeal Porridge

Pin Jamaican Cornmeal Porridge for Later

Mini Rum Carrot Cake

January 2, 2017 by Tanya 49 Comments

Mini rum carrot cake ith cream cheese rum glaze

This mini rum carrot cake recipe may be the cutest thing you make all year. They are so cute and perfect for giving away to family and friends. They are also perfect for Valentine's Day.

Mini rum carrot cake on colorful plates.

This post contains affiliate links, please read my full disclaimer here.

Full Recipe Ingredients/Instructions are available in the 
recipe card at the bottom of the post. 
You can find important tips/tricks in the
blog post.

Happy New Year! 2017 is among us and it's time for me to come off my vacation and comply with all my New Year's resolutions. So for my first recipe for the new year, I decided to share this Mini Rum Carrot Cake Recipe. OK, I'm lying...I originally decided to share another recipe as the first recipe of the year and for some reason, I can't find where I wrote out the recipe. 2017 is off to a great start! No worries, I'm sure I will come across that recipe one of these days but for now, I think these mini rum carrot cakes are a great way to start the year.

One of my changes that I intend to make to the blog for this year is to incorporate more Caribbean and African recipes to the blog. I'm half Jamaican and half African (Sierra Leone) so it seems like something I should just do, right? Plus, hubby and daughter are asking for it so why not. This won't become a blog only dedicated to those kinds of recipes alone, at least I don't think it will, but I would love to recreate some dishes from my culture so you all can see some of the foods I grew up eating.

rum carrot cakes on colorful plates

So what about that this lovely Rum Carrot Cake Recipe?!? Well...I asked my Jamaican grandmother for some recipes and she laughed at me. Thanks Granny! She wasn't one to write down her recipes and she sure didn't take photos and blog about them. However, she collected a few cookbooks and was happy to hand them over to me. One of those cookbooks was Caribbean Cookbook by Rita G. Springer, published in 1968. There was a Carrot Pudding with Rum Sauce Recipe that I had to try. So I ran to my kitchen, created the recipe, and it was not a pudding at all. Instead, the batter was more like a cake batter so I decided these would become mini rum carrot cakes. I decided to create a cream cheese rum glaze to cover these cakes because cream cheese glaze rocks. Like seriously, what other glaze is better?

I decided to make these mini because the batter is not enough for a full cake recipe. I didn't want to double it and felt that mini worked better for many reasons. First, these are great to give away around the Holidays and these are a perfect treat for Valentine's Day. I don't know about you all, but me and my hunny love boozy desserts for Valentine's Day. I think it's obvious why. Second, mini recipes are just the cutest!

Well there you have it. Full video demonstration on how I make these Mini Rum Carrot Cakes is below. Here's to a wonderful 2017!

Notes on Rum Carrot Cake

  • I use a nice Jamaican dark rum for this recipe. It seems to create the best flavor for me.
  • I grated my carrots by hand because I find grating soothing. I used the larger side of my grater as indicated in my video, resulting in larger pieces of carrot in my cake. Feel free to grate your carrots smaller.
  • I used a good old fashioned zip lock bag to glaze the cake. Just place glaze in a ziplock bag, snip a corner, and glaze onto cake. Full demonstration is in video below.
Mini rum carrot cake. Perfect size to give away. Perfect size for Valentine's Day.
Print Recipe
4.91 from 10 votes

Mini Rum Carrot Cake

This mini rum carrot cake recipe may be the cutest thing you make all year. They are so cute and perfect for giving away to family and friends. 
Prep Time10 minutes mins
Cook Time35 minutes mins
Total Time45 minutes mins
Course: Dessert
Cuisine: Caribbean
Keyword: rum carrot cake
Servings: 4 person
Calories: 735kcal
Author: Tanya

Ingredients

  • 1.5 cups carrot grated
  • 1 cup flour
  • 1 teaspoon baking powder
  • ½ teaspoon cinnamon ground
  • ½ teaspoon nutmeg ground
  • ½ teaspoon salt
  • .5 cup butter softened
  • 1 egg
  • ⅔ cups granulated sugar
  • ¼ cup dark rum
  • ½ teaspoon vanilla extract
  • ¾ cups raisins

For the Cream Cheese Glaze

  • 4 oz cream cheese
  • ½ cup powdered sugar
  • 1 Tablespoon dark rum
  • 2 Tablespoon milk (optional)

Instructions

  • Preheat oven to 350 degrees.
    Combine flour, salt, baking powder, cinnamon, and nutmeg in a bowl and set aside.
    Cream butter in mixer until fluffy, about a minute. Add sugar until sugar and butter are fully combined. Add egg, vanilla, rum, and carrots and allow to mix in.
    Add flour mixture into butter mixture and mix until incorporated. Add raisins and stir in.
    Add batter to greased mini bundt pans. Place in preheated oven for 30-35 minutes or until toothpick inserted comes out clean.
    Remove from oven and allow to cook on cooling rack. 

Make Glaze

  • While cake is baking, make glaze by creaming cream cheese in mixer until fluffy. Add powdered sugar and rum to mixture. Add milk if you want glaze to be thinner.
    Place glaze in zip lock bag, snip a tiny piece of edge of zip lock bag, and glaze cake. 
    Enjoy 🙂

Nutrition

Calories: 735kcal

Looking for more mini recipes for Valetine's Day? Try these Coffee Brownies for Two with Hazelnut Glaze

Looking for more Cake Recipes?

  • Grapefruit Cake with Glaze
  • The best Red Velvet Cupcakes with Cream Cheese Frosting
  • Orange Poppyseed Cake

If you like this Caribbean recipe, you'll also like this Sweet Potato Pudding.

Pin Mini Rum Carrot Cakes for Pinterest

Spiced Iced Sweet Tea

December 19, 2016 by Tanya 23 Comments

spiced iced tea

This delicious and easy Spiced Iced Sweet Tea recipe is perfect for the Holidays. Enjoy it as you celebrate the Holiday season. This post is sponsored by Southern Breeze but as always, all opinions are 100% mine.

spiced sweet tea in glass with cloves on top

This post contains affiliate links, please read my full disclaimer here.

'Tis the season for spice and everything nice, especially this spiced iced sweet tea! I love this time of year. The Holidays seems to bring out all the joy in my bones as everyone is in the giving spirit and all the best desserts get baked around this time of year. It's when bakers pull out all the cinnamon, nutmeg, cloves, and sometimes even the rum...yea ya'll, I love me a good rum cake.

I'll be honest though, we haven't finished with our Christmas decorations. Lucky for me, hubby bought one of those flashing light tools that shine lights on the house rather than hanging lights so we aren't at a total lost. We have a tree up, albeit doesn't have decorations yet, and a really creepy elf has been creeping around the house moving about as we sleep. Other than that, our household is failing on showing our Holiday spirit.

I was able to bring a little Holiday spirit around the house by creating this Spiced Iced Sweet Tea recipe with two of my favorite spices, cinnamon and cloves, and Lemon Flavored Southern Breeze Sweet Tea.

spiced iced sweet tea in glass with sticker

This Spiced Sweet Iced Tea recipe comes together in a breeze and only requires 4 ingredients.

First, bring 2 quarts of water to a boil. I don't have a tea kettle so a good nice pot works fine for me. Place 2 Lemon flavored Southern Breeze Sweet tea tea bags in the water along with 1 teaspoon of whole cloves and 2 cinnamon sticks.

hand holding cloves

Whole Cloves

cinnamon sticks in hand over saucepan

Cinnamon Sticks

Allow to steep for 5-10 minutes. 5 minutes is recommended but I always get distracted and my tea bags end up staying around 10. Tea still good though.

saucepan with tea bags and tea in it

Remove the tea bags from the water and transfer the tea to a pitcher, leaving the spices inside. They will sink to the bottom of your pitcher but they will continue to flavor your drink. Refrigerate until cold and serve over ice.

spiced iced sweet tea in glass pitcher

That's it! Easy Peasy Right. I hope you and your family enjoy this Spiced Iced Sweet Tea Recipe and have a wonderful Holiday Season 🙂 I'm off to get some decorations for this tree of our ours 🙂

Notes on Spiced Iced Sweet Tea

  • No need to add sugar to this recipe as Southern Breeze sweet tea contains sweetener in the bag along with the tea leaves.
  • Southern Breeze Sweet Tea is zero calories and comes in a variety of flavors including Peach and Original. I used lemon for this but plan on experimenting with other flavors. Check out my recipe for Peach Sweet Tea using the peach flavor.
  • In order to ensure that the flavors truly mend, add the cloves and cinnamon sticks when you are brewing and when you remove the tea bags. Allow them to stay in during cooling time but remove them once the drink is served.
  • There is also a quick brew option for this sweet tea. Instructions are listed on the box.
spiced sweet tea
Print Recipe
4.80 from 5 votes

Spice Iced Sweet Tea

Prep Time5 minutes mins
Cook Time2 hours hrs
Total Time2 hours hrs 5 minutes mins
Servings: 4
Author: Tanya

Ingredients

  • 2 qts water
  • 2 Southern Breeze Lemon Flavored Teabags
  • 1 teaspoon whole cloves
  • 2 cinnamon sticks

Instructions

  • Bring 2 qts of water to a boil. Remove from heat. 
    Add water, tea bags, cloves, cinnamon sticks to pitcher and brew for about 5 minutes. Remove tea bags and place pitcher in fridge until chilled. Serve over ice. 

Pin Spiced Iced Tea for Later

Easy Seafood Chowder Recipe

November 28, 2016 by Tanya 30 Comments

easy seafood chowder recipe.

This Easy Seafood Chowder Recipe is a perfect choice for this winter. Delicious, full of seafood goodness, and super easy to make.

easy seafood chowder recipe in 3 bowls.

This post contains affiliate links, please read my full disclaimer here.

Full Recipe Ingredients/Instructions are available in the 
recipe card at the bottom of the post. 
You can find important tips/tricks in the
blog post.


I would probably eat seafood every day of the week if I could. Seriously, there's something I love about shrimp, crab, mussels, etc. Oddly enough, I don't cook with it as often I should. Perhaps because the majority of the time I have chicken on my mind and the majority of our weeknight meals have some form of poultry. However, this easy seafood chowder has crept into our dinner rotation so much that I had to share the recipe with you all.

easy seafood chowder recipe in bowls

When I think of seafood chowder, the word easy never usually crossed my mind...until I came across this recipe. I had been searching the interwebs for a good soup recipe and somehow stumbled across this one. Fact is, it's so easy that it can be made in about 30 minutes and nothing needs to be thawed out. This is perfect for me as I always forget to thaw my frozen meat out. In all honesty, I have been a little slack in planning my meals the last few months. Perhaps this is the reason why seafood has crept into our rotation so often. Shrimp and mussels thaw and cook quite quickly.

Should the seafood in this easy seafood chowder be thawed first?

Nope, there is no need. Sounds crazy but seafood cooks quickly and can be cooked from frozen and will have great texture in your final dish. You don't want your seafood to over cook. I find adding it in while frozen helps. It's a method I use for my Pressure Cooker Shrimp Paella. With this soup, the broth is prepared first and the frozen seafood is added and cooked within a matter of 5-10 minutes.

How to serve Easy Seafood Chowder?

I like to serve this meal in these cute french onion soup bowls so we can hold the handle while we eat our soup. It's perfect for those of us who like to eat our soup in bed.

Let me know if you try this Easy Seafood Chowder Recipe. If you post it on the social media, please hashtag #myforkinglife so I can let you know how amazing you are.

Notes on Easy Seafood Chowder Recipe

  • You can add any kind of seafood to the chowder. I personally prefer the three listed in this recipe but a good fish, like a cod, could make a great substitute.
  • Swanson Cooking Stock, Seafood, 32 ozcan be purchased in most grocery stores. You can also make your own by sauteing carrots, onions, celery, and shrimp shells. It takes a long time and I feel the store bought stuff works just fine.
  • You can add a chopped russet potatoes to this dish to give it more substance. Just make sure to add the potato to the broth early and allow it cook before adding the seafood.
  • This can also be served as a good appetizer. We get about 6 servings out of this seafood chowder.

Looking for more soup recipes? Try my Pressure Cooker Sausage lentil and sausage soup recipe.
 

easy seafood chowder recipe
Print Recipe
No ratings yet

Easy Seafood Chowder

Easy and Delicious Seafood Chowder with shrimp, crab, and mussels. 
Prep Time10 minutes mins
Cook Time30 minutes mins
Total Time40 minutes mins
Course: Main Course
Cuisine: American
Keyword: easy seafood chowder
Servings: 6 people
Calories: 364kcal
Author: Tanya

Ingredients

  • ½ cup butter
  • 1 medium onion minced
  • 1 stalk celery minced
  • ¼ teaspoon cayenne pepper
  • ½ teaspoon Old Bay Seasoning
  • ¼ teaspoon dried thyme
  • ¼ teaspoon marojam
  • 3 Tablespoon flour
  • 2 cups seafood stock
  • 1 ½ cups milk
  • 1 can cream of potato soup
  • 1 can cream of celery soup
  • 6 oz frozen medium shrimp, peeled and deveined
  • 1 lb frozen fully cooked mussels in garlic sauce
  • 1 6 oz can of lump crab meat

Instructions

  • Melt butter in pot over medium heat. Add onions and celery and saute until softened.
    Add cayenne pepper, old bay, thyme, marojam and stir to incorporate.
    Add flour and stir.
    Add seafood stock, milk, cream of potato soup and cream of celery soup. Stir and bring to boil.
    Once boiling, add shrimp, mussells, and crab meat. Stir to ensure all seafood is covered. Leave in broth until fully cooked, about 6 minutes.
    Soup is done when shrimp is pink color.
    easy seafood chowder recipe

Nutrition

Calories: 364kcal


Like this Recipe? Pin this Easy Seafood Chowder Recipe for Later

Easy Seafood Chowder Recipe. Perfect seafood soup recipe for the Winter. Shrimp, Mussels, & Crab.

Recipe adapted from Food.com

Holiday Gift Guide - The Best Cookbooks for Beginners

November 21, 2016 by Tanya 5 Comments

It's officially Holiday Season and although I somewhat feel it's a bit early to see all the Christmas decorations out in the stores, it's a reminder that I need to go on and get my list together. I truly feel that everyone has an inner love for cooking.

O.k. maybe not but you may have that person in your life who has started to take an interest in cooking and you're wondering which book to get them. This list of the best cookbooks for beginners should help you with that purchase. All of these I have found tremendously helpful in my foodie life. 

This post contains affiliate links, please read my full disclaimer here.

The Best Cookbooks for The True Beginners

1. How to Cook Everything The Basics: All You Need to Make Great Food--With 1,000 Photos

This is the book that started my love for cooking and my eventual creation of My Forking Life. It literally teaches you How to Cook Everything, from how to scramble eggs, to salads, soups, entrees, breads, desserts...you name it! I even made cornbread from scratch with this book. I've used this book so much that it is literally falling apart. I still pull it out when I am looking for recipe inspiration. Each recipe comes with photo instructions as well as tips and variations for each recipe. This book is the perfect cookbook for a beginner chef.

[Read more...]

Scalloped Potatoes with Blue Cheese

November 14, 2016 by Tanya 19 Comments

Scalloped potatoes with blue cheese. Side dish. Potatoes au gratin.

These Scalloped Potatoes with Blue Cheese are a great spin on your traditional scalloped potatoes. Impress your friends and family with this fancy side dish.

scalloped potaoes covered in blue cheese in orange baking dish

This post contains affiliate links, please read my full disclaimer here.

Full Recipe Ingredients/Instructions are available in the 
recipe card at the bottom of the post. 
You can find important tips/tricks in the
blog post.

What happens when the Managing Director of the French Dairy Board comes to your town and discusses all kinds of cheeses from overseas? You halfway listen and stuff your mouth with all the beautiful cheese. Ok, no...don't do that, you should actually listen and focus less on stuffing your face. But yea, I stuffed my face. So yea, there was that time that the Managing Director of the French Dairy Board came to visit and I ate cheese until my heart was filled with joy. I posted this picture on my Instagram from the event.

cheese and snacks on board

One of the cheeses I was able to try was the Saint Agur Blue Cheese. This Blue Cheese was simply amazing! Creamy with just the right amount of strength. I despise blue cheese that is way too strong. The flavor is present but it's not too intense, which is usually the problem with most blue cheeses. Hubby always says that blue cheese taste like soap (I have no clue what he means by that) but when he tried this one, he actually liked it.

So I brought the cheese home and had fun with it. First, I drizzled some honey over it (a trick the Managing Director of the French Diary Board taught me) and had it as a snack with a glass of wine. Then I stared at it and asked "what in the world do you want me to do with you?!" And Eureka!!! Scalloped potatoes with blue cheese popped into my mind!

Scalloped potatoes with blue cheese on blue plate

The cool thing about these scalloped potatoes with blue cheeese is that they are super easy to make. In the spirit of Thanksgiving, easy and fancy recipes are a must. Who has times to slave over the side dishes when so much time will be spent on the turkey...and the pies. In less than an hour, you can have this in the oven baking up, ready for dinner. Also, everyone will think you are so fancy because blue cheese is so much fancier than cheddar.

Notes about Scalloped Potatoes with Blue Cheese

  • A nice and pretty casserole dish, about 1.5 to 2 quarts, works best for this type of dish. You should have about 4 layers if you use a similar sized dish.
  • Make sure you end with the Parmesan cheese on top when layering the ingredients. This will give that beautiful golden melted cheese crust on top of the dish.
  • Use a mandolin slicer on the 3.5mm setting for slicing your potatoes. I urge you to take extreme precautions when using this slicer. Please pay attention when using this. I learned my lesson the hard way. *ouch*
  • Any brand of blue cheese will do but the Saint Agur Blue Cheese highly recommended.

As always, Enjoy 🙂

potatoes au gratin in baking dish

Recipe adapted from Blue Cheese Potatoes Gratin

Scalloped potatoes with blue cheese. potatoes au gratin
Print Recipe
5 from 3 votes

Scalloped Potatoes with Blue Cheese

Author: Tanya

Ingredients

  • 2 lbs Russet Potatoes
  • 1.5 cup heavy cream
  • ½ cup crumbled blue cheese
  • ½ cup parmesan cheese
  • 2 cloves garlic
  • 1 Tablespoon butter
  • 1 Tablespoon flour
  • salt&pepper to taste

Instructions

  • Preheat oven to 375 degrees.
  • Thinly slice russet potatoes and set aside.
  • Melt butter over medium low heat in a saucepan. Mince garlic and add it to butter. Cook for about 1 minute, stirring constantly.
  • Add flour and stir until flour is dissolved. Add heavy cream and cook over medium low heat until mixture thickens, about 5 minutes. Season with salt and pepper to taste.
  • Remove from heat and add blue cheese. Stir to combine.
  • Spread some of the potatoes evenly on the bottom of a 2 qt casserole dish. Add enough blue cheese sauce to cover the potatoes, then add some shredded parmesan cheese on top of this layer. Continue with these layers (potatoes, blue cheese sauce, shredded parmesan cheese) until you have about 4 layers, finishing with the parmesan cheese on top.
  • Bake in preheated oven uncovered for 50 minutes or until potatoes are tender. Enjoy 🙂

Simple Pumpkin Cake Recipe

November 10, 2016 by Tanya 3 Comments

Simple pumpkin cake recipe. Made from scratch. Great Fall cake.

This Simple Pumpkin Cake Recipe is the perfect sweet treat for the Fall. No mixer needed when making this delicious Southern and Simple cake. 

Simple Pumpkin Recipe. No mixer needed to make this cake. Lemon frosting.

This post contains affiliate links, please read my full disclaimer here.

Full Recipe Ingredients/Instructions are available in the 
recipe card at the bottom of the post. 
You can find important tips/tricks in the
blog post.

Fall is here! O.k, it's been here for a while but I think I am just starting to accept it. We have had warm weather here in Charlotte and it's just starting to really feel like Fall. Booooooo!!!! I am not a fan of cold weather and all the shivers it brings to my body. I guess all is not negative when it comes to the weather changing, especially when it comes to food. Bring on the chillis, the soups, and pumpkin flavored everything. Speaking of pumpkin, I am now officially tired of it. However, before I toss out all my canned pumpkins sitting in my cabinet, I wanted to share this Simple Pumpkin Cake Recipe.

pumpkin cake half eaten with fork on plate

This Pumpkin Cake Recipe is something I discovered in the Southern Cakes: Sweet and Irresistible Recipes for Everyday Celebrations. I encourage everyone to check out this book. There truly are some gems inside.

Back in July, when the weather was lovely, I saw a co-worker of mine with the book. I asked to browse through it briefly and asked if at some point I could borrow it. Not too long after, the book ended up in my mailbox at work. There are a tons of cakes in here that I said I would try before I return it. So far, I've only tried this one. I've had it held hostage since then because I want to try more recipes. I promise I will return it soon y'all.

pumokin cake covered in frosting

This cake came out with the perfect consistency between being moist and crumby. The flavor reminds me of a spice cake with a pumpkin twist. The frosting is a lemon cream cheese frosting and it is a perfect combination when it comes to flavor. Another cool thing about this cake is that I made it with no mixer. I love my red KitchenAid but sometimes a Classic Wooden Kitchen Spoon is so much better. In fact, it's what the book recommends when it comes to combining the ingredients.

I hope you continue to enjoy the Fall if cold weather is you're kind of thing. I also hope you enjoy this recipe 🙂 Let me apologize in advance of having no video of me creating this beautiful cake. Darn camera wouldn't let me be great.

Simple Pumpkin Recipe. No mixer needed to make this cake. Lemon frosting.
Print Recipe
5 from 2 votes

Simple Pumpkin Cake Recipe

Author: Tanya

Ingredients

  • 2 ½ cups All purpose flour
  • 2 ½ tsps of baking powder
  • 1 ¼ teaspoon salt
  • ½ teaspoon baking soda
  • 2 teaspoon ground cinnamon
  • ½ teaspoon ground nutmeg
  • ½ teaspoon ginger
  • ¾ cup raisins
  • 1 cup chopped pecans
  • 1 cup plus 2 tablespoon vegetable oil
  • 2 cups sugar
  • 4 eggs
  • 2 cups canned pumpkin

For the Lemon Cream Cheese Frosting

  • 3 cups powdered sugar
  • 8 oz cream cheese softened
  • 1 lemon
  • 2 Tablespoon milk
  • pinch of salt

Instructions

  • Preheat oven to 325 degrees. Grease two 8 inch round cake pans, set aside.
  • Combine flour, baking powder, salt, baking soda, cinnamon, nutmeg, and ginger in a bowl. Set aside.
  • In another bowl, combine raisins and pecans. Add ¼ cup from the flour mixture to the raisins and nuts and stir to combine, set aside.
  • In another bowl, combine the sugar and 1 cup of vegetable oil. stir to combine. Add eggs one at a time and stir to combine.
  • Add the flour mixture to the sugar mixture and stir until all the flour disappears from the batter. Add the canned pumpkin and stir to combine. Then add the raisins and pecan mixture and stir until combined.
  • Place in prepared cake pans and bake in preheated oven for about 25 minutes, until the cakes are golden and a toothpick inserted in the center comes out clean. Remove from oven and allow cakes to cool completely.

For the Lemon Cream Cheese Frosting

  • Zest the lemon over a bowl. Cut the lemon and squeeze out all the juice in same bowl. Add cream cheese, milk, powdered sugar, and pinch of salt. Mix until smooth.
  • Frost the cake with frosting. Enjoy 🙂


Breakfast Granola Recipe

November 7, 2016 by Tanya Leave a Comment

This breakfast granola recipe is not only delicious, it's healthy and super easy to make. Make your own batch in less than an hour. 

breakfast granola on top of yogurt in glass cup

This post contains affiliate links, please read my full disclaimer here.

Full Recipe Ingredients/Instructions are available in the 
recipe card at the bottom of the post. 
You can find important tips/tricks in the
blog post.

It's super hard for me to get the energy to eat breakfast in the morning before work. Like seriously, I know it's extremely important to eat a healthy breakfast so your brain can function but I usually just don't have an appetite early in the morning. Am I the only one with this problem? Anyways, I strive for ways to get breakfast in my belly without too much fuss. Like seriously, not trying to cut the stove on in the AM before work. which is why make ahead breakfast recipes, like these Oatmeal Raisin Breakfast Cookies and this Strawberry Baked Oatmeal are perfect for me or anyone else who struggles with making breakfast before work. Oh le struggle!

The beautiful thing about this breakfast granola recipe is that it can be made ahead and stored. I like to make my breakfast granola on the weekend and eat it throughout the week. I store it for about a week but it usually doesn't even last that long. I eat this stuff for breakfast and snack.

granola in glass bowl over yogurt

It's also healthy! ok ok, yes it has white chocolate chips which may not be the healthiest thing on the planet, but with chia seeds and wheat germ added, I think it makes up for it.

I like to pile a ton of this healthy breakfast granola on yogurt or put it in milk and eat it as cereal. It can be eaten alone if that's your thing but I'm a big fan of dairy. So bring on the milk and yogurt.

Notes on Breakfast Granola Recipe

  • Feel free to swamp out  few of the ingredients. For example, if you hate white chocolate chips, use milk chocolate chips in this breakfast granola. But seriously, who in the world would hate white chocolate chips??
  • Be careful not to burn the granola. If it stays in the oven too long, it will have burnt taste to it. I start to check around 20 minutes to ensure it doesn't cook for too long.
  • I like to store my breakfast granola in mason jars . Keeps it nice and crunchy.
  • This would make perfect Christmas gifts. Seriously, bake up a batch, place them in mason jars, wrap a nice ribbon around it and give it to your coworkers and friends. They will love you for it! Your wallet will love you too!
Print Recipe
No ratings yet

Breakfast Granola Recipe

Author: Tanya

Ingredients

  • 2 cups rolled oats
  • ½ cup chopped pecans
  • ½ cup dried cranberry
  • ¼ cup wheat germ
  • ¼ cup chia seeds
  • ⅓ cup honey + 2 Tbsp
  • ¼ cup grape seed oil
  • ¼ teaspoon salt
  • ¾ cup white chocolate chips

Instructions

  • Preheat oven to 350 degrees F.
  • Place oats on baking sheet with parchment paper and bake for 10 minutes. Place in bowl.
  • Place chopped pecans on baking sheet and bake for 10 minutes. Place in same bowl.
  • Add dried cranberry, wheat germ, chia seeds, honey, and grape seed oil to bowl. Stir to combine.
  • Add white chocolate chips and stir to combine.
  • Place mixture on baking sheet and spread out. Bake in preheated oven for about 20-30 minutes, until fragrant and golden.
  • Remove from oven and allow to cool. Break into chunks. Enjoy 🙂
pinterest image for breakfast granola

How to Make BoJangles Biscuits

October 28, 2016 by Tanya 15 Comments

woman smiling holding cooked biscuits

I had the opportunity to travel to the Bojangles test kitchen and learn how to make Bojangles Biscuits. Continue reading to learn all about my experience in making these perfect fluffy buttery Bojangles Biscuits. 

author holding up pan of baked biscuits

If you've come here looking for all the secrets and the exact recipe for how to make Bojangles biscuits, well let me let you know now that I ain't got it. There is no way in the world Bojangles is going to give me or anyone else all their secret ingredients for those beautiful biscuits. I don't blame them either. However, I was able to learn a few things about the magic of how they make these biscuits. Keep reading if you want to learn more. Here's my recipe for fluffy buttermilk biscuits from scratch. 

photo of rolling pins over bojangles sign

Not all biscuits are created equally. Bojangles, a fast food chain that boast about its famous chicken and biscuits, has some pretty good biscuits. So imagine how excited I was when I was invited to the test kitchen with my  Charlotte Food Blogger friends to make biscuits. Seriously, imagine it...I was too excited. I think hubby and daughter kind of got tired of hearing about it.

I've only made biscuits a few times before learning how to make Bojangles biscuits. Feel free to check out my blueberry biscuit or Cinnamon Raisin Biscuits recipe.

Rumor is, there are at least 48 steps on how to make Bojangles biscuits. No, that's not a mistype...48. But I'll break it down in easier steps. As a matter of fact, I may be missing a few steps but I'll high lite the most important.

First, place your dry ingredients, including shortening, in a huge bowl.  Make a well in the middle of the bowl and add your cold milk, then stir with your hands until it resembles cottage cheese. Allow it to set for a while, maybe about 5 minutes.

Next, flour your surface. We made two circles, one small one to flatten our dough on and then another huge one to roll out our dough.

author putting flour on wooden table

Once you've done that, remove your dough from the bowl and place it on the small circle of flour. Press your dough down with your hands. You will flatten it a bit, fold it over each side into the center, and roll it from the top to make a cylinder.

author making face when touching wet dough
author rolling out dough

Once you've done that, roll the dough out with the pin. We used two pins, one to spread the dough out and one with nice metal circles on the end to ensure our dough was rolled out evenly.

author rolling out dough with rolling pin

Then we use our biscuit cutter to cut all of these biscuits. I was supposed to get 15 biscuits out of my dough and somehow I only got 14. Oooops.

author using biscuit cutter to cut put biscuits
author cutting out biscuits with cutter
author cutting out biscuits and almost done

Place biscuits on the tray, going from outside in to ensure all biscuits fit.

author placing biscuits on sheet pan
author finished with placing biscuits on sheet pan

Bake biscuits in a preheated oven on 400 degrees for about 9 minutes and then you have beautiful biscuits.

author looking down at biscuits

Now of course I could have eaten these biscuits just like they were but since I was at the test kitchen, I had to have some fun and create masterpieces with my biscuits. My sandwich was good but that dessert biscuit I made was something else. Ever had a bo berry biscuit?? It's a Bojangles biscuit with blueberries and icing. Now they are good by themselves but when you add some whip cream and sprinkles, it takes it to a whole other level.

biscuit sandwich on plate
biscuit with ice cream on top

Notes on how to make Bojangles Biscuits (or any biscuit)

  • Use all cold ingredients. That dough was freezing cold when I first put my hands in it but it allowed my biscuits to get nice and fluffy. The ingredients, including the dry ingredients, were all refrigerated before we started making biscuits.
  • Make sure that all your shortening is broken into small pieces. If any large pieces of shortening end up on the top of your biscuit, the biscuit will crack and it won't be pretty.
  • When rolling out dough, make sure your hands and utensils (rolling pins, counter top, etc.) are well floured so it doesn't stick. Have an extra bowl or sifter with flour handy to re flour.
  • Do not add flour directly to the dough. This is a no no. I honestly forget why, but hey, if the biscuit master says so, I follow instructions.
  • When cutting out biscuits, re-flour biscuit cuter after about 3 cuts to avoid flour stick.
  • Once you have cut your biscuit circles, remove outer scrap pieces first. It'll make your biscuits easier to pick up.
  • When placing biscuits in baking tray, go from outer in. It'll make your biscuits fit on the tray easier.
  • Do not grease your pan with butter....or it will burn. Griddle oil or shortening works best.
  • Brush the top of your biscuits with room temperature butter that is melted. Yummy Yummy in my tummy.

My experience was wonderful. I hope you learned a thing or two from my experience at the Bojangles kitchen. Also, make sure the next time you go into Bojangles and purchase a Bo berry biscuit, take it home and add whip cream to it. Best thing ever!

Five Spice Chicken Thighs

October 11, 2016 by Tanya 4 Comments

five spice chicken recipe. five spice chicken thighs

This Easy Five Spice Chicken Thighs recipe is one of the easiest yet tastiest chicken recipes you will ever eat.  Keep reading to find out more, recipe at the bottom. This post contains affiliate links, meaning if you click on a link and make a purchase, I get a little bit of change. 

five spice chicken thighs covered in green onion in orange plate

This post contains affiliate links, please read my full disclaimer here.

Full Recipe Ingredients/Instructions are available in the 
recipe card at the bottom of the post. 
You can find important tips/tricks in the
blog post.

I love easy peasy recipes. It's kind of a requirement for meals that are in our weekly rotation. Especially when I have busy work weeks and this week has been busy busy busy. So here's an easy peasy 5 spice chicken thighs recipe for you busy folks like me.

I created this recipe one night when I had chicken thighs in the fridge and not a clue what I wanted to do with them. So I went searching and searching through my spice cabinet trying to figure out what the heck I was going to put on these thighs. So I am searching and come across this 5 spice powder I had in my cabinet. I have tons of random spices by the way...I'm a spice hoarder, not afraid to admit it.

So I grabbed this powder and pulled out other ingredients and went to mixing and creating like a mad scientist and came up with this marindade. And this marindade...OMG, delish!

Over time, I tweaked the recipe a little. I suggest you allow the chicken to chill in the marinade for about 4 hours so those flavors really get in the chicken. Then just preheat your oven, throw them in a dish, bake for about 40 minutes, and KAZAM...dinner with a delicious sauce is ready.

chicken thigh on white plate

Notes About Five Spice Chicken Thighs

  • Five spice powder can be found at your local grocer. You can also buy spices online. Frontier Five Spice Powder, 1.92-Ounce Bottle
  • Typical spices in Five spice powder are cinnamon, anise, fennel, ginger, clove, and licorice root.
  • The green onion topping on these five spice chicken thighs are not mandatory but it makes the dish look fancy. Fancy wins...plus since I omitted the onion in the marinade I feel like it's a nice touch.
  • This recipe calls for baking the thighs. I would love to grill these babies and assume they would be even more delicious over a charcoal grill. I love charcoal over gas grills by the way...I just love that charcol flavor in grilled foods. Yummy. If you choose to grill, get rid of that extra marinade.
  • As always, make sure your chicken reaches an internal temperature of 165 degrees Fahrenheit. Always use a Instant Read MEAT Thermometer to ensure your chicken is done.
five spice chicken recipe. five spice chicken thighs
Print Recipe
No ratings yet

Five Spice Chicken Thighs

Author: Tanya

Ingredients

  • 1.5 lbs boneless and skinless chicken thighs
  • Marinade
  • 2 Tablespoon olive oil
  • 1 Tablespoon soy sauce
  • 1 Tablespoon rice wine vinegar
  • 1 Tablespoon brown sugar
  • 1 teaspoon minced garlic
  • 1 teaspoon Five Spice Powder
  • 1 teaspoon Siracha
  • pinch of salt
  • green onion chopped (for topping)

Instructions

  • Combine all ingredients in a large bowl. Massage marinade into chicken, ensuring you coat all pieces. Place in fridge and allow to marinate for 4 hours.
  • Preheat oven to 425 degrees Fahrenheit. Place in an oven safe dish and bake uncovered for about 40 minutes or until chicken has reached an internal temperature of 165 degrees F.
  • Remove from oven. Cover with foil paper and allow chicken to rest for 10 minutes. Sprinkle with green onion. Enjoy 🙂

Easy Pumpkin Cookie Recipe

October 6, 2016 by Tanya 4 Comments

easy pumpkin cookie recipe

This easy pumpkin cookie recipe makes the perfect soft cookie for the Fall. You can't go wrong with pumpkin and white chocolate. 

pumpkin cookies stacked on top of each other

This post contains affiliate links, please read my full disclaimer here.

Full Recipe Ingredients/Instructions are available in the 
recipe card at the bottom of the post. 
You can find important tips/tricks in the
blog post.

It's Pumpkin season, It's Pumpkin season!!! I had to get a recipe with pumpkin in it on the blog. I have created this easy pumpkin cookie recipe for all my pumpkin lovers. Even my non pumpkin lovers will love this one.

Now I know some people are getting so tired of pumpkin. Every Fall, the pumpkin flavor takes over our coffee creamers, our breads, and our soups. There are times when I get a little sick of pumpkin myself. But like a bad habit, I can't shake the pumpkin love. So I joined in and decided to make these pumpkin cookies.

This cookie recipe really tested my knowledge on baking a cookie. You know, there is an art to this stuff. I made multiple batches of this cookie recipe to get the right flavor, texture, and color. I was ecstatic when I finally found it. I brought these pumpkin cookies to work and it was coworker approved! They loved them! And if you're wondering, my coworkers are awesome and they keep it all the way real.  So if they say they're good, then they're good.

I added white chocolate chips to this pumpkin cookie recipe because I love white chocolate. I found that it was a great combination with the spices and the pumpkin flavor. Funny thing though, my daughter hates white chocolate so she ate all the cookie pieces around it. She's funny because although she hates white chocolate now, I assure you that in a few weeks she will be all about it.

cookie dough on parchment paper

These cookies come together with ease. I just put the ingredients in my stand mixer, stared in amazement as it mixed on its own, and plopped these babies on a baking sheet with parchment paper. Your house will smell so good while these pumpkin cookies are baking.

Check out the video below for visual instructions on how to make these yummy pumpkin cookies. As Always, Enjoy 🙂

Print Recipe
No ratings yet

Easy Pumpkin Cookie Recipe

Author: Tanya

Ingredients

  • ½ cup butter softened
  • ¾ cup white sugar
  • ¼ cup brown sugar
  • 1 egg
  • 1 teaspoon vanilla
  • 1 ½ cup flour
  • 1 teaspoon baking soda
  • 1 teaspoon cinnamon
  • ½ teaspoon nutmeg
  • ¼ teaspoon ginger
  • ¼ teaspoon salt
  • ½ cup pumpkin canned
  • 1 cup white chocolate chips

Instructions

  • Preheat oven to 350 degrees F.
  • Combine flour, baking soda, cinnamon, nutmeg, ginger and salt in a bowl. Set aside.
  • Mix butter in mixer until light and fluffy. Add white and brown sugar and mix.
  • Add egg and vanilla.
  • Add pumpkin.
  • Add flour mixture slowly.
  • Add in white chocolate chips and stir until combined.
  • Place on cookie sheet, about 2 inches apart with a rounded cookie scoop.
  • Bake in oven for about 12-14 minutes, or until the cookies are golden.
  • Remove from oven, allow to cool on baking sheet for 5 minutes. Then transfer to cooling rack to complete cooling. Enjoy 🙂

Parmesan Breadcrumb Chicken Recipe

September 25, 2016 by Tanya 2 Comments

This Parmesan Breadcrumb Chicken is not only a quick and easy weeknight dinner option, it's also a sure fire way to ensure you have no more dry chicken breast. 

Chicken on white plate cut and piece on fork

This post contains affiliate links, please read my full disclaimer here.

Full Recipe Ingredients/Instructions are available in the 
recipe card at the bottom of the post. 
You can find important tips/tricks in the
blog post.

As my first post after my week off, I wanted to post a quick and easy recipe that my family loves...this Parmesan Breadcrumb Chicken. In my not so professional opinion, chicken breast is one of the hardest parts of the chicken to cook perfectly. I remember back in the day, before I cared about the culinary arts, how much of a disaster it was when I tried to bake boneless chicken breast. I'd buy the chicken breast from the store, you know, those super thick pieces of boneless chicken breast. I'd preheat my oven, sprinkle a little season, mostly salt, pepper, and maybe paprika if I was feeling fancy, and stick it in the oven. I'd let it bake for a longggg time because my biggest fear is undercooked chicken. How would it turn out you may ask?? A super dry thick breast mess. May be the reason for some relationships ending in the past...

Fast forward to now. I still find chicken breast to be a bit difficult at times but not with this Parmesan Breadcrumb Chicken Recipe. Every time I make this, the chicken is moist and flavorful. My daughter and hubby love it and I never stress about dry chicken.

Here are all the ingredients you will need:

ingredients for parmesan chicken breast

That's it...not that much. Dinner will be done quickly and your chicken breast will look like this in about 30 minutes.

close up parmesan breadcrumb chicken.

Hooray for no more dry chicken, Recipe deets are below. As always, don't forget to Enjoy 🙂

Print Recipe
No ratings yet

Parmesan Breadcrumb Chicken Recipe

Author: Tanya

Ingredients

  • 1.5 lbs boneless skinless chicken breast
  • ⅓ cup mayonnaise
  • 1 cup Italian Panko Breadcrumbs
  • ½ cup shredded parmesan
  • 1 Tablespoon fresh parsley finely chopped
  • 1 Tablespoon dry basil
  • ½ teaspoon garlic powder
  • Salt and pepper

Instructions

  • Preheat oven to 400 degrees.
  • Flatten chicken breast or slice in half to desired thickness.
  • Season chicken breast with a little salt and pepper. Rub mayonnaise all over chicken.
  • Add breadcrumbs, parmesan cheese, parsley, basil, and garlic powder to a dish and combine. Dip chicken breast in mixture and make sure each piece is fully coated.
  • Place on baking sheet and bake in preheated oven for about 30 minutes or until done, when temperature reaches 160 degrees F. Enjoy 🙂

Mini Dutch Baby Pancakes Recipe

September 11, 2016 by Tanya 7 Comments

mini dutch baby pancake recipe

This Mini Dutch Baby Pancakes Recipe is my idea of a delicious and easy breakfast on a Saturday morning. Ready in less than 30 minutes and no more standing over the stove flipping pancakes. 

mini pancakes in ramekins covered in blueberries and sugar

This post contains affiliate links, please read my full disclaimer here.

Full Recipe Ingredients/Instructions are available in the 
recipe card at the bottom of the post. 
You can find important tips/tricks in the
blog post.

As summer comes to an end, I had to pop on the blog and post one of my all time favorite breakfast recipes, Dutch Baby Pancakes. Soon pumpkins, squash, and the color orange will take over and no one will care about anything else. Le sigh....I like fall and all but summer is my favorite season. Warm weather and fresh fruit will be missed greatly by me.

ramekins covered in powdered sugar and lemon in photo

So about these Mini Dutch Baby Pancakes...they're amazing! Whoever thought about baking a pancake is a genius and should be honored. I'd make a plaque and hold a fancy dinner because baking pancakes is such a great idea. Seriously, the steps are as simple as preparing the batter, popping it in the oven, and then "ding ding ding," breakfast is done. No longer are the days you have to watch the stove to ensure your pancake doesn't burn. No worries about flat pancakes with this dutch baby recipe. I don't know if I'll ever make pancakes any other way.

I love these babies as minis. Why you may ask? Honestly...because they are soooo freaking cute. I used to make my dutch baby in a big cast iron skillet...which is cool and all....but this is just too cute and fancy to resist. And what about these cute ramekins? Perfect display when you want a fancy breakfast layout.

In order to make these mini dutch baby pancakes, you'll need butter, eggs, milk, All Purpose flour, sugars, vanilla extract, lemon juice, and fresh fruit. I bet you you can find all these ingredients in your house without even taking a trip to the grocery store. Another thing I love about this recipe.

ingredients for mini dutch pancake

Oh...and a blender. You need a blender. Can you believe mine died when I was preparing this very recipe. I improvised though and used a food processor. They came out just fine. But my poor blender, I'll miss it.

Hopefully you love this recipe as much as my family and I do. My daughter has even become a pro in making these and wants to have competitions on whose taste better and who makes a better presentation. I let her think she wins.

Well I'm off to enjoy these last few days of summer...until next time, Enjoy 🙂

Looking for more Breakfast Recipes?? Try these out:

  • Million Dollar Bacon
  • Egg Frittata (Air Fryer Recipe)
  • Creamy Cheese Grits with Jalapeño (Instant Pot Recipe)
  • Instant Pot Egg Bites 
  • Corned Beef Hash Breakfast Casserole
  • Strawberry Baked Oatmeal
mini dutch baby pancake recipe
Print Recipe
4.75 from 4 votes

Mini Dutch Baby Pancakes Recipe

This Mini Dutch Baby Pancake Recipe is the delicious and fun. Perfect treat for making breakfast with the kids. Top with fresh fruit for a well rounded breakfast. 
Prep Time10 minutes mins
Cook Time17 minutes mins
Total Time27 minutes mins
Course: Breakfast
Cuisine: American
Keyword: mini dutch baby pancakes
Servings: 6 people
Calories: 235kcal
Author: Tanya

Equipment

  • Mini Colorful Ramekins

Ingredients

  • 4-6 Tablespoon butter*
  • 4 eggs
  • 1 cup milk
  • 3 Tablespoon granulated sugar
  • ¼ teaspoon salt
  • ½ teaspoon vanilla extract
  • 1 cup flour
  • fresh fruit preferrably strawberries and blueberries
  • fresh lemon juice
  • *Amount of butter will depend on size of ramekins. Use 6 ramekins if they are small and 4 if they are the larger kind.

Instructions

  • Preheat oven to 400 degrees Fahrenheit
  • Place 1 tablespoon butter in each ramekin. Place in oven to allow butter to melt.
  • Meanwhile, add eggs to a blender and blend for about 1 minute, until eggs are frothy.
  • Add milk, sugar, salt, vanilla extract, and flour to blender. Mix until combined.
  • Remove ramekins from oven and use a pastry brush to spread butter on sides of ramekins.
  • Add batter to each ramekin making sure an equal amount is in each.
  • Place ramekins back in oven and bake for 17-20 minutes, or until pancakes have risen and tops are golden brown.
  • Top each pancake with fresh fruit, a squeeze of lemon juice, and powdered sugar. Enjoy.

Nutrition

Calories: 235kcal | Carbohydrates: 24g | Protein: 7g | Fat: 12g | Saturated Fat: 7g | Cholesterol: 134mg | Sodium: 224mg | Potassium: 116mg | Fiber: 1g | Sugar: 8g | Vitamin A: 461IU | Calcium: 68mg | Iron: 1mg

Baked Italian Chicken with Mushrooms

August 29, 2016 by Tanya 8 Comments

italian baked chicken and mushrooms
italian baked chicken and mushrooms on a plate with dark background

This post contains affiliate links, please read my full disclaimer here.

Full Recipe Ingredients/Instructions are available in the 
recipe card at the bottom of the post. 
You can find important tips/tricks in the
blog post.

This Baked Italian Chicken with Mushrooms recipe is quick, easy, and flavorful. Perfect for those days when you're in need of a quick dinner fix with very little fuss.

Alrighty, enough of my complaints...let me get to the point of this post, this Italian Chicken with Mushrooms recipe. Busy months require recipes like this...when you can come home, put the ingredients in the oven for about 35-40 minutes, and BAM, dinner is ready. No more whining from the kid and no more pouting from the hubby about when dinner will be served.

[Read more...]

Cheese and Wine Tasting Experience at FlatIron

August 26, 2016 by Tanya 1 Comment

cheese and wine experience platter

Flatiron Kitchen + Taphouse, located in Davidson, N.C.,  prides itself on its big city culinary experience specializing in high quality meats and sides.  I had an opportunity to partake in a cheese and wine tasting experience here and I thoroughly enjoyed myself. Read about my experience below. 

cheese, nuts, olives on board

My first ever cheese and wine tasting experience occurred at a cute restaurant located in Davidson, NC known as Flatiron Kitchen + Taphouse . Shout out to The Charlotte Food Bloggers for organizing this event.

Davidson N.C. is a cute little town located north of Charlotte. I usually  wouldn't make  the 30 minute drive up I-77 but had to check out this cheese and wine event hosted by this restaurant. Hubby and I have always wanted to throw a cheese and wine party and I figured that this would be a great place to get ideas.

Let me take a moment to discuss this cheese and wine party my hubby wants us to host.  He wants our guest to wear tuxedos and ballgowns and he wants a butler to carry around the cheese and wine on huge platters. He wants to call it a fancy affair and have everyone walk around with perfect posture. This may not seem odd to many people, but my hubby likes to wear overalls on a weekly basis. It just totally shocks me that he wants to have this party. I mean seriously, check out the picture of us below at his grandmother's house...wine and cheese party people or nah?

man and woman sitting in front of car eating
grilled bed and glass of water on table
cheese and wine experience platter

Alrighty...back to my cheese and wine tasting experience at Flatiron. First, we were greeted by our host, Jason, who would guide us through our wonderful cheese and wine experience. Jason was a great host and had already picked out the combination he thought we would enjoy. 

Our cheese trays came with 6 kinds of cheese (Appalachian Creamery, Buttermilk Blue Cheese, Goat Cheese, Sheep Cheese, Extra Sharp Cheddar Cheese, and Double Cream Soft Cow Cheese). The tray also came with palate cleansers to help cleanse the palette after each tasting (olives, walnuts, the best fig jam ever, grapes, and dried apricots). Grilled bread also was brought to our table as a palate cleanser and it was amazing. I could have eaten that all by itself as a meal.

We tried a different wine with each kind of cheese...yes, that's 6 glasses of wine....no worries, I didn't finish all my glasses but if I were close enough to uber, I sure would have.

My favorite cheese, although pungent, salty, and soooo blue was the blue cheese. It was paired with a Riesling wine known as P.J. Vackenberg from Germany. The blue cheese taste, which was strong in this cheese, shocked me at first but having it with that Riesling really calmed down that flavor. I ate the whole piece.

bluecheese on a fork

My least favorite cheese was a sheep cheese known as Manchego. My first, and possibly last time trying this. This cheese is hard, chalky, and pretty much flavorless in my opinion. It was matched with a red Spanish Tempranillo wine, which I loved.

hand holding sheep cheese

I could go on and on about each cheese and the multiple wines but I would strongly urge you to check out Flatiron if you're in the neighborhood or don't mind the drive or uber ride un I-77. Among other items, they have an Artisan Cheese and Meat Plate on the menu.

I had a blast at my first wine and cheese tasting experience at Flatiton in Davidson. I'll also note that they have a complintmentary ine tasting once a month. Information can be found here KnoWine Night .

sign of flatiron kitchen and taphouse

Vietnamese Chicken Salad Recipe

August 10, 2016 by Tanya 2 Comments

vietnamese chicken salad

This light and flavorful Vietnamese Chicken Salad Recipe with Asian flavors is a must have on your lunch menu. Bring it to work or eat it at home on the weekends, you and your family will fall in love. 

chicken salad in white bowl

This post contains affiliate links, please read my full disclaimer here.

Full Recipe Ingredients/Instructions are available in the 
recipe card at the bottom of the post. 
You can find important tips/tricks in the
blog post.

I tend to post on here once a week and missed last weeks posting. I seriously thought that I would be able to post while away on vacation but I seriously thought wrong. If you follow me on Instagram or Twitter, you may have noticed that I posted some gorgeous pics from Jamaica. I had so much fun visiting family, chillaxing, and eating some great food. I thought about not coming back but...I got bills. Speaking of bills, I returned to work yesterday and thankfully, it wasn't a nightmare when I returned. I guess it's a blessing when you love what you do.

I decided that my first post upon my return should be another bring your lunch to work recipe. In an attempt to save some coins so that I can continue to take amazing vacations I am trying to make more lunches that I can prep ahead of time and carry to work. This is where this Vietnamese Chicken Salad Recipe comes in handy.

This salad takes a bit of prep work when it comes to chopping, slicing, and dicing...but nothing too major. Once you've chopped your veggies, the rest of it comes together with great ease.

I generally make this salad on a Sunday (when Rotisserie chicken goes on sale at my local supermarket) and pack it away for lunch. It can serve me and hubby for about two lunch days.

Make sure you pack the salad portion (veggies and chicken) in a separate bowl from the dressing or else you will have soggy salad. Unless you're into that kind of thing...

The dressing for this salad contains fish sauce, also known as stinky sauce in my house. I've eaten this salad at work and no one has called me stinky girl but be warned fish sauce has a well...fishy smell. Since this salad is so freaking good, I think it's worth the risk of being called stinky girl.

Here are the recipe ingredients laid out on my itty bitty table. Don't forget to top your salad with crushed peanuts...if you're into that kind of thing.

ingredients for vietnamese chicken salad

I've created a recipe video for this one illustrating the creation of this wonderful Vietnamese Chicken Salad Recipe. Hope you all enjoy 🙂

Looking for my light recipes? Try these out:

Rotisserie Chicken Salad

Kale and Broccoli Salad with Sweet and Sour Dressing

Thai Chili Cucumber Salad

vietnamese chicken salad
Print Recipe
No ratings yet

Vietnamese Chicken Salad Recipe

Author: Tanya

Ingredients

For the Salad:

  • 2 cups of shredded chicken breast from a rotisserie chicken
  • 4 cups of napa cabbage shredded
  • 1 red bell pepper chopped
  • 4 green onions sliced
  • 1 cup matchstick carrots
  • ½ cup cilantro chopped
  • ½ cup mint leaves chopped
  • ½ cup peanuts chopped (optional)

For the Dressing:

  • ¼ cup fresh lime juice
  • 1 teaspoon Sambal Oelek Also known as Vietnamese Chilli Paste
  • 3 cloves garlic grated
  • 2 Tablespoon sugar
  • 3 Tablespoon fish sauce
  • 3 Tablespoon Vegetable oil

Instructions

  • First, remove skin from rotisserie chicken and eat it because it is delicious! Then remove meat, preferably chicken breast and place in a bowl and set aside.
  • Combine cabbage, bell pepper, green onion, carrot, cilantro, and mint in a bowl and toss to combine. Set aside.
  • Add chicken to bowl with vegetables and toss to combine.
  • In a separate bowl, combine dressing ingredients and whisk.
  • When ready to eat, top salad with crushed peanuts and dressing. Enjoy 🙂

Recipe adapted from Once Upon a Chef.

Cucumber Ginger Juice

July 6, 2016 by Tanya 2 Comments

Cucumber ginger juice

This refreshing cucumber ginger juice recipe will leave you happy you had the chance to drink your veggies for the day. It's a delightful drink for those long, hot summer days.

Cucumber ginger juice in glass with paper straw

This post contains affiliate links, please read my full disclaimer here.

Full Recipe Ingredients/Instructions are available in the 
recipe card at the bottom of the post. 
You can find important tips/tricks in the
blog post.

My husband started a garden at his grandmother's house. I didn't really understand why initially but now I get it. He finds a certain joy in coming home with bags full of vegetables that he has planted. The garden has all types of vegetables and fruit that include tomatoes, peppers, cabbage, cucumbers, onions, cantaloupe, green beans, okra, sweet potatoes, two kinds of watermelon, and corn. Everyone has worked in the garden...except me. Even my husband's 96 year old grandma got out there and pruned some weeds. Maybe one day I will make it out there to help out...but this heat keeps telling me to stay cool on the inside.

One day, as I sat in the A.C. looking out the window, smiling at the beautiful sunshine, my hubby came home and brought me these beauties:

cucumbers from my husbands garden on table

Cucumbers! A lot...and I mean a lot of cucumbers. I had no clue what to do with them all. So I did what any logical food blogger would do, I asked The Facebook. I got many responses and ample advice. Most people suggested I make pickles with these cucumbers, which I did. However, I didn't want to eat way too many pickles and get pickle wasted.

My cousin, Vern, suggested a cucumber ginger drink and even provided a recipe. Her recipe was simple, quick, and easy. She even suggested that I could add a splash of rum if I wanted. Feel free to add a splash to yours as well.

This recipe is pretty quick and easy to make. The ginger gives it a unique flavor and the lime cuts down on the strong flavors of the ginger providing a good balance. Feel free to omit the rum as I did in this video. If you do add rum, make sure it is only a dash as the rum can be overpowering.

Hope you all enjoy this recipe as much as I did. Special thanks and shoutout to everyone that gave advice on what I should do with those cucumbers. I had fun trying out different recipes and I am looking forward to sharing more in the future. Enjoy 🙂

Cucumber ginger juice
Print Recipe
5 from 1 vote

Cucumber Ginger Juice

Author: Tanya

Ingredients

  • 3 small-medium sized cucumbers
  • 1 teaspoon of freshly grated ginger
  • 1 teaspoon of sugar in the raw
  • juice of 1 lime
  • splash of rum Optional

Instructions

  • Cut cucumbers and add to blender.
  • Grate ginger and add to blender.
  • Add sugar in the raw and lime juice.
  • Blend until desired consistency.
  • Enjoy 🙂
  • ***If using rum, add a splash during blending process. Careful not too add too much.

Dukkah Spice Mix

June 19, 2016 by Tanya 15 Comments

dukkah egyptian spice mix

Dukkah Spice Mix, also known as Egyptian Spice Mix, is probably my favorite spice mix in the whole entire Universe. Ok, those are some strong words but I will say that when I came across this Dukkah Spice mix, I fell in love. This mixture of flavorful spices will have you fall in love too. This post may contain affiliate links, please read my full disclosure here.

dukkah egyptian spice mix in jar


I came across this spice mixture when I ordered one of those cooking at home kits where they deliver the meals to your door. Love those things! Anyways, this kit had a Dukkah Spiced chicken recipe. What in the world is Dukkah I thought and will I really be this courageous to try it? Oh well, here goes I thought. The kit came with a little packet of the spice mix, chicken, and sweet potatoes. There were a few other ingredients but I now forget what they were.

I was instructed to chop my potatoes, add olive oil, and sprinkle with the Dukkah spice seasoning. I was instructed to add the same seasoning to the chicken as well. Odd I thought, very odd. Why in the world would they tell me to add this seasoning to the chicken and potatoes? Because it is just that forking delicious!!!

After dinner that night, I rummaged through my kitchen looking for that little spice packet. What the heck is in this stuff I thought. It must have 40 ingredients! To my surprise, it listed only 5: Almonds, coriander, cumin, sesame seeds, and salt. That's it! I've got to find this stuff I thought.

So for weeks, I went searching for this stuff in the stores and could never find it. Like seriously, my local grocery stores are missing out by not stocking this magical Dukkah Spice Mix. Then it hit me, duh Tanya, you can make this at home...it has like 5 ingredients.

So I went to the world wide interwebs and I found out how to make it. This stuff is so good, don't be surprised if you get a jar of it from me for Christmas. In the meantime, you can make it yourself.

So now I will share my recipe with you all. Oh, by the way, did I mention that all (well most) of my recipes will be on video as well? I love visual explanations and thought I would give it a go. Feel free to leave me feedback on whether you like  the videos or not. Here are the recipe deets:

spices and nuts in ramekins on table

First, grab your ingredients:

Then, add your coriander seed (½ cup), sesame seeds (½ cup), cumin seeds (¼ cup), and whole black peppercorn (1tsp) to a skillet over medium low heat and stir until you can smell the spices, about 5 minutes.

spices being toasted in cast iron skillet with wooden spatula

Once your nose is filled with the beautiful smell of spices, remove seeds from stove and add to a food processor with 1 cup roasted whole almonds and 1 teaspoon salt.

spices and nuts in food processor

Pulse until ground.

chopped spices in food processor

And there you have it, Dukkah Egyptian Spice Mix. Sprinkle over any meat, fish, or vegetable you like.

pin image of dukkah seasoning in glass jar.

Here's a photo of my pan fried chicken with the Dukkah spice seasoning. Looks yummy right!

collage: dukkah in glass jar on left, dukkah on cooked chicken on right

Looking for more Homemade Spice recipes? Try these out:

Homemade BBQ Seasoning

Homemade Poultry Seasoning

dukkah egyptian spice mix
Print Recipe
5 from 3 votes

Dukkah Spice Mix

Easy and flavorful Dukkah spiced mixed. 
Prep Time5 minutes mins
Cook Time5 minutes mins
Total Time10 minutes mins
Course: Main Course
Cuisine: African
Keyword: dukkah spice mix
Author: Tanya

Ingredients

  • 1 cup roasted almonds
  • ½ cup sesame seeds
  • ½ cup coriander seeds
  • ¼ cup cumin seeds
  • 1 teaspoon whole black peppercorn
  • 1 teaspoon sea salt

Instructions

  • Add sesame seeds, coriander seeds, cumin seeds, and whole black peppercorn to skillet over medium-low heat for about 5 minutes, or until you can smell the aroma of the spices. Make sure to stir continuously to avoid burning.
  • Once toasted, remove seeds and add to food processor. Add roasted almonds and sea salt. Turn on processor and process until nuts and seeds are finely ground.
  • Store in an airtight container in the refrigerator,

Notes

Can be added to meat, fish, or your favorite vegetable.

Adapted from The Kitchn

Pin Dukkah Spice Mix for Later

Dukkah Egyptian Spice Mix. Perfect spice mix for Poultry, Meats, and Vegetables. dukkah spice.

How to Make a Fruity Martini at Home

June 11, 2016 by Tanya 1 Comment

Learn how to make a fruity martini at home. Save money, drink good drinks.

*This post contains affiliate links and is intended for ages 21 and up.

This post contains affiliate links, please read my full disclaimer here.

Learn how to make a fruity martini at home. Watch the video for more details, recipe below.

You must try this Fruity Martini with fresh Strawberries. At less than $2.50 per serving, this martini is not only delicious, it's budget friendly. We decided to prepare this martini after realizing we were spending way too much on drinks when we went out to dinner. Seriously, imagine going to a restaurant and ordering two meals at 15 dollars. Pre tax, and if you drink water, your dinner would be 30 dollars. But if you add 5 or 6 drinks, especially martinis...you start sweating bullets wondering how much that bill will be. Now I'm not saying I'll never have a martini or two when I go out to eat, but it would be nice to make some of these fancy pants martinis at home.

All you need is the alcohol, ice, martini glasses or a spice jar (the spice jar explanation is in the video), and a martini shaker. Oh, and of course fruit if you are fancy like we are.

We have received rave reviews on this drink! OK, so my friend Tia and my best friend Miss. Tracy tried it out and loved it. hehehe. Best review was that it taste like a Jolly Rancher. And for those of us that don't get enough fruit in our diet, here's a great place to start.

Enjoy a date night or get together at home by making this drink and turn up! Enjoy 🙂

Learn how to make a fruity martini at home. Save money, drink good drinks.
Print Recipe
No ratings yet

How to Make a Martini at Home

Author: Tanya

Ingredients

  • Ice
  • 3 parts Watermelon Pucker
  • 2 parts white Tequila
  • 3 parts Sweet & Sour Mix
  • Sliced Strawberries

Instructions

  • Add ingredients in shaker.
  • Shake vigorously for about 30 seconds.
  • Pour into martini glasses or spice jar. Enjoy 🙂
Learn how to make a fruity martini at home. Save money, drink good drinks.

Peach Sweet Tea and Rum

June 7, 2016 by Tanya 3 Comments

peach rum iced tea

Cool and refreshing Peach Sweet Tea that's perfect for the summer.

peach rum iced tea on a table outside

This post contains affiliate links, please read my full disclaimer here.

This post is sponsored by Southern Breeze Sweet Tea. All opinions are my own.

My all time favorite season is summer! I got married on the first day of summer. I dream of summer in the winter. If I could put summer in my pocket and keep it year round I would. I can’t control my excitement that the warm weather is finally here!

You know what that means in the South? Fireflies, porch sitting, and Sweet Iced Tea!

Well, let me correct myself. People in the South drink sweet tea year round, not just in the summer. However, mixing a pitcher of sweet tea and sitting on your front porch waving to neighbors is a great way to spend a Saturday afternoon. As a matter of fact, sitting on your front porch drinking this Peach Sweet Tea and Rum and waving to neighbors is a great way to spend a Saturday afternoon.

This Peach Sweet Tea and Rum drink was created using Southern Breeze Sweet Tea.  These tea bags are not your typical tea bags. The cool thing is they come in Family Pitcher sizes already. No need in finding 10 tea bags to make 1 pitcher of iced tea, all you need is 2 of these Family Sized bags.  

How much sugar should you add when making sweet tea? A question you don’t need to ask when using Southern Breeze Sweet Tea because the sweetener is in the bag! What a win with this no sugar sweet tea!

Feel free to make this tea on its own without the addition of alcohol or fruit. I added peaches and rum into my tea because....well I have no good reason, it's rum and peaches, why not?

This drink is a breeze to make and you will enjoy sitting on your porch waiving and cheesing at everyone as they walk by. You may even catch yourself smiling and waving at that neighbor who you secretly dislike.

If you like this, you'll love my Spiced Iced Sweet Tea.

Here are the recipe deets:

Prepare your Southern Breeze Sweet Tea by bringing 2 quarts of water to a boil.

boiling water in saucepan

Once boiled, add water and 2 Family Sized Tea Bags to a pitcher and let steep for about 5 minutes.

tea bags for iced tea in water in pitcher

Remove the bags and discard. Place pitcher in fridge to cool.

Once cooled, Slice 2 ripe peaches and add to the pitcher. Add ½ cup of dark rum.

peaches sliced
dark rum for iced tea in measuring glass

Stir and serve over ice. Enjoy 🙂

glass of peach tea lemonade in southern breeze sweet tea glass

*Southern Breeze Sweet Tea is zero calories and contains the sweetener in the bag along with the tea leaves. It comes in a variety of flavors for all you sweet tea lovers out there.

peach rum iced tea
Print Recipe
No ratings yet

Peach Sweet Tea and Rum

Author: Tanya

Ingredients

  • 2 Family Sized Southern Breeze Sweet Tea Original Flavor
  • 2 quarts of water
  • 2 ripe peaches
  • ½ cup dark rum

Instructions

  • Prepare your Southern Breeze Sweet Tea by bringing 2 quarts of water to boil.
  • Once boiled, add water and 2 Family Sized Tea Bags to a pitcher and steep for about 5 minutes. Remove the bags and discard.
  • Place sweet tea in fridge to cool.
  • Once cooled, Slice 2 ripe peaches and add to the pitcher. Add ½ cup of dark rum. Stir and serve over ice. Enjoy 🙂

Strawberry Basil Lemonade Recipe

May 31, 2016 by Tanya 9 Comments

This Strawberry Basil Lemonade Recipe will leave you refreshed and and satisfied. Try this delicious spin on your traditional Lemonade recipe. 

strawberry basil lemonade in a pitcher with lemons surrounding it

This post may include affiliate links, please read my full disclosure here.

Post updated on 3/28/19 

Full Recipe Ingredients/Instructions are available in the 
recipe card at the bottom of the post. 
You can find important tips/tricks in the
blog post.

If you follow me on the Gram, you will realize that I eat out more than I should. I promise I am trying to change my ways but I won't lie, I love restaurants. Typically when I go out to eat, I always order just a water to drink. Why you may ask? Because I am cheap and also because I think water is delicious!

Well one day while eating out with my hubby, I decided to be fancy and ordered a strawberry lemonade instead of a water. You all, I was super excited about this strawberry lemonade. I was ready for my taste buds to jump out of my mouth and do the running man on the table. And not that new dance they claim is the running man, but old school Kid&Play running man.

I was ready for magic....and when I took that first sip of that strawberry lemonade, I wanted to cry. It was gross. I politely asked my waiter to bring it back and went back to my traditional water. This is where the idea of strawberry basil lemonade began.

This experience made me want to go home and make up my own recipe for strawberry lemonade, and I did!

strawberry basil lemonade in glass with stray

This recipe calls for a few simple ingredients: strawberries of course, lemon, sugar, and......BASIL! A lot of you are probably thinking I have gone insane? " Basil?" "In my drank?" "Are you for real?"

Why yes I am.

Now feel free to omit the basil if you want, this strawberry lemonade is still delicious without it. But I wanted to kick it up a notch.

How to make Strawberry Basil Lemonade

First, create a simple syrup by combining 1 cup of white sugar and 1 cup of water in a medium pot and bring to a boil. Boil until sugar is dissoved. Remove from heat and allow to cool.

sugar in measuring cup being poured into water in saucepan

Next, squeeze about lemons to make about 1 cup of squeezed lemon juice. Set aside.

half a lemon on juicer top

Next, chop about 12 medium straberries, yielding about 1 ½ cup of strawberries. Add that and about ¼ cup of basil leaves to a food processor and process until smooth. I like to use my mini food processor for this recipe. 

Strain strawberry and basil mixture through a fine strainer into a pitcher. Add simple syrup mixture, lemon juice, and 2 ½ cups of water to a pitcher. Stir until combined.

water being poured into pitcher with strawberry syrup

Serve chilled over ice and Enjoy 🙂

Variations of this Recipe

This flavor profile goes great in a margarita. Check out my Strawberry Basil Margarita.

Looking for other Drink Recipes? Try These Out:

  • Jamaican Carrot Juice
  • Jamaican Rum Punch
  • Peach Sweet Tea and Rum

Pin Strawberry Basil Lemonade Recipe for Later

strawberry basil lemonade pin for pinterest
Print Recipe
4.50 from 2 votes

Strawberry Basil Lemonade Recipe

This strawberry basil lemonade recipe is a refreshing sweet treat that is perfect for any spring or summer day. #strawberrylemonade #summerdrinks #lemonade
Prep Time10 minutes mins
Total Time10 minutes mins
Course: Drinks
Cuisine: American
Servings: 6 people
Calories: 149kcal
Author: Tanya

Ingredients

  • 1 ½ cups chopped strawberries about 12 medium strawberries
  • ¼ cup basil chopped
  • 1 cup lemon juice squeezed from lemons
  • 3 ½ cups water divided
  • 1 cup sugar

Instructions

  • Create a simple syrup by combining 1 cup sugar and 1 cup water in a small pot and bring to a boil until sugar is dissolved. Turn off stove and allow mixture to cool to room temperature.
  • Add strawberries and basil to a food processor or blender and pulse until combined and mixture is smooth.
  • Strain strawberry and basil mixture into pitcher. 
  • Add 2 ½ cups of cold water, lemon juice, and simple syrup to a pitcher. Stir until combined.
  • Serve over ice. Enjoy 🙂

Notes

Suggested Tools for Strawberry Basil Lemonade

  • Mesh Strainer 
  • Mini Food Processor
  • Pitcher

Nutrition

Calories: 149kcal | Carbohydrates: 38g | Sodium: 8mg | Potassium: 96mg | Sugar: 36g | Vitamin A: 55IU | Vitamin C: 37.1mg | Calcium: 14mg | Iron: 0.2mg

Sweet Chili Asian Wings - Cooking with Flemz

May 26, 2016 by Tanya Leave a Comment

Sweet Chilli Asian Wings is a quick and easy appetizer that can be created with ease. No excuse not to make these as it has only 6 main ingredients. Woo hoo!

This post contains affiliate links, please read my full disclaimer here.

Print Recipe
No ratings yet

Sweet Chili Asian Wings

Sweet Chili Asian Wings are easy to make and delicious. 
Prep Time10 minutes mins
Cook Time25 minutes mins
Total Time35 minutes mins
Course: Appetizer
Cuisine: American
Keyword: asian wings
Servings: 4
Calories: 512kcal
Author: Tanya

Ingredients

  • 3 lbs chicken wings
  • ¾ cup sweet chilli sauce
  • 2 Tablespoon soy sauce
  • 1 teaspoon minced garlic
  • 1 teaspoon ginger
  • 2 Tablespoon cilantro
  • salt & pepper

Instructions

  • Preheat oven to 500 degrees. Prepare baking sheet by lining with foil and spraying with cooking oil.
  • Season chicken wings with salt & pepper, not too much, not too little.
  • Place chicken wings on baking sheet and cook for 20-25 minutes, or until cooked through.
  • While wings are baking, make your sauce by combining sweet chilli sauce, soy sauce, garlic, and ginger.
  • Once wings have finished baking, remove and place them in sauce, tossing to coat.
  • Place wings back on pan and return to oven for 5 minutes to allow sauce to bake into chicken.
  • Remove and sprinkle with cilantro. Enjoy 🙂

Nutrition

Calories: 512kcal | Saturated Fat: 8g

Easy Baked Chicken Wings in Sweet & Sour Sauce

May 23, 2016 by Tanya 17 Comments

finshed

This post contains affiliate links, please read my full disclaimer here.

Full Recipe Ingredients/Instructions are available in the 
recipe card at the bottom of the post. 
You can find important tips/tricks in the
blog post.

Easy Baked Chicken Wings in Sweet & Sour Sauce is an ideal recipe for any busy night. I get it, I get it...I literally say this about all my recipes. Yet it's true, my goal in life is to provide easy and quick recipes you can whip up in a breeze. So here goes another.

I didn't typically think of wings as a dinner item when I initially started cooking. When most people think of wings, they think of appetizers. Well that's the win win of the situation, wings can be both. Whether you're hosting a party or just feeding your hungry family, these can be whipped up in a second...or like 30 minutes 🙂

Now I'd like to take a moment and discuss this sauce...oh this sauce. Anyone else love that sauce from the Chinese restaurants that comes when you order Sweet & Sour chicken? Well...this isn't it. I always tried to replicate it in my kitchen by combining ketchup, white sugar, and vinegar...Fail, complete fail, lol. It never came out like the restaurants. I did however change up the ingredients and came up with the sauce below. It's great on the wings and it is daughter and hubby approved. Here are the recipe deets.

First, Preheat oven to 400 degrees F. Prepare a baking pan by covering with foil and spraying with cooking spray until fully covered, set aside.

Next, combine ½ cup ketchup, 1 tablespoon white vinegar, 1 tablespoon brown sugar, 1 tablespoon soy sauce, 1 clove minced garlic and 1 teaspoon grated ginger in a medium bowl. Stir and set aside.

Ingredients for chicken wings in white ramekins

Ingredients

mixed sauce in glass bowl with spoon sticking out

mixed sauce

Next, season 2 lbs chicken wings with salt & pepper....use your judgment here. Not too much, not too little.

peppered chicken in bowl

Then, add your sauce to you chicken and stir until fully coated.

chicken wings covered in sauce in bowl

with sauce

Place your wings on your prepared sheet.

marinated chicken on baking sheet

marinated chicken

Bake chicken for 30 minutes or until cooked through. Then, crank that oven to broil and let the wings crisp a little. Keep them in there no longer that 5 minutes.

And then you will have this.....

finished chicken wings on blue plate with orange towel in background

Enjoy 🙂

Print Recipe
No ratings yet

Easy Baked Chicken Wings in Sweet & Sour Sauce

Author: Tanya

Ingredients

  • 2 lbs chicken wings
  • ½ cup ketchup
  • 1 Tablespoon vinegar
  • 1 Tablespoon brown sugar
  • 1 Tablespoon soy sauce
  • 1 clove garlic minced
  • 1 teaspoon grated ginger

Instructions

  • Preheat oven to 400 degrees. Line a baking sheet with foil paper and spray with cooking spray. Set aside.
  • Combine ketchup, vinegar, brown sugar, soy sauce, garlic, and ginger. Set aside.
  • Season wings with salt & pepper. Cover wings with ketchup mixture.
  • Bake wings in preheated oven for 30 minutes or until cooked through. Increase heat to broil and broil for 5 minutes until wings become sticky. Enjoy!
longphoto

Cinnamon Bun Oreo Cookie Milkshake

May 17, 2016 by Tanya 11 Comments

This Cinnamon Bun Oreo Cookie Milkshake is Everything!!!! Can I shout that from the roof top? Who has a ladder? Just kidding, I'm scared of heights. But seriously, it's really good.

oreo milkshake with straw sticking out and oreos on side

This post contains affiliate links, please read my full disclaimer here.

Full Recipe Ingredients/Instructions are available in the 
recipe card at the bottom of the post. 
You can find important tips/tricks in the
blog post.

Many of you are probably wondering what the heck a Cinnamon Bun Oreo is. I wondered myself when I stumbled upon this beauty in the store the other day. One of those day when I walk into the store just to buy some bottled water and tea and somehow ended up in the cookie aisle. My mind said "get out of here, how did you get here in the cookie aisle?" But my heart...it just made me roam around the aisle because I love me some cookies. And then they appeared...the Oreos. The regular, the double stuffed, the mint (my favorite), the special edition Spring kind. And then out the corner out of my eye I saw it. Cinnamon Bun Oreo Cookies.

Cinnamon Bun oreo package

My first thought? "Oreo is doing too much." Then I picked up the package and inspected it for about 5 minutes, wondering if I should buy it. Of course, I walked out that store with my bottled water and tea, 5 other items I didn't need, and these Oreos.

When I initially tried the Oreos...I thought they were ok. Not too bad, not too great, just ok. They needed something I thought. I pondered...milk was the obvious answer...but I wanted more! Ice cream it is! And that's my friends, how this wonderful milkshake was created. This milkshake isn't just ok, it's great!

Be careful ladies, this milkshake will bring all the boys to ya yard (I had to say it).  Here are the recipe deets:

First, add 7 Cinnamon Bun Oreo Cookies to a blender and pulse until small crumbs, it should look like this.

crushed oreos in blender

Then, add 5 scoops of Vanilla Ice Cream

Vanilla Ice Cream on ice cream scoop getting placed in blender

⅓ cup milk

milk being poured into blender

and ¼ teaspoon vanilla

canilla extract over blender

Turn on blender and blend until smooth. Enjoy 🙂

Print Recipe
No ratings yet

Cinnamon Bun Cookie Milkshake

Author: Tanya

Ingredients

  • 7 Cinnamon Bun Oreos
  • 5 scoops Vanilla Ice Cream
  • ⅓ cup milk
  • ¼ teaspoon vanilla

Instructions

  • Add Oreos to blender and pulse until crushed into the size of medium crumbs.
  • Add ice cream, milk, and vanilla to blender and blend until smooth. Enjoy 🙂
Cinnamon Bun Oreo Cookie Milkshake

Indoor Grill Chilli Lime Shrimp

May 14, 2016 by Tanya 6 Comments

Indoor Grill. Chilli Powder. Lime. Shrimp. Yum. That pretty much sums up this recipe.

shrimp on plate with cilantro on top

This post contains affiliate links, please read my full disclaimer here.

Full Recipe Ingredients/Instructions are available in the 
recipe card at the bottom of the post. 
You can find important tips/tricks in the
blog post.

I should start by saying....I'm back!!!! I missed last week and it had me pretty sad . If you were following me you would notice a new look to the blog. You like? I am now self-hosted! The change was not as easy as I thought it would be but I managed. I am still working on the site but spent a lot of my time researching website layouts, domains, and my bank account as I knew I would have to pay for self-hosting, lol.

During the week, I was super busy and honestly didn't have time for the cooking, photo taking, and recipe development. In all honesty, I didn't have much time to cook. I am sure you all have had those weeks too. When you're even busier than most weeks and your stress level is on 100 and your kid is asking, "what's for dinner?" and you just sigh in response. That's when quick meals like this made on the indoor grill come in handy.

I am sure many of you wonder why I would even mention cooking on an indoor grill when summer is so close. I wondered it a little too when I made it. But in reality, we have a grill that uses coal and I wasn't going outside to try to figure out how to strike that thing up. Plus, what will I do when it's dark outside? I just fire up that indoor grill by plugging it into that wall socket.

Shrimp also makes this recipe ideal for those super busy nights, especially when you forget to take anything out the freezer the night before. Yikes! I defrost my shrimp quickly by running it under cold water.

Here are the recipe deets:

First, defrost your shrimp following the instructions if frozen. Feel free to use fresh shrimp if you fancy like that. Deveine your shrimp (you all know what that stuff is in the shrimp back) and peel your shrimp, leaving the tail ends on if you like.

shrimp deveined and defrosted in bowl

peeled and deveined shrimp

Combine 3 tablespoon soy sauce, 1 tablespoon olive oil, 1 teaspoon chilli powder, 2 teaspoon brown sugar, ½ teaspoon garlic powder, ¼ teaspoon cumin, ¼ teaspoon cayenne powder, and 1 teaspoon lime juice in a bowl. Add shrimp and stir to cover in marinade. Let marinate for 15-20 minutes.

soy sauce and other ingredients in bowl with fork

chilli lime marinade

shrimp being marinated in bowl

shrimp marinating in sauce

Next, fire up your indoor grill by plugging it in and wait for it to heat up. My indoor grill, as a majority of them do, has grill plates on both sides so no flipping is required. Place your shrimp on the grill and cook for about 3 minutes, until done.

shrimp on indoor grill

shrimp on indoor grill

Remove from grill, plate, and serve immediately with your favorite side dish. I topped my shrimp with cilantro. Enjoy 🙂

lime and shrimp pinterest image

chilli lime shrimp

Print Recipe
5 from 1 vote

Indoor Grill Chilli Lime Shrimp

Author: Tanya

Ingredients

  • 16 oz shrimp
  • 3 Tablespoon soy sauce
  • 1 Tablespoon olive oil
  • 2 teaspoon brown sugar
  • 1 teaspoon chilli powder
  • 1 teaspoon lime juice
  • ½ teaspoon garlic powder
  • ¼ teaspoon cumin powder
  • ¼ teaspoon cayenne powder

Instructions

  • Defrost shrimp (if using frozen shrimp), peel, and devein.
  • Prepare marinade by combining soy sauce, olive oil, brown sugar, chilli powder, lime juice, garlic powder, cumin powder, and cayenne powder in a bowl.
  • Add shrimp to marinade and stir to coat. Let marinate for 15-20 minutes.
  • Start indoor grill and place shrimp on grill once hot. Close cover and cook for about 3 minutes.
  • Serve immediately and sprinkle with chopped cilantro if you like. Enjoy 🙂

Mother's Day Recipe Round Up

May 6, 2016 by Tanya 3 Comments

image of different recipes, cupcakes, shrimp and pasta, nachos

Mother's Day is on Sunday and I have to celebrate my mommy over the telephone since we are States away. I'll be sure to change my Facebook profile picture to a picture of me and her like all my Facebook friends are doing.  I am not sure what my hubby and daughter are doing for me but I sure hope it is nice. Here's a post of how I would want my Mother's Day meals to be.

This post contains affiliate links, please read my full disclaimer here.

Breakfast

image of coffee with whipped cream on top

Turtle Coffee

biscuits on plate with butter on top

Cinnamon Raisin Biscuits

Lunch

nacho on chip woith sweet potato and black beans on top

Sweet Potato & Black Bean Nachos

Dinner

corned beef and cabbage in pot

Corned Beef and Cabbage – Jamaican Style

or

shrimp scampi on white plate

Shrimp & Bacon Scampi

Dessert

cupcake on white plate

Mint Oreo Cupcakes for Two

What a delight that would be if someone made these for me and I could just relax and watch T.V. all day. *Hint Hint* to Mr. Husband if you are reading.

What are your plans for Mother's Day? Feel free to share in the comments below.

Wishing all the Mothers a Happy Mother's Day 🙂

Tropical Tres Leches Cake Recipe

May 5, 2016 by Tanya 10 Comments

This Tropical Tres Leches Cake is a delicious spin on a traditional recipe.

tres leches cake on plate with kiwi and strawberries on top and sides

This post contains affiliate links, please read my full disclaimer here.

Full Recipe Ingredients/Instructions are available in the 
recipe card at the bottom of the post. 
You can find important tips/tricks in the
blog post.

Tres Leches Cake, also known as "Milk Cake", is probably one of my all time favorite cakes. My hubby introduced me to this sweet delight while we were dating. We were at a Mexican restaurant and he ordered it for desert. I tried it out and...I wasn't impressed. Years went by and I never even considered trying another tres leches cake until hubby really wanted me to make one. So I scoured the internet and came across a recipe and fell in love. This is the only way I will ever make Tres Leches and no one will ever talk me out of it.

I added kiwis and strawberry because I love those two fruits combined. Hubby thinks of the tropics when it comes to Kiwi...hence the name.

Here is a photo of all the things you shall need (The white unlabelled container is sugahhhh)

[Read more...]
  • « Previous Page
  • 1
  • …
  • 15
  • 16
  • 17
  • 18
  • Next Page »

Welcome!

Welcome to My Forking Life! Hi, I'm Tanya, attorney, busy wife and mom, and lover of quick, easy, and delicious meals.

More about me

Popular Recipes

  • Jamaican Oxtails Recipe
  • air fried chicken in air fryer basket
    Air Fryer Fried Chicken
  • brown stew chicken in pan
    Brown Stew Chicken
  • Pressure Cooker Shrimp Paella

Holiday Favorites

  • sweet potato pie on a plate
    Southern Sweet Potato Pie Recipe
  • spoon lifting gravy out of gravy dish
    Easy Recipe for Gravy without Drippings
  • creamy baked macaroni and cheese, the best baked macaroni and cheese, creamy mac and cheese
    Creamy Baked Macaroni and Cheese
  • Stirring the giblet gravy with a spoon.
    Grandma's Giblet Gravy Recipe
as seen on...various online websites text listed

Footer

↑ back to top
  • Privacy Policy
  • Contact
  • About Tanya

As an Amazon Associate, I earn from qualifying purchases.

Copyright © 2025 My Forking Life

Rate This Recipe

Your vote:


A rating is required
A name is required
An email is required